MadMachine SwiftIO Feather
Overview
The SwiftIO Feather board, designed by MadMachine is designed with support for the modern Swift language. Zephyr provides basic low-level capabilities for the SwiftIO Feather board. Swift application would run on top of Zephyr. More information about the board can be found at:
Hardware
MIMXRT1062DVL6B MCU (Cortex-M7 at 600MHz, 2048KB on-chip memory)
Memory
8MB QSPI Flash
32MB SDRAM
TF socket for SD card
USB
USB-C 2.0 OTG connector
Power
5V USB power
4.2V DC jack
Debug
SWD connector
RGB LED
Supported Features
The mm_feather board configuration supports the following hardware features:
Interface |
Controller |
Driver/Component |
|---|---|---|
NVIC |
on-chip |
nested vector interrupt controller |
SYSTICK |
on-chip |
systick |
DISPLAY |
on-chip |
display |
GPIO |
on-chip |
gpio |
I2C |
on-chip |
i2c |
SPI |
on-chip |
spi |
UART |
on-chip |
serial port-polling; serial port-interrupt |
I2S |
on-chip |
I2S |
USB |
on-chip |
USB device |
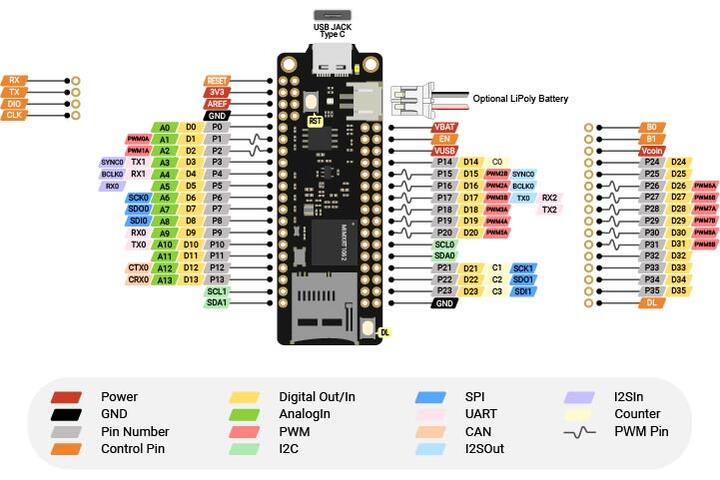
Connections and IOs
Note: The following SwiftIO Feather pinout diagram is used for Swift programming. The Swift ID is not the same as the Zephyr driver ID.
Name |
GPIO |
Other peripherals |
|||
|---|---|---|---|---|---|
Swift ID |
Pin name |
Swift ID |
Zephyr driver |
Swift ID |
Zephyr driver |
P0 |
GPIO_AD_B1_04 |
D0 |
GPIO1_IO20 |
||
P1 |
GPIO_AD_B1_08 |
D1 |
GPIO1_IO24 |
||
P2 |
GPIO_AD_B1_09 |
D2 |
GPIO1_IO25 |
||
P3 |
GPIO_AD_B1_10 |
D3 |
GPIO1_IO26 |
UART1 |
UART_8 |
P4 |
GPIO_AD_B1_11 |
D4 |
GPIO1_IO27 |
||
P5 |
GPIO_AD_B1_12 |
D5 |
GPIO1_IO28 |
||
P6 |
GPIO_AD_B1_15 |
D6 |
GPIO1_IO31 |
SPI0 |
SPI_3 |
P7 |
GPIO_AD_B1_14 |
D7 |
GPIO1_IO30 |
||
P8 |
GPIO_AD_B1_13 |
D8 |
GPIO1_IO29 |
||
P9 |
GPIO_AD_B1_03 |
D9 |
GPIO1_IO19 |
UART0 |
UART_2 |
P10 |
GPIO_AD_B1_02 |
D10 |
GPIO1_IO18 |
||
P11 |
GPIO_AD_B1_05 |
D11 |
GPIO1_IO21 |
||
P12 |
GPIO_AD_B0_14 |
D12 |
GPIO1_IO14 |
CAN0 |
CAN_3 |
P13 |
GPIO_AD_B0_15 |
D13 |
GPIO1_IO15 |
||
P14 |
GPIO_B0_00 |
D14 |
GPIO2_IO00 |
||
P15 |
GPIO_B1_03 |
D15 |
GPIO2_IO19 |
||
P16 |
GPIO_B1_02 |
D16 |
GPIO2_IO18 |
||
P17 |
GPIO_B1_01 |
D17 |
GPIO2_IO17 |
UART2 |
UART_4 |
P18 |
GPIO_B1_00 |
D18 |
GPIO2_IO16 |
||
P19 |
GPIO_B1_15 |
D19 |
GPIO2_IO31 |
||
P20 |
GPIO_B1_14 |
D20 |
GPIO2_IO30 |
||
P21 |
GPIO_B0_03 |
D21 |
GPIO2_IO03 |
SPI1 |
SPI_4 |
P22 |
GPIO_B0_02 |
D22 |
GPIO2_IO02 |
||
P23 |
GPIO_B0_01 |
D23 |
GPIO2_IO01 |
||
P24 |
GPIO_B0_04 |
D24 |
GPIO2_IO04 |
||
P25 |
GPIO_B0_05 |
D25 |
GPIO2_IO05 |
||
P26 |
GPIO_B0_06 |
D26 |
GPIO2_IO06 |
||
P27 |
GPIO_B0_07 |
D27 |
GPIO2_IO07 |
||
P28 |
GPIO_B0_08 |
D28 |
GPIO2_IO08 |
||
P29 |
GPIO_B0_09 |
D29 |
GPIO2_IO09 |
||
P30 |
GPIO_B0_10 |
D30 |
GPIO2_IO10 |
||
P31 |
GPIO_B0_11 |
D31 |
GPIO2_IO11 |
||
P32 |
GPIO_B0_12 |
D32 |
GPIO2_IO12 |
||
P33 |
GPIO_B0_13 |
D33 |
GPIO2_IO13 |
||
P34 |
GPIO_B0_14 |
D34 |
GPIO2_IO14 |
||
P35 |
GPIO_B0_15 |
D35 |
GPIO2_IO15 |
||
GPIO_AD_B1_07 |
GPIO1_IO23 |
I2C0 |
I2C_3 |
||
GPIO_AD_B1_06 |
GPIO1_IO22 |
||||
GPIO_AD_B1_00 |
GPIO1_IO16 |
I2C1 |
I2C_1 |
||
GPIO_AD_B1_00 |
GPIO1_IO17 |
||||
Programming and Flash
Build and flash applications as usual (see Building an Application and Run an Application for more details).
Configuring a Console
Connect a USB-to-serial adapter from your PC to corresponding UART pins of SwiftIO Feather.
Use the following settings with your serial terminal of choice (minicom, putty, etc.):
Speed: 115200
Data: 8 bits
Parity: None
Stop bits: 1
Flashing
Here is an example for the Hello World application.
Connect a DAPLink debugger from your PC to corresponding SWD pins of SwiftIO Feather.
# From the root of the zephyr repository
west build -b mm_feather samples/hello_world
west flash
Open a serial terminal, reset the board (press the “reset” button), and you should see the following message in the terminal:
*** Booting Zephyr OS build v2.6.0-rc1-301-gd9c666a5abf8  ***
Hello World! mm_feather
Debugging
Here is an example for the Hello World application.
# From the root of the zephyr repository
west build -b mm_feather samples/hello_world
west debug
Open a serial terminal, step through the application in your debugger, and you should see the following message in the terminal:
*** Booting Zephyr OS build v2.6.0-rc1-301-gd9c666a5abf8  ***
Hello World! mm_feather