NXP LPCXpresso11U68
Overview
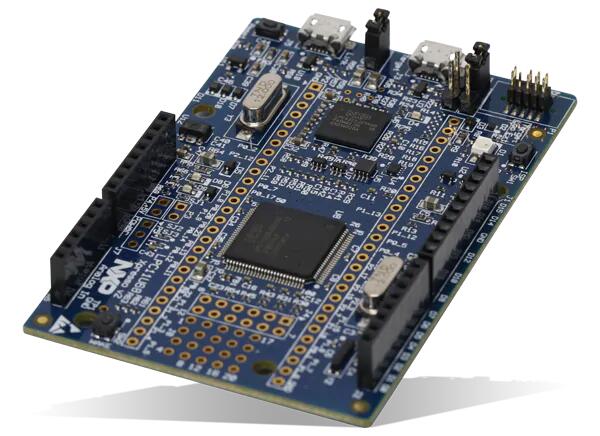
The LPCXpresso11u68 development board uses an NXP LPC11U68 MCU based on an ARM Cortex-M0+ core.
Hardware
The LPCxpresso 11U68 board provides the following hardware components:
LPC11U68 microcontroller in LQFP100 package
ARM Cortex-M0+
Memory:
256KB of flash memory
32KB of SRAM
2x2KB of additional SRAM
4 KB EEPROM
USB:
USB 2.0 Full-Speed device controller
DMA controller
5x USART
2x I2C
2x SSP with DMA support
Board power supply: through USB bus or external power supply (3V and 5V)
Arduino connectors compatible with the ‘Arduino UNO’ platform
Tri-color user LED, Power On Led, Reset LED
Three push buttons: target reset, ISP and user
More information can be found here:
Supported Features
The lpcxpresso11U68 supports the following features:
Interface |
Controller |
Driver/Component |
|---|---|---|
NVIC |
on-chip |
nested vector interrupt controller |
SYSTICK |
on-chip |
systick |
IOCON |
on-chip |
pinmux |
CLOCK |
on-chip |
clock and reset control |
GPIO |
on-chip |
gpio |
I2C |
on-chip |
i2c master/slave controller |
UART |
on-chip |
serial port-polling; serial port interrupt |
EEPROM |
on-chip |
eeprom |
Other hardware is not yet supported on Zephyr.
Connections and IOs
The IOCON controller can be used to configure the LPC11U68 pins.
Name |
Function |
Usage |
|---|---|---|
PIO2_11 |
UART |
USART RX |
PIO2_12 |
UART |
USART TX |
PIO2_16 |
GPIO |
GREEN LED |
PIO2_17 |
GPIO |
RED LED |
PIO2_18 |
GPIO |
BLUE_LED |
PIO0_4 |
I2C |
I2C SCL |
PIO0_5 |
I2C |
I2C SDA |
Programming and Debugging
Flashing
The LPCXpresso11U68 board can be flashed by using the on-board LPC-Link2 debug
probe (based on a NXP LPC43xx MCU). This MCU provides either a CMSIS-DAP or
a J-Link interface. It depends on the embedded firmware image. The default
OpenOCD configuration supports the CMSIS-DAP interface. If you want to
switch to J-Link, then you need to edit the
boards/arm/lpcxpresso11u68/support/openocd.cfg file and to replace:
source [find interface/cmsis-dap.cfg]
with:
source [find interface/jlink.cfg]
Note
The firmware image of the LPC-Link2 can be updated using the LPCScrypt tool.
Note
The Mbed project also provides some firmware images here. In addition to a CMSIS-DAP interface, they also provide a convenient update mechanism through a pseudo USB disk.
Here are the steps to flash a firmware you built into a LPCXpresso11U68 board:
Connect the “Link” micro-B USB port to your host computer.
Next, simply run the
west flashcommand
Debugging
Please refer to the Flashing section and run the west debug command
instead of west flash.