Developing with nRF9161 DK
The nRF9161 DK is a hardware development platform used to design and develop application firmware on the nRF9161 System in Package (SiP). The nRF9161 SiP is a low power SiP with integrated DECT NR+ modem and 3GPP Release 14 LTE-M/NB-IoT with GNSS.
See the nRF9161 DK Hardware guide for detailed information about the nRF9161 DK hardware. To get started with the nRF9161 DK, complete the steps in the Quick Start app in nRF Connect for Desktop. If you are not familiar with the nRF Connect SDK, see Installation and Configuration and building documentation to install the nRF Connect SDK and learn more about its development environment.
Board controller
The nRF9161 DK contains an nRF5340 Interface MCU (IMCU), which acts both as an on-board debugger and board controller. The board controller controls signal switches on the nRF9161 DK and can be used to route the nRF9161 SiP pins to different components on the DK, such as pin headers, external memory, a SIM card or eSIM. For a complete list of configuration options available, see the nRF9161 DK board control section in the nRF9161 DK User Guide.
The nRF5340 IMCU comes preprogrammed with J-Link SEGGER OB and board controller firmware. If you want to change the default configuration of the DK, you can use the Board Configurator app in nRF Connect for Desktop . See the nRF Connect Board Configurator documentation for instructions on how to change the configuration of the DK.
Updating the nRF Cloud certificate
When you wish to use nRF Cloud’s REST Application Programming Interface (API), the DK requires a valid security certificate. This means that you need to update the certificate stored on the DK. To do so, you need to download a new certificate and then provision it to your DK.
Downloading the nRF Cloud certificate for the nRF9161 DK
To download the nRF Cloud certificate for your nRF9161 DK, complete the following steps. Make sure you are logged in to the nRF Cloud portal.
Click Devices under Device Management in the navigation pane on the left.
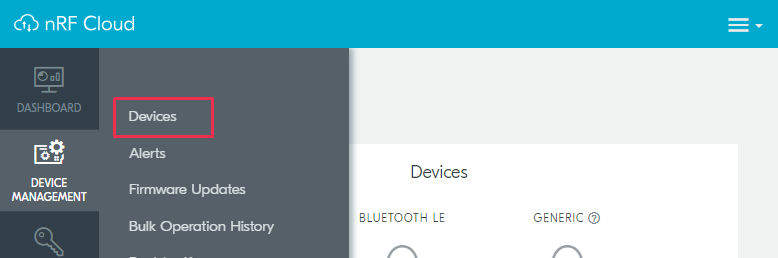
nRF Cloud - Devices
Click Add Devices.
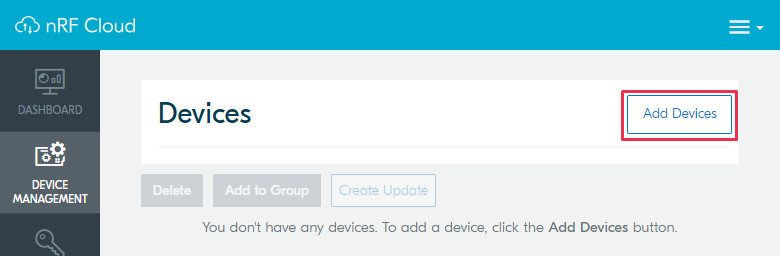
nRF Cloud - Add Devices
The Select Device Type pop-up opens.
Click LTE Device in the Select Device Type pop-up.
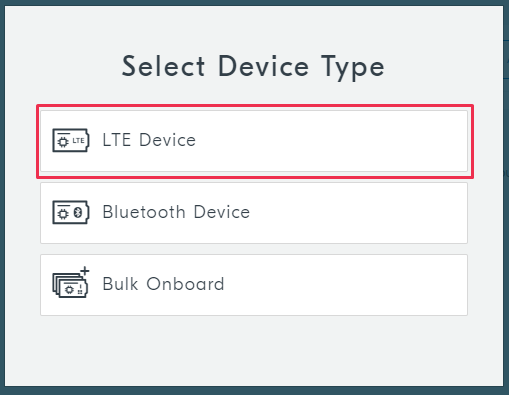
nRF Cloud - Select Device Type
Click Create JITP Certificates at the bottom of the page.
The Create JITP Certificates dialog box opens.
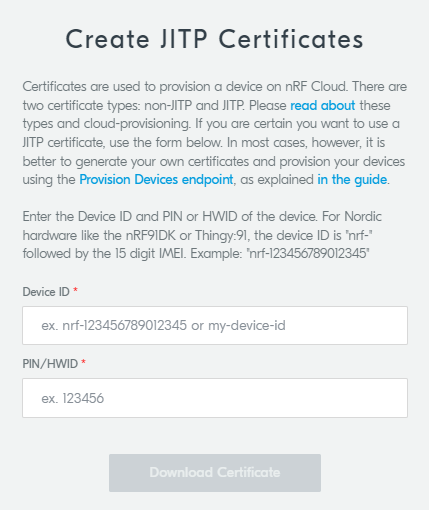
nRF Cloud - Create JITP Certificates dialog box
Enter the following information:
Device ID: the device ID is composed of nrf- and the 15-digit International Mobile (Station) Equipment Identity (IMEI) number that is printed on the label of your nRF9161 DK. For example, nrf-123456789012345.
Ownership code: the ownership code is the PIN or the hardware ID of your DK, and it is found on the label of your nRF9161 DK.
If the label contains a PIN in addition to the IMEI number, enter this pin. If it does not contain a PIN, enter the Hardware ID (HWID) HEX code, with or without colons. For example, AA:BB:CC:DD:EE:FF or AABBCCDDEEFF.
Note
The ownership code serves as a password and proves that you own the specific nRF9161 DK. Therefore, do not share it with anyone.
Click Download Certificate and save the
.cert.jsonfile to a folder of your choice.Note
The certificate contains all the information that is needed to connect your nRF9161 DK to nRF Cloud. Therefore, do not share it with anyone.
Close the Create JITP Certificates dialog box.
Provisioning the nRF Cloud certificate
After downloading the certificate, you must provision it to your nRF9161 DK.
Complete the following steps to provision the certificate:
Start nRF Connect for Desktop and install the Cellular Monitor app.
Open the Cellular Monitor app.
Connect the DK to the computer with a USB-C cable, and turn it on.
Click Select device and select the DK from the drop-down list.
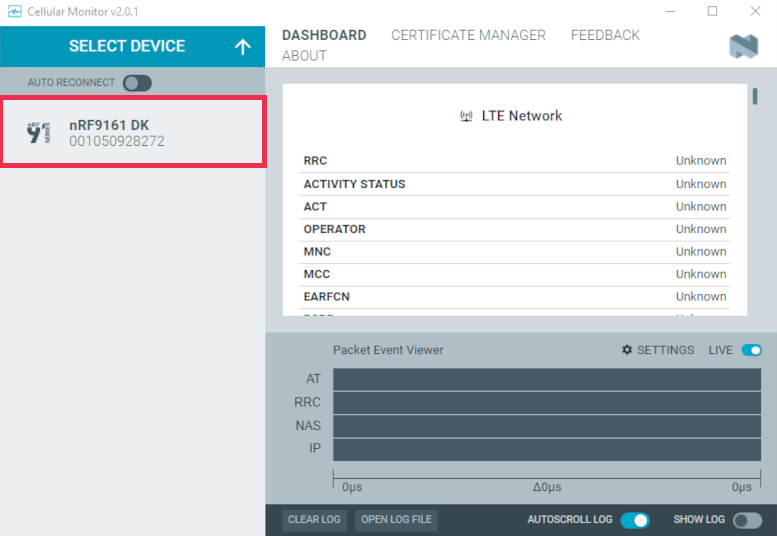
Cellular Monitor - Select device
The drop-down text changes to the type of the selected device, with the SEGGER ID below the name.
Click the Open Serial Terminal option of the Cellular Monitor app to open the Serial Terminal.
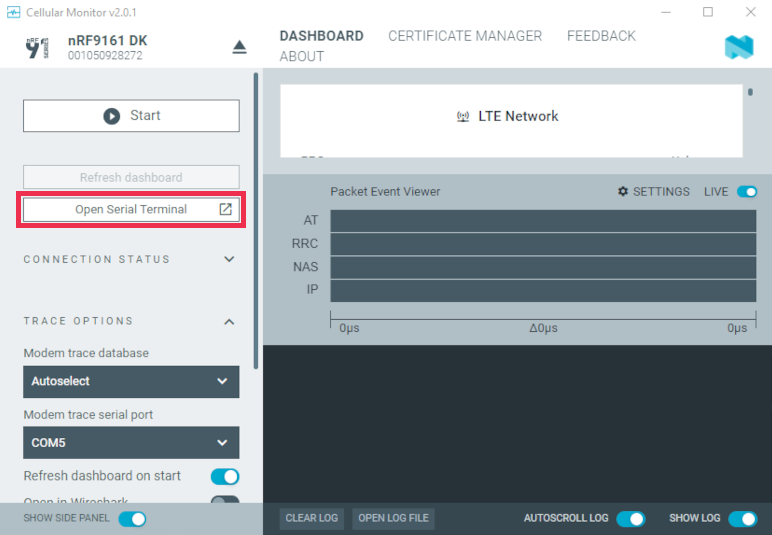
Cellular Monitor - Open Serial Terminal
Enter
AT+CFUN=4in the text field for AT commands and click Send. This AT command puts the modem to offline state.Enter
AT+CFUN?in the text field for AT commands and click Send. This AT command returns the state of the modem.The command must return
+CFUN: 4, which indicates that the modem is in offline state. If it returns a different value, repeat the previous step.Open the Cellular Monitor app.
Click CERTIFICATE MANAGER in the navigation bar to switch to the certificate manager view.
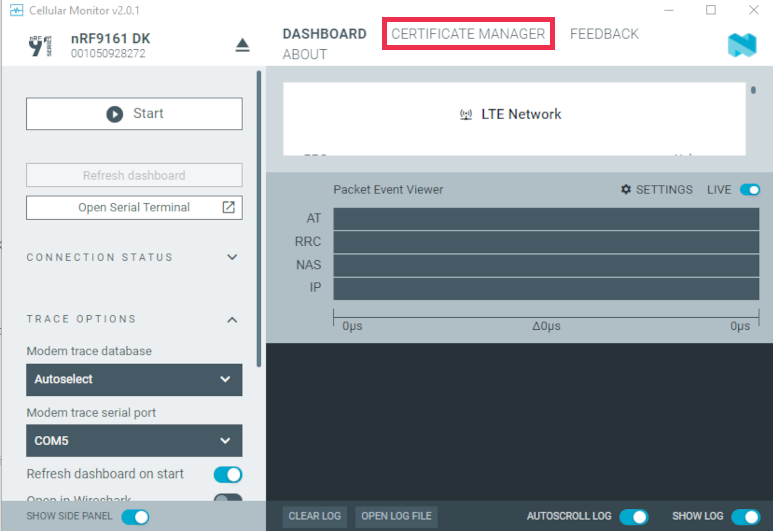
Cellular Monitor - Certificate Manager
Click Load from JSON and select the
*.cert.jsonfile that you downloaded from nRF Cloud. Alternatively, you can drag and drop the file onto the GUI.Ensure that the Security tag is set to
16842753, which is the security tag for nRF Cloud credentials.Click Update certificate.
The log message “Certificate update completed” indicates that the certificate was provisioned successfully. If you encounter any errors, switch to the terminal view and check the output of the AT commands that were sent to the nRF9161 DK modem.
Note
If you have connected your nRF9161 DK to nRF Cloud before, you must delete the device there after provisioning the certificate. Open the entry for your device from the Devices view, then click the gear icon to the right of the device’s name, and select Delete Device. Then, add the nRF9161 DK again to the nRF cloud.
Build targets
Make sure to select a suitable build target when building your application.
In Zephyr, the firmware for the application core of nRF9161 DK is divided into two different build targets:
nrf9161dk_nrf9161for build targets that have Cortex-M Security Extensions (CMSE) disabled.nrf9161dk_nrf9161_nsfor build targets that have CMSE enabled and have the Secure Processing Environment (SPE) firmware alongside the Non-Secure Processing Environment (NSPE) firmware.
For information about CMSE and the difference between the two environments, see Processing environments.
Updating the DK firmware using Programmer
Download and extract the latest application and modem firmware from the nRF9161 DK Downloads page.
The downloaded ZIP archive contains the following firmware:
- Application firmware
The
img_app_blfolder contains full firmware images for different applications. The guides in this section use the image for the Asset Tracker v2 application as an example. Asset Tracker v2 simulates sensor data and transmits it to Nordic Semiconductor’s cloud solution, nRF Cloud.The data is transmitted using either LTE-M or NB-IoT. Asset Tracker v2 first attempts to use LTE-M, then NB-IoT. Check with your SIM card provider for the mode they support at your location. For the Onomondo SIM card, check the Onomondo LTE-M coverage and Onomondo NB-IoT coverage to see the network coverage for different countries.
- Application firmware for Device Firmware Update (DFU)
The images in the
img_fota_dfu_binandimg_fota_dfu_hexfolders contain firmware images for DFU. These images are not used in the guides in this section.- Modem firmware
The modem firmware is in a ZIP archive instead of a folder. The archive is named
mfw_nrf91x1_followed by the firmware version number. Do not unzip this file.
Tip
For a more compact nRF Cloud firmware application, you can build and install the Cellular: nRF Cloud multi-service sample. See Configuring and building an application for details on building a firmware sample application.
The CONTENTS.txt file in the extracted folder contains the location and names of the different firmware images.
Complete the following steps to program applications using the Programmer app from nRF Connect for Desktop.
Updating the modem firmware
To update the modem firmware, complete the following steps.
If you experience any problems during the process, press Ctrl+R (command+R on macOS) to restart the Programmer app and try again.
Open the Programmer app.
Connect the nRF9161 DK to the computer with a USB-C cable, and then turn the DK on.
Click SELECT DEVICE and select the DK from the drop-down list.
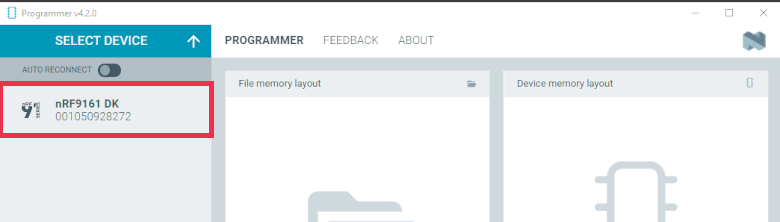
Programmer - Select device
If the DK is not visible, press
Ctrl+Rin Windows orcommand+Rin macOS to restart the Programmer application.The drop-down text changes to the type of the selected device, with its SEGGER ID below the name. The Device memory layout section also changes its name to the device name, and indicates that the device is connected. If the Auto read memory option is selected in the JLINK SETTINGS section of the side panel, the memory layout will update. If it is not selected and you wish to see the memory layout, click Read in the DEVICE section of the side panel.
Click Add file in the FILE section, and select Browse.
Navigate to where you extracted the firmware, and select the
mfw_nrf91x1_<version-number>.zipfile.Click Write in the DEVICE section of the side panel.
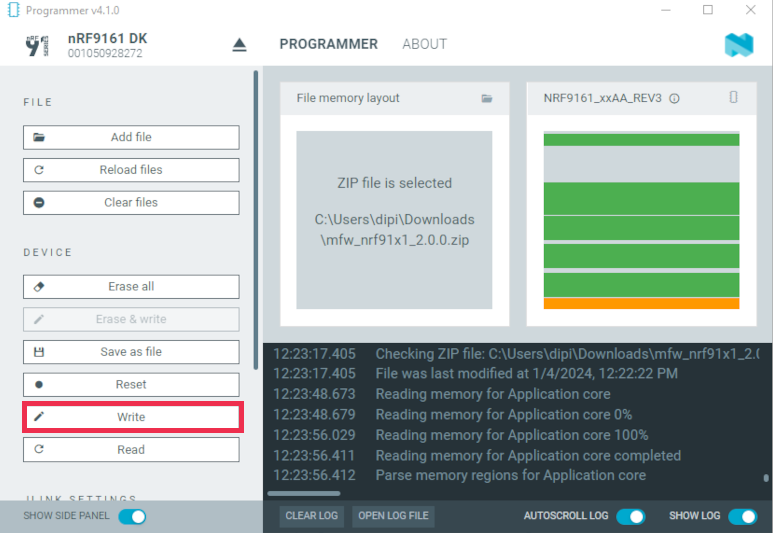
Programmer - Write
The Modem DFU window appears.
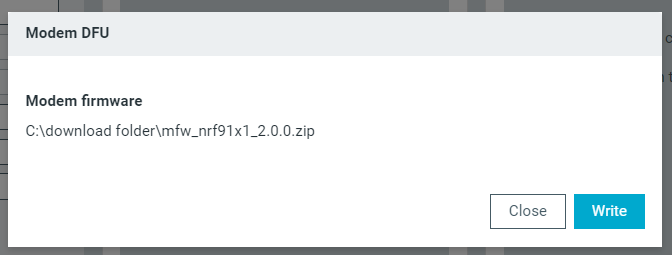
The Modem DFU window
Ignore the warning message and click the Write button in the Modem DFU window to update the firmware. Do not unplug or turn off the device during this process.
When the update is complete, you see a success message. If you update the application firmware now, you can go directly to Step 4 of Updating the application firmware.
Note
If you experience problems updating the modem firmware, click Erase all in the DEVICE section of the side panel and try updating again.
Updating the application firmware
To update the application firmware using the Programmer app, complete the following steps.
If you experience any problems during the process, press Ctrl+R (command+R in macOS) to restart the Programmer app and try again.
Open the Programmer app.
Connect the nRF9161 DK to the computer with a USB-C cable, and then turn the DK on.
Click SELECT DEVICE and select the DK from the drop-down list.
Programmer - Select device
If the DK is not visible, press
Ctrl+Rin Windows (command+Rin macOS) to restart the Programmer application.The drop-down text changes to the type of the selected device, with its SEGGER ID below the name. The Device memory layout section also changes its name to the device name, and indicates that the device is connected. If the Auto read memory option is selected in the JLINK SETTINGS section, the memory layout will update. If it is not selected and you wish to see the memory layout, click Read in the DEVICE section.
Click Add file in the FILE section, and select Browse.
Navigate to where you extracted the firmware, and then to the
img_app_blfolder there.Select the
.hexfile for the application you are programming.For Asset Tracker v2, select the
nrf9161dk_asset_tracker_v2_<version-number>.hexHEX file.For NB-IoT, there is a second variant of the Asset Tracker v2 firmware in the
nrf9161dk_asset_tracker_v2_nbiot_legacy_pco_<version-number>.hexfile. Only use this legacy variant if your network does not support ePCO.Click the Erase & write button in the DEVICE section to program the DK. Do not unplug or turn off the DK during this process.
Building and programming
You can program applications and samples on the nRF9161 DK after obtaining the corresponding firmware images.
Note
When you update the application firmware on an nRF9161 DK, make sure the modem firmware and application firmware are compatible versions.
To program applications using the Programmer app from nRF Connect for Desktop, follow the instructions in Updating the application firmware.
Building and programming using Visual Studio Code
Complete the following steps to build and program using the nRF Connect for VS Code extension:
Open the nRF Connect for VS Code extension.
Complete the steps listed on the How to build an application page in the nRF Connect for VS Code extension documentation.
Program the application:
Connect the nRF9161 DK to your PC using a USB cable.
Power on the nRF9161 DK.
In nRF Connect for VS Code extension, click the Flash option in the Actions View.
If you have multiple boards connected, you are prompted to pick a device at the top of the screen.
A small notification banner appears in the bottom-right corner of Visual Studio Code to display the progress and confirm when the flashing is complete.
Building and programming on the command line
Complete the command-line build setup before you start building nRF Connect SDK projects on the command line.
To build and program the source code from the command line, complete the following steps:
Open a terminal window.
Go to the specific sample or application directory. For example, the folder path is
ncs/nrf/applications/asset_tracker_v2when building the source code for the Asset Tracker v2 application on the nRF9161 DK.Make sure that you have the required version of the nRF Connect SDK repository by pulling the nRF Connect SDK repository, sdk-nrf on GitHub using the procedures described in Obtaining a copy of the nRF Connect SDK and Updating a copy of the nRF Connect SDK.
To get the rest of the dependencies, run the
west updatecommand as follows:west updateTo build the sample or application code, run the
west buildcommand as follows:west build -b build_target
The parameter build_target must be
nrf9161dk_nrf9161_nswhen building the application code for the nRF9161 DK.Note
The parameter destination_directory_name can be used to optionally specify the destination directory in the west command. Unless a destination_directory_name is specified, the build files are automatically generated in
build/zephyr/.
Program the application:
Connect the nRF9161 DK to your PC using a USB cable.
Power on the nRF9161 DK.
Program the sample or application to the device using the following command:
west flashNote
When programming with the Asset Tracker v2 application, use the
west flash --erasecommand. The application has secure boot enabled by default that includes data in the One-Time Programmable region (OTP). This means that everything must be erased before flashing.The device resets and runs the programmed sample or application.
Testing the cellular connection with the AT Client sample
The Cellular: AT Client sample enables you to send AT commands to the modem of your nRF9161 DK to test and monitor the cellular connection. You can use it to troubleshoot and debug any connection problems.
Complete the following steps to test the cellular connection using the AT Client sample:
Follow the steps in Updating the application firmware to program the sample to the DK. When selecting the HEX file, select
nrf9161dk_at_client_<version-number>.hexinstead of the one for Asset Tracker v2.Test the AT Client sample as described in the Testing section of the Cellular: AT Client documentation.
Available drivers, libraries, and samples
See the Drivers, Libraries, and samples sections and the respective repository folders for up-to-date information.