Getting started with nRF9160 DK
This section will get you started with your nRF9160 DK. You will update the firmware (both the modem firmware and the application firmware) and the nRF Cloud certificates of the DK, and conduct some initial tests.
If you have already set up your nRF9160 DK and want to learn more, see the following documentation:
Installation and Configuration and building documentation to install the nRF Connect SDK and learn more about its development environment.
Developing with nRF9160 DK for more advanced topics related to the nRF9160 DK if you are already familiar with the nRF Connect SDK.
If you want to go through a hands-on online training to familiarize yourself with cellular IoT technologies and development of cellular applications, enroll in the Cellular IoT Fundamentals course in the Nordic Developer Academy.
Minimum requirements
Make sure you have all the required hardware and that your computer has one of the supported operating systems.
Hardware
nRF9160 DK
nano-SIM card that supports LTE-M or Narrowband Internet of Things (NB-IoT) (the nRF9160 DK contains an iBasis SIM card)
micro-USB 2.0 cable
Software
On your computer, one of the following operating systems:
Microsoft Windows
macOS
Ubuntu Linux
The operating system versions that support the nRF Connect SDK tools are listed in the Supported operating systems section.
Getting started using Quick Start
To work with the nRF9160 DK firmware and certificates, complete the following steps:
Install nRF Connect for Desktop.
Start nRF Connect for Desktop and install the Quick Start application, a cross-platform tool for guided setup and installation procedures.
Prepare your DK:
Punch out the nano-SIM from the SIM card and plug it into the SIM card holder on the nRF9160 DK.
Make sure the PROG/DEBUG SW10 switch on the nRF9160 DK is set to nRF91. On DK v0.9.0 and earlier, this is the SW5 switch.
Connect the nRF9160 DK to the computer with a micro-USB cable, and then turn the DK on.
Use the Quick Start app to update the DK firmware.
Follow the steps in the application to update the firmware, create an nRF Cloud account, and activate the iBasis SIM card that came with your nRF9160 DK. When selecting which application to program, select the Asset Tracking option.
If you have not yet installed the nRF Connect SDK and selected the preferred development environment, the application will point you to the related resources. It will also provide you with links to the recommended learning materials from Nordic Semiconductor related to cellular development.
Connecting the nRF9160 DK to nRF Cloud
To transmit data from your nRF9160 DK to nRF Cloud, you need an nRF Cloud account. nRF Cloud is Nordic Semiconductor’s platform for connecting your IoT devices to the cloud, viewing and analyzing device message data, prototyping ideas that use Nordic Semiconductor’s chips, and more.
If you used the Quick Start app to get started, you have an account and can add the nRF9160 DK to nRF Cloud.
Creating an nRF Cloud account
To create an nRF Cloud account, complete the following steps:
Open the nRF Cloud landing page and click Register.
Enter your email address and choose a password, then click Create Account. nRF Cloud will send you a verification email.
Copy the 6-digit verification code and paste it into the registration dialog box. If you do not see the verification email, check your junk mail for an email from
no-reply@verificationemail.com.If you closed the registration dialog box, you can repeat Step 1 and then click Already have a code?. Then enter your email and the verification code.
You can now log in to nRF Cloud with your email and password. After logging in, you are taken to the dashboard view that displays your device count and service usage.
Adding the nRF9160 DK to nRF Cloud
To add the nRF9160 DK to nRF Cloud, complete the following steps. Make sure you are logged in to the nRF Cloud portal and have an activated SIM card in the SIM card slot of the nRF9160 DK.
Connect the nRF9160 DK to the computer with a USB cable and switch it on, or reset the device if it is already switched on.
Wait up to three minutes for the device to find the cellular network and connect to the nRF Cloud server.
At this stage, the nRF9160 DK is provisioned on nRF Cloud, but not yet associated with your nRF Cloud account. When the device has connected, the LED3 double pulse blinks to indicate that user association is required and you can move to the next step. See Asset Tracker v2 LED indication for more information.
Click Devices under Device Management in the navigation pane on the left.
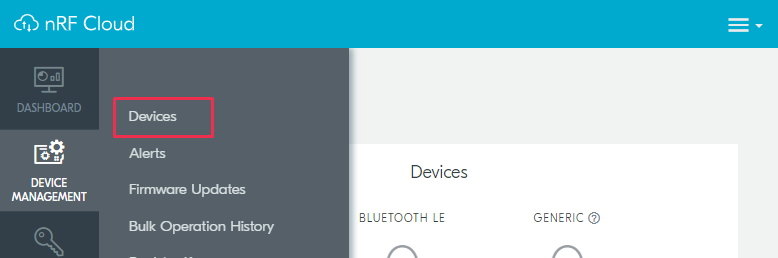
nRF Cloud - Devices
Click Add Devices.
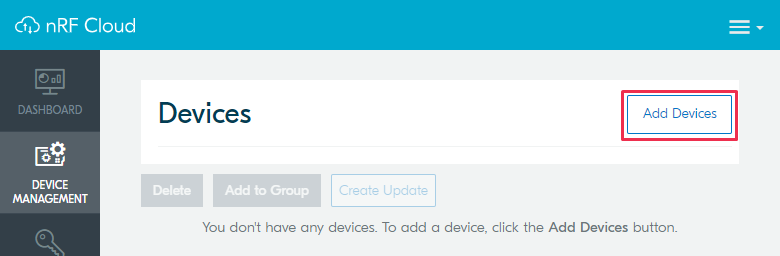
nRF Cloud - Add Devices
The Select Device Type pop-up opens.
Click LTE Device in the Select Device Type pop-up.
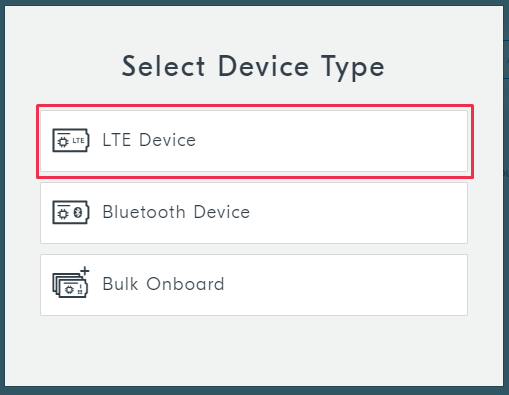
nRF Cloud - Select Device Type
Enter your device ID and ownership code (PIN/HWID) on the Add LTE Device page.
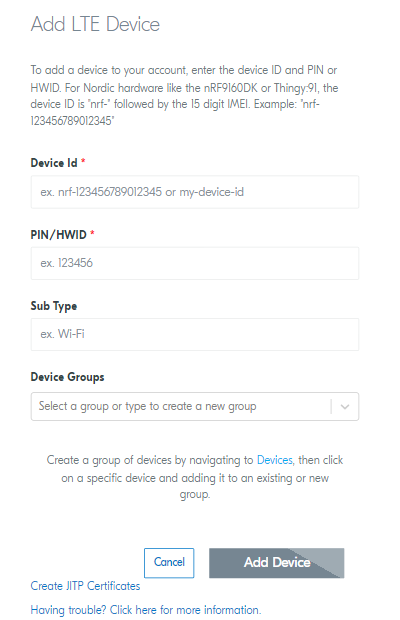
nRF Cloud - Add LTE Device
Device ID: The device ID is composed of nrf- and the 15-digit International Mobile (Station) Equipment Identity (IMEI) number that is printed on the label of your nRF9160 DK. For example, nrf-123456789012345. It is case sensitive, so make sure all the letters are lower-case.
PIN/HWID: The ownership code is the PIN or the hardware ID of your device, and it is found on the label of your nRF9160 DK. This is not the PIN code for your SIM card.
If the label contains a PIN in addition to the IMEI number, enter this pin. If it does not contain a PIN, enter the Hardware ID (HWID) HEX code, with or without colons. For example, AA:BB:CC:DD:EE:FF or AABBCCDDEEFF.
Note
The ownership code serves as a password and proves that you own the specific nRF9160 DK. Therefore, do not share it with anyone.
Click the Add Device button.
The Do you need to activate an iBasis SIM? pop-up opens.
Click Continue and wait for the device to reconnect to nRF Cloud. It is normal for the device to disconnect and reconnect multiple times during device provisioning.
If you have not yet activated the iBasis SIM card that came with your nRF9160 DK, click Activate iBasis SIM instead, and follow the instructions.
The nRF9160 DK is now added to your nRF Cloud account. This is indicated by the blinking of LED3, which shows that the device is publishing data. See Asset Tracker v2 LED indication for more information.
On nRF Cloud, you can access the device by clicking Devices under Device Management in the navigation pane on the left.
Testing the GNSS functionality
Asset Tracker v2 supports acquiring GNSS position and transmitting it to nRF Cloud.
To achieve the fastest Time To First Fix of GNSS position, the following conditions need to be met:
The device must be able to connect to nRF Cloud. You can confirm this by checking whether the status of your DK is displayed correctly on the nRF Cloud portal. The cloud connection is used to download GPS assistance data.
Your network operator should support Power Saving Mode (PSM) or Extended Discontinuous Reception (eDRX) with the SIM card that you are using. If you are using an iBasis SIM card, check the iBasis network coverage spreadsheet to see the supported features and network coverage for different countries.
The device may be able to acquire a GNSS position fix even if the network does not support PSM or eDRX for your SIM card, but it will likely take longer to do so.
For best results retrieving GNSS data, place the nRF9160 DK outside with a clear view of the sky. It might also work indoors if the device is near a window.
Complete the following steps to test the GNSS functionality:
If you have an external antenna for your nRF9160 DK, attach it to connector J2 to the left of the LTE antenna. See nRF9160 DK GPS for more information.
Turn on or reset your DK.
Log in to the nRF Cloud portal.
Click Devices under Device Management in the navigation pane on the left.
nRF Cloud - Devices
From the Devices view, open the entry for your device.
Observe that after a while, the GNSS data is displayed on the map in the GPS Data card on nRF Cloud.
Next steps
You have now completed getting started with the nRF9160 DK. See the following links for where to go next:
Installation and Configuration and building documentation to install the nRF Connect SDK and learn more about its development environment.
Developing with nRF9160 DK for more advanced topics related to the nRF9160 DK.