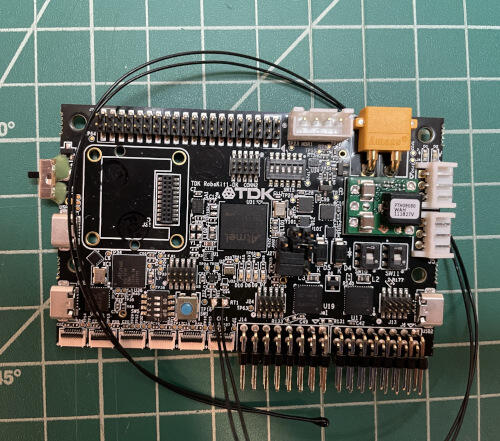
TDK RoboKit 1
Overview
The TDK RoboKit1 is a development board for use primarily with ROS2 and provides a large number of small ground robotics useful sensors including chirp sensors for time of flight (e.g. ultrasonic obstacle detection).
It pairs a 300MHz Cortex-M7 ATSAME70Q21 with an array of TDK sensors and pin headers useful for robotics.

Hardware
ATSAME70Q21 ARM Cortex-M7 Processor
12 MHz crystal oscillator (Pres)
32.768 kHz crystal oscillator
Micro-AB USB device
Micro-AB USB debug (Microchip EDBG) interface supporting CMSIS-DAP, Virtual COM Port and Data
JTAG interface connector
One reset pushbutton
One red user LED
TDK ICM 42688-P 6-Axis 32KHz IMU
TDK ICP-10111 Pressure Sensor
TDK NTC Thermistor for Temperature
AKM AK09918C Magnetometer
2 TDK HVCi-4223 Cortex-M3 Dedicated Motor Controller
3 TDK ICS-43434 Stereo Microphones
Connector for Industrial Dual IMU (TDK IIM-46230)
TDK CH101 Ultrasonic Range Sensor Array (9 Connectors, comes with 3)
Supported Features
The TDK RoboKit1 board supports the following hardware features:
Peripheral |
Kconfig option |
Devicetree compatible |
GPIO |
||
USART |
||
UART |
||
SPI |
||
I2C |
||
I2S |
||
ADC |
||
DAC |
||
PWM |
||
CAN |
||
USB |
||
WATCHDOG |
||
NVIC |
N/A |
|
SYSTICK |
N/A |
N/A |
COUNTER |
||
DMA |
||
ENTROPY |
||
HWINFO (reset cause) |
||
HWINFO (device id) |
N/A |
The default configuration can be found in the Kconfig boards/arm/tdk_robokit1/tdk_robotkit1_defconfig.
Connections and IOs
The TDK RoboKit Hardware Guide has detailed information about board connections.
System Clock
The SAM E70 MCU is configured to use the 12 MHz external oscillator on the board with the on-chip PLL to generate a 300 MHz system clock.
Serial Port
The ATSAME70Q21 MCU has five UARTs and three USARTs. One of the UARTs is configured for the console and is available as a Virtual COM Port via the USB2 connector.
Programming and Debugging
Flashing the Zephyr project onto SAM E70 MCU requires the OpenOCD tool. Both west flash and west debug commands should correctly work with both USB0 and USB1 connected and the board powered.
Flashing
Run your favorite terminal program to listen for output. Under Linux the terminal should be
/dev/ttyACM0. For example:$ minicom -D /dev/ttyUSB0 -o
The -o option tells minicom not to send the modem initialization string. Connection should be configured as follows:
Speed: 115200
Data: 8 bits
Parity: None
Stop bits: 1
Connect the TDK RoboKit1 board to your host computer using the USB debug port (USB1), USB2 for a serial console, and remaining micro USB for power. Then build and flash the Hello World application.
# From the root of the zephyr repository
west build -b tdk_robokit1 samples/hello_world
west flash
You should see “Hello World! tdk_robokit1” in your terminal.
Debugging
You can debug an application in the usual way. Here is an example for the Hello World application.
# From the root of the zephyr repository
west build -b tdk_robokit1 samples/hello_world
west debug
References
- TDK RoboKit1 Product Page:
