Building and programming a sample application
The recommended way of building and programming an nRF Connect SDK sample is to use the Nordic Edition of the SEGGER Embedded Studio (SES) IDE.
Note
See Programming precompiled firmware images and Building and programming from the source code for information about programming a Thingy:91.
Building with SES
Complete the following steps to build nRF Connect SDK projects with SES after installing SEGGER Embedded Studio and completing the first time setup:
Start SEGGER Embedded Studio.
If you have installed the nRF Connect SDK using the Toolchain manager, click Open IDE next to the version you installed to start SES. If you have installed SES manually, run
bin/emStudio.Select File -> Open nRF Connect SDK Project.
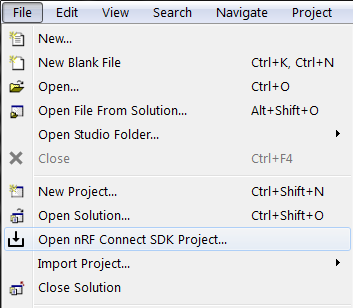
Open nRF Connect SDK Project menu
To import a project into SES, you must specify the following information:
nRF Connect SDK Release - Select the nRF Connect SDK version that you want to work with.
The drop-down list contains the current version of all nRF Connect SDK installation directories that SES knows about. To add a missing nRF Connect SDK installation directory to that list, run
west zephyr-exportin the installation repository or define the Zephyr base to point to the directory (see Setting up the SES environment).nRF Connect Toolchain Version - If you used the Toolchain manager to install the nRF Connect SDK, select the version of the toolchain that works with the selected nRF Connect SDK version. Otherwise, select NONE and make sure that your SES environment is configured correctly (see Setting up the SES environment).
Note
The drop-down list contains only toolchain versions that are compatible with the selected nRF Connect SDK version.
Projects - Select the project that you want to work with.
The drop-down list contains a selection of samples and applications from the sdk-nrf and sdk-zephyr repositories. Select any of the checkboxes underneath to add the samples from that area to the drop-down list. To add projects to the drop-down list, for example, your own custom projects, click … and select the folder that contains the projects that you want to add.
Board Name - Select the board that you want to work with.
The drop-down list contains the build targets for all Nordic Semiconductor boards that are defined in the sdk-nrf and sdk-zephyr repositories. Select any of the checkboxes underneath to add the build targets from that area to the drop-down list. To add build targets to the drop-down list, for example, targets for your own custom board, click … and select the folder that contains the board definitions.
Build Directory - Select the folder in which to run the build. The field is filled automatically based on the selected board name, but you can specify a different directory.
Clean Build Directory - Select this option to ensure that you are not building with an outdated build cache.
Extended Settings - Select this option to display a field where you can specify additional CMake options to be used for building. See Providing CMake options.
The following figure shows an example configuration for the Asset Tracker application built for the
nrf9160dk_nrf9160nsbuild target: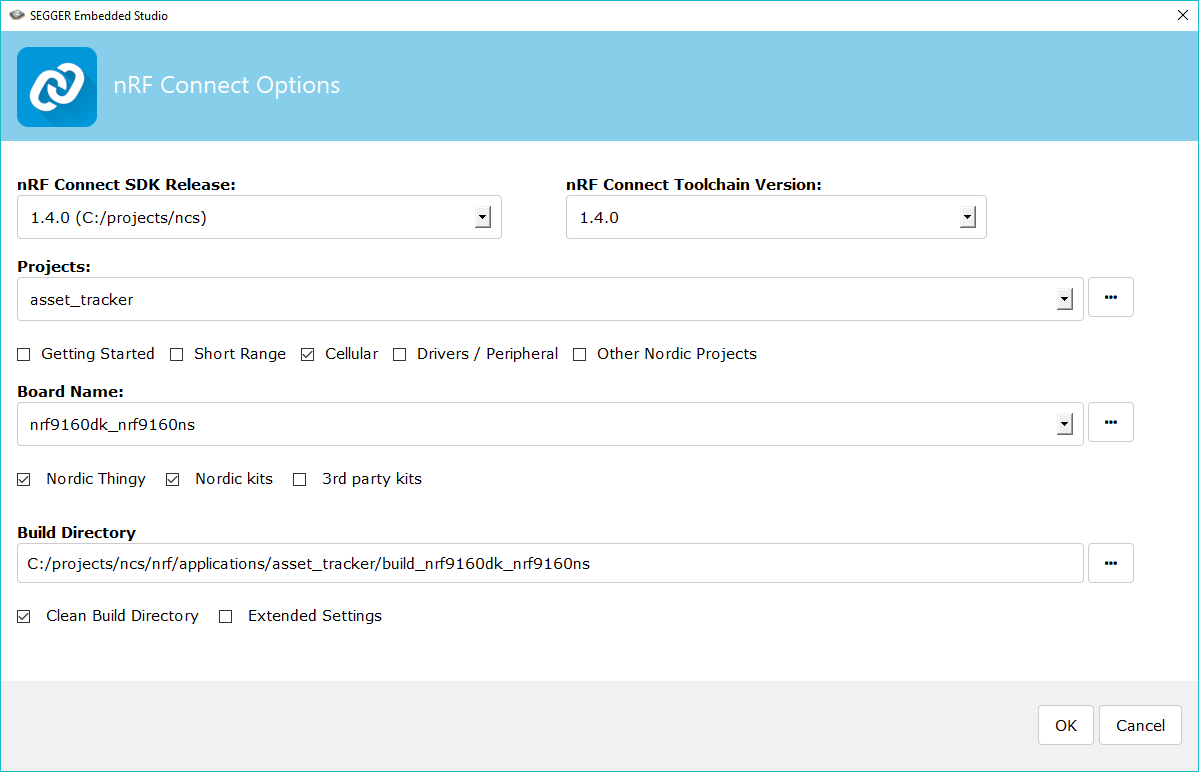
Opening the Asset Tracker project
Click OK to import the project into SES. You can now work with the project in the IDE.
Note
At this stage, you might get an error indicating a project load failure. For example:
Can't load project file
The project file <filepath> is invalid.
The reported error is 'solution load command failed (1)'
This issue might be caused by a variety of problems, such as incorrectly specified project file paths. SES helps you to identify the source of the issue by providing a text output with detailed information about the error. Make sure to click OK on the error pop-up message and then inspect the text output in SES.
Build and program your project.
The required steps differ depending on if you build a single application or a multi-image project (such as the nRF9160 samples, which include SPM).
Important
If you are working with an nRF9160 DK, make sure to select the correct controller before you program the application to your board.
Put the SW5 switch (marked debug/prog) in the NRF91 position to program the main controller, or in the NRF52 position to program the board controller. See the Device programming section in the nRF9160 DK User Guide for more information.
To build and program an application:
Select your project in the Project Explorer.
From the menu, select Build -> Build Solution.
When the build completes, you can program the sample to a connected board:
For a single-image application, select Target -> Download zephyr/zephyr.elf.
For a multi-image application, select Target -> Download zephyr/merged.hex.
Note
Alternatively, choose the Build and Debug option. Build and Debug will build the application and program it when the build completes.
To inspect the details of the code that was programmed and the memory usage, click Debug -> Go.
Note
In a multi-image build, this allows you to debug the source code of your application only.
If you get an error that a tool or command cannot be found, first make sure that the tool is installed. If it is installed, verify that its location is correct in the PATH variable or, if applicable, in the SES settings.
Building on the command line
Complete the following steps to build nRF Connect SDK projects on the command line after completing the command-line build setup.
Open a terminal window.
If you have installed the nRF Connect SDK using the Toolchain manager, click the down arrow next to the version you installed and select Open bash.
Go to the specific sample or application directory. For example, to build the nRF9160: AT Client sample, run the following command to navigate to the sample directory:
cd nrf/samples/nRF9160/at_clientBuild the sample or application using the west command. The development board is specified by the parameter board_name in the west command as follows:
west build -b board_name
Note
To build from a directory other than the sample or application directory, run the west build command with an additional parameter directory_name, specifying the sample or application directory.
See Board names for more information on the development boards. To reuse an existing build directory for building another sample or application for another board, pass
-p=autotowest build.If you want to configure your application, run the following west command:
west build -t menuconfigSee Configuring your application for additional information about configuring an application.
After running the
west buildcommand, the build files can be found inbuild/zephyr. For more information on the contents of the build directory, see Build Directory Contents.Important
If you are working with an nRF9160 DK, make sure to select the correct controller before you program the application to your board.
Put the SW5 switch (marked debug/prog) in the NRF91 position to program the main controller, or in the NRF52 position to program the board controller. See the Device programming section in the nRF9160 DK User Guide for more information.
Connect the development board to your PC using a USB cable.
Power on the development board.
Program the sample or application to the board using the following command:
west flashTo fully erase the board before programming the new sample or application, use the command:
west flash --eraseThe
west flashcommand automatically resets the board and starts the sample or application.
For more information on building and programming using the command line, see the Zephyr documentation on Building, Flashing and Debugging.