Working with nRF53 Series
The nRF Connect SDK provides support for developing on the nRF5340 System on Chip (SoC) using the nRF5340 DK (PCA10095).
See the nRF5340 DK User Guide for detailed information about the nRF5340 DK hardware. To get started with the nRF5340 DK, follow the steps in the Getting started with nRF Connect SDK (nRF53 Series) guide.
Note
The nRF5340 PDK has been deprecated with the introduction of the production-level nRF5340 DK. To determine if you have a PDK or DK, check the version number on the sticker on your kit. If the version is 0.11.0 or higher, the kit is an nRF5340 DK.
See the nRF Connect SDK v1.4.0 documentation for the last release supporting the nRF5340 PDK.
Introduction
nRF5340 is a wireless ultra-low power multicore System on Chip (SoC) with two fully programmable Arm Cortex-M33 processors: a network core and an application core. The nRF Connect SDK supports Bluetooth Low Energy and NFC communication on the nRF5340 SoC.
See the nRF5340 Product Specification for more information about the nRF5340 SoC. nRF5340 DK gives an overview of the nRF5340 DK support in Zephyr.
Network core
The network core is an Arm Cortex-M33 processor with a reduced feature set, designed for ultra-low power operation.
This core is used for radio communication. With regards to the nRF5340 samples, this means that the network core runs the radio stack and real-time procedures.
Currently, the nRF Connect SDK provides the following solutions for the network core:
Bluetooth LE Controller (both the SoftDevice Controller and the Zephyr Bluetooth LE Controller)
Samples that directly use the radio peripheral
See Network samples for more information.
In general, this core should be used for real-time processing tasks involving low-level radio protocol layers.
The board name for the network core in Zephyr is nrf5340dk_nrf5340_cpunet.
Application core
The application core is a full-featured Arm Cortex-M33 processor including DSP instructions and FPU.
Currently, the nRF Connect SDK provides the following solutions for the application core:
High-level radio stack (the host part of the Bluetooth Low Energy stack) and application logic
Samples running only on the application core (for example, NFC samples with nRF5340 support)
See Application samples for more information.
In general, this core should be used for tasks that require high performance and for application-level logic.
The M33 TrustZone divides the application MCU into secure and non-secure domains. When the MCU boots, it always starts executing from the secure area. The secure bootloader chain starts the Secure Partition Manager sample, which configures a part of memory and peripherals to be non-secure and then jumps to the main application located in the non-secure area.
In Zephyr, nRF5340 DK is divided into two different build targets:
nrf5340dk_nrf5340_cpuappfor the secure domainnrf5340dk_nrf5340_cpuappnsfor the non-secure domain
When built for the nrf5340dk_nrf5340_cpuappns board, the Secure Partition Manager sample is automatically included in the build.
Trusted Firmware-M (TF-M) support
You can use Trusted Firmware-M (TF-M) as an alternative to Secure Partition Manager for running an application from the non-secure area of the memory.
For more information and instructions on how to do this, see Running applications with Trusted Firmware-M.
Inter-core communication
Communication between the application core and the network core happens through a shared memory area. The application core memory is mapped to the network core memory map. This means that the network core can access and use the application core memory for shared memory communication.
Interprocessor Communication (IPC) is used to indicate to the other core that there is new data available to pick up. The actual data exchange is handled by Open Asymmetric Multi Processing (OpenAMP).
Zephyr includes the OpenAMP library, which provides a complete solution for exchanging messages between the cores. The IPC peripheral is presented to Zephyr as an Interprocessor Mailbox (IPM) device. The OpenAMP library uses the IPM SHIM layer, which in turn uses the IPC driver in nrfx.
FOTA upgrades
You can upgrade the firmware of the device over the air, thus without a wired connection. Such an upgrade is called a FOTA (firmware over-the-air) upgrade. FOTA upgrades can be used to replace the application.
Note
To upgrade firmware on the network core, perform the steps for FOTA upgrade described below, replacing app_update.bin (file used when upgrading firmware on the application core) with net_core_app_update.bin.
In addition, ensure that CONFIG_PCD is enabled for the MCUBoot child image.
For more details, see nRF5340: Network core bootloader.
To perform a FOTA upgrade, complete the following steps:
- Make sure that your application supports FOTA upgrades.
To download and apply FOTA upgrades, the following requirements apply:
You must enable the mcumgr module, which handles the transport protocol over Bluetooth Low Energy. To enable this module in your application, complete the following steps:
Enable
CONFIG_MCUMGR_CMD_OS_MGMT,CONFIG_MCUMGR_CMD_IMG_MGMT, andCONFIG_MCUMGR_SMP_BT.Call
os_mgmt_register_group()andimg_mgmt_register_group()in your application.Call
smp_bt_register()in your application to initialize the mcumgr Bluetooth Low Energy transport.
See the code of the SMP Server Sample for an implementation example. After completing these steps, your application should advertise the SMP Service with UUID 8D53DC1D-1DB7-4CD3-868B-8A527460AA84.
To upgrade the application, you must use MCUboot as the upgradable bootloader (
CONFIG_BOOTLOADER_MCUBOOTmust be enabled).
- Create a binary file that contains the new image.
To create a binary file for an application upgrade, make sure that
CONFIG_BOOTLOADER_MCUBOOTis enabled and build the application as usual. The build will create several binary files (see Using MCUboot in nRF Connect SDK). Theapp_update.binfile is the file that must be downloaded to the device.
- Download the new image to a device.
Use nRF Connect for Mobile or nRF Toolbox to upgrade your device with the new firmware.
To do so, make sure that you can access the
app_update.binfile from your phone or tablet. Then connect to the device with the mobile app and initiate the DFU process to transferapp_update.binto the device.Note
There is currently no support for the FOTA process in nRF Connect for Desktop.
Available samples
nRF5340 samples usually consist of two separate images: one that runs on the network core and one that runs on the application core.
Most samples that support nRF5340 are not dedicated exclusively to this device, but can also be built for other chips that have the radio peripheral (for example, the nRF52 Series). The following subsections give a general overview of what samples can run on nRF5340.
Network samples
The nRF5340 network core supports samples that directly use the radio peripheral, for example, Radio Test.
Bluetooth Low Energy
For Bluetooth Low Energy, the nRF Connect SDK provides the Bluetooth: HCI RPMsg sample. This Zephyr sample is designed specifically to enable the Bluetooth LE Controller functionality on a remote MCU (for example, the nRF5340 network core) using the RPMsg Messaging Protocol as a transport for Bluetooth HCI. The sample implements the RPMsg transport using the OpenAMP library to communicate with a Bluetooth Host stack that runs on a separate core (for example, the nRF5340 application core).
This sample must be programmed to the network core to run standard Bluetooth Low Energy samples on nRF5340. You can choose whether to use the SoftDevice Controller or the Zephyr Bluetooth LE Controller for this sample. See Bluetooth LE Controller for more information.
You might need to adjust the Kconfig configuration of this sample to make it compatible with the peer application. For example:
CONFIG_BT_MAX_CONNmust be greater than or equal to the maximum number of connections configured for the Bluetooth Host in the application core firmware.If the application sample uses specific Bluetooth LE functionalities, these functionalities must be enabled in the network sample as well. For example, you must modify the configuration of the network sample to make it compatible with the Bluetooth: Throughput sample:
CONFIG_BT_CTLR_TX_BUFFER_SIZE=251
CONFIG_BT_CTLR_DATA_LENGTH_MAX=251
This configuration guarantees that the network sample can handle the Bluetooth LE DLE update procedure, which is used in the Bluetooth: Throughput sample.
IEEE 802.15.4
For IEEE 802.15.4, the nRF Connect SDK makes use of Zephyr’s nRF IEEE 802.15.4: Serialization RPMsg sample. This Zephyr sample is designed specifically to enable the nRF IEEE 802.15.4 radio driver and its serialization library on a remote MCU (for example, the nRF5340 network core) using the RPMsg Messaging Protocol as a transport for the nRF 802.15.4 radio driver serialization. The sample implements the RPMsg transport using the OpenAMP library to communicate with the nRF IEEE 802.15.4 radio driver serialization host that runs on a separate core (for example, the nRF5340 application core).
This sample must be programmed to the network core to run samples for 802.15.4-based protocols like Thread or Zigbee on nRF5340.
Application samples
The nRF Connect SDK provides a series of Bluetooth Low Energy samples, in addition to the Bluetooth samples in Zephyr. Most of these samples should run on the nRF5340 DK, but not all have been thoroughly tested.
Some Bluetooth LE samples require configuration adjustments to the Bluetooth: HCI RPMsg sample as described in the Network samples section.
The nRF Connect SDK also provides Thread and Zigbee samples that can be run on the nRF5340 DK. These samples are built for the application core, but make use of both cores. The network core application is built and flashed automatically.
Additionally, the nRF Connect SDK provides NFC samples that are available for nRF5340. These samples run only on the application core and do not require any firmware for the network core.
When programming any of these samples to the application core, configure CONFIG_BOARD_ENABLE_CPUNET to select whether the network core should be enabled.
When radio protocols (Bluetooth LE, IEEE 802.15.4) are used, this option is enabled by default.
Building and programming a sample
Depending on the sample, you must program only the application core (for example, when using NFC samples) or both the network and the application core.
Note
On nRF5340, the application core is responsible for starting the network core and connecting its GPIO pins.
Therefore, to run any sample on nRF5340, the application core must be programmed, even if the firmware is supposed to run only on the network core, and the firmware for the application core must set CONFIG_BOARD_ENABLE_CPUNET to y.
You can use the nRF5340: Empty firmware for application core sample for this purpose.
For details, see the code in zephyr/boards/arm/nrf5340dk_nrf5340/nrf5340_cpunet_reset.c.
To program only the application core, follow the instructions in Building with SES and use nrf5340dk_nrf5340_cpuapp or nrf5340dk_nrf5340_cpuappns as build target.
When programming both the application core and the network core, you can choose whether you want to build and program both images separately or combined as a multi-image build.
In a multi-image build, the image for the application core is the parent image, and the image for the network core is treated as a child image in a separate domain. For this to work, the network core image must be explicitly added as a child image to one of the application core images. See Defining and enabling a child image for details.
The network sample Bluetooth: HCI RPMsg is automatically added to all Bluetooth Low Energy samples in the nRF Connect SDK.
When CONFIG_BT_RPMSG_NRF53 is set to y (the default), the build system automatically includes the sample as a child image in the nrf5340_dk_nrf5340_cpunet core.
The network sample nRF IEEE 802.15.4: Serialization RPMsg is built automatically by the nRF Connect SDK build system and included as a child image in the nrf5340_dk_nrf5340_cpunet core if your application is built for the application core and has the CONFIG_NRF_802154_SER_HOST option enabled.
This option is enabled automatically for Thread and Zigbee samples in the nRF Connect SDK.
SES is unable to automatically program the network sample Bluetooth: HCI RPMsg to the network core when it is added as a child image. To program the network sample to the network core, see Programming the network sample from SES.
A dedicated network sample can be built and flashed by following the instructions in Building with SES.
Make sure to use nrf5340dk_nrf5340_cpunet as the build target when building the network sample, and nrf5340dk_nrf5340_cpuapp or nrf5340dk_nrf5340_cpuappns when building the application sample.
Programming the network sample from SES
Follow the instructions in Building with SES, use nrf5340dk_nrf5340_cpuapp or nrf5340dk_nrf5340_cpuappns as the build target, and open the Bluetooth Low Energy sample to work with.
Build the sample as described in Building with SES. This also creates the network core image.
Note
You must reprogram the network core sample Bluetooth: HCI RPMsg only when changes are made to it. You can modify and program the application core sample without reprogramming the network core.
Follow these steps to program the network sample Bluetooth: HCI RPMsg to the network core when it is included as a child image:
Select File -> New Project….
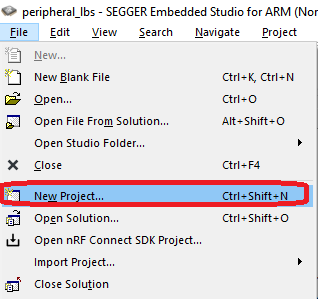
Create New Project menu
Select Add the project to the current solution.
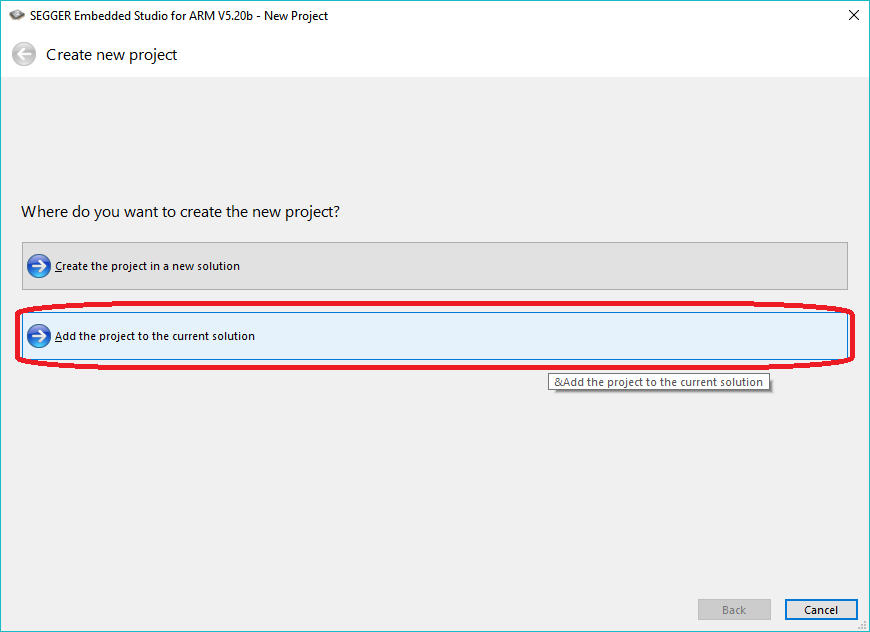
Adding a project target for programming the network core
Select the project template, project name, and project location.
An externally built executable for Nordic Semiconductor nRF: This allows to specify the network core hex file created by the build system to be flashed.
Name: Specify the name of the project as it will appear in SES. In this example,
hci_rpmsg_nrf5340_netcoreis used.Location: Specify the location of the project. This must be the same location as the current project / build folder. Click Browse to open a dialog where you can navigate to the current project / build folder and click Select Folder.
Click Next.
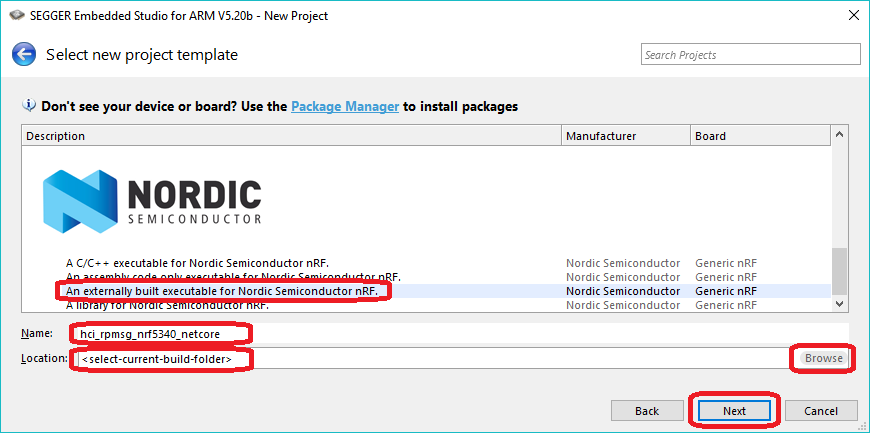
Creating a new project for programming the network core
Configure the project settings.
Target Processor: Select
nRF5340_xxAA_Network.Load File: Specify
$(ProjectDir)/hci_rpmsg/zephyr/merged_CPUNET.hex. This is the merged hex file for the network core that will be programmed.
Click Next.
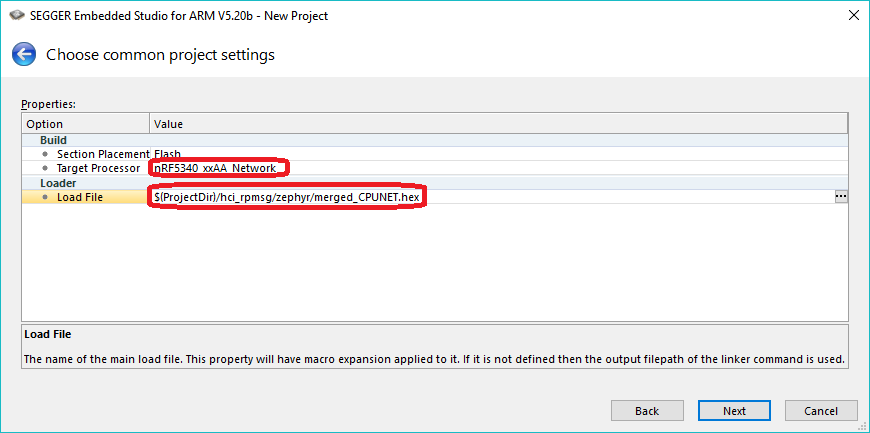
Project settings for programming the network core
Add the project files.
This project will only be used for programming the network core so you must only add the default Script Files.
Click Next
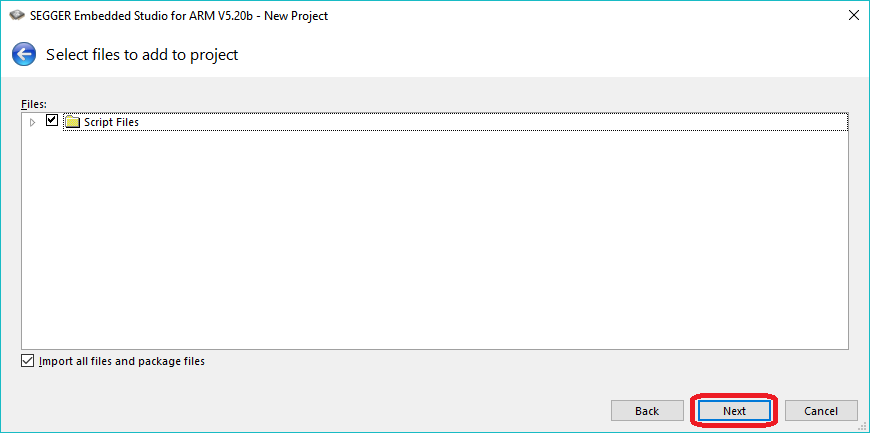
Adding script files for programming the network core
Add the project configurations.
This project will only be used for programming the network core so no build configurations are needed.
Deselect Debug and Release.
Click Finish.
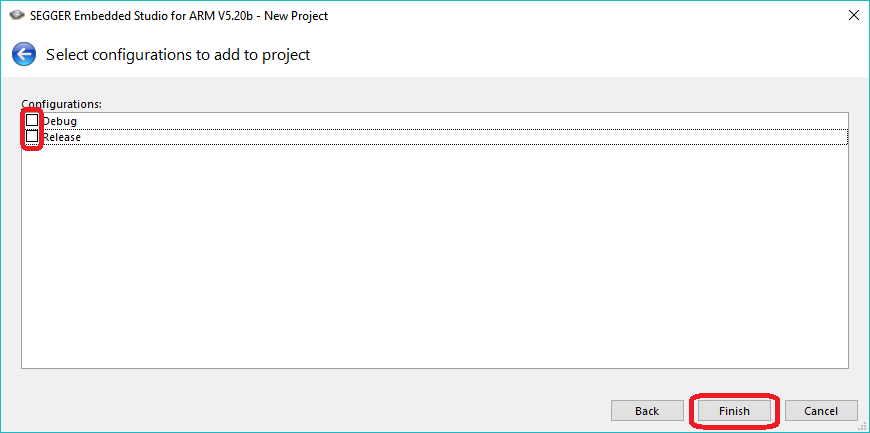
Deselecting configurations and finishing the configuration
A new project has been created for programming the network core with the network sample Bluetooth: HCI RPMsg.
To program the network sample, the
hci_rpmsg_nrf5340_netcoreproject must be active. If thehci_rpmsg_nrf5340_netcoreproject is not the current active project, then set it as active using Project -> Set Active Project -> hci_rpmsg_nrf5340_netcore.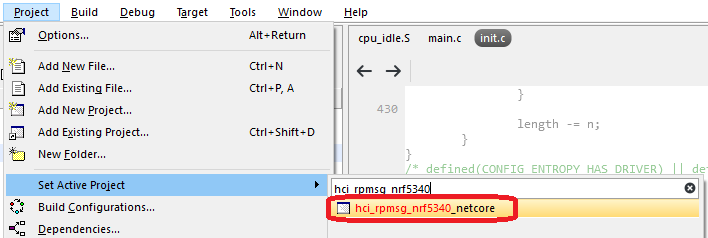
Set the hci_rpmsg_nrf5340_netcore programming target as active
You can now program the network sample using Target -> Download hci_rpmsg_nrf5340_netcore.
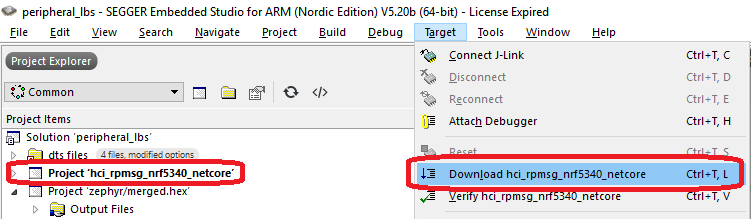
Program the network sample hci_rpmsg_nrf5340_netcore
Ignore any warnings regarding project being out of date. The
hci_rpmsg_nrf5340_netcoreis a pure programming target so it cannot build.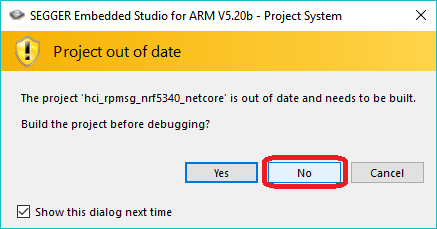
Ignore any ‘Project out of date’ warning
After the network core is programmed, make sure to make the application target active again.
To do this, select Project -> Set Active Project -> zephyr/merged.hex.
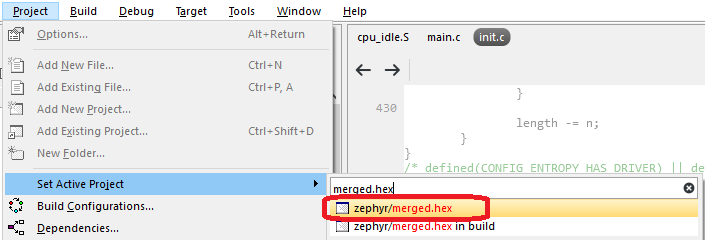
Set the zephyr/merged.hex target as active
Note
Flashing the network core erases the application which must be therefore programmed again.
Programming from the command line
To program the nRF5340 DK from the command line, you can use either west or nrfjprog (which is part of the nRF Command Line Tools).
Note
Programming the nRF5340 DK from the command line (with west or nrfjprog) requires the nRF Command Line Tools v10.12.0 or later.
Multi-image build
To program a multi-image HEX file that includes images for both the application sample and the network sample, you must use west. Programming multi-image builds for different cores is not yet supported in nrfjprog.
Open a command prompt in the build folder of the application sample and enter the following command to erase the whole flash and program both the application sample and the network sample:
west flash --erase
See Readback protection if you encounter an error.
Separate images
If you built the application sample and the network sample as separate images, you must program them separately.
First, open a command prompt in the build folder of the network sample and enter the following command to erase the flash of the network core and program the network sample:
west flash --erase
Then navigate to the build folder of the application sample and enter the same command to erase the flash of the application core and program the application sample:
west flash --erase
First, open a command prompt in the build folder of the network sample and enter the following command to erase the flash of the network core and program the network sample:
nrfjprog -f NRF53 --coprocessor CP_NETWORK --program zephyr/zephyr.hex --chiperase
Then navigate to the build folder of the application sample and enter the following command to erase the flash of the application core and program the application sample:
nrfjprog -f NRF53 --program zephyr/zephyr.hex --chiperase
Finally, reset the board:
nrfjprog --pinreset
See Readback protection if you encounter an error.
Readback protection
When programming the device, you might get an error similar to the following message:
ERROR: The operation attempted is unavailable due to readback protection in
ERROR: your device. Please use --recover to unlock the device.
This error occurs when readback protection is enabled. To disable the readback protection, you must recover your device. See the following instructions.
Enter the following command to recover both cores:
west flash --recover
Enter the following commands to recover first the network core and then the application core:
nrfjprog --recover --coprocessor CP_NETWORK
nrfjprog --recover
Note
Make sure to recover the network core before you recover the application core.
The --recover command erases the flash and then writes a small binary into the recovered flash.
This binary prevents the readback protection from enabling itself again after a pin reset or power cycle.
Recovering the network core erases the flash of both cores. Recovering the application core erases the flash of only the application core. Therefore, you must recover the network core first. Otherwise, if you recover the application core first and the network core last, the binary written to the application core is deleted and readback protection is enabled again after a reset.
Getting logging output
When connected to the computer, the nRF5340 DK emulates three virtual COM ports. In the default configuration:
Logging output from the application core sample is available on the third (last) COM port.
Logging output from the network core (if available) is routed to the first COM port.
The second (middle) COM port is silent.