Modifying a sample application
After programming and testing a sample application, you probably want to make some modifications to the application, for example, add your own files with additional functionality, change compilation options, or update the default configuration.
Adding files and changing compiler settings
All files that your application uses must be specified in the CMakeList.txt file.
By default, most samples include only the main application file src/main.c.
This means that you must add all other files that you are using.
You can also configure compiler options, application defines, or include directories, or set build types in CMakeList.txt.
To update the CMakeList.txt file, either edit it directly or use SEGGER Embedded Studio (SES) to maintain it.
Editing CMakeList.txt directly
Add all files that your application uses to the target_sources function in CMakeList.txt.
To include several files, it can be useful to specify them with a wildcard.
For example, to include all .c files from the src folder, add the following lines to your CMakeList.txt:
FILE(GLOB app_sources src/*.c)
target_sources(app PRIVATE ${app_sources})
Instead of specifying each file (explicitly or with a wildcard), you can include all files from a folder by adding that folder as include folder:
target_include_directories(app PRIVATE src)
See the CMake documentation and CMake Details in the Zephyr documentation for more information about how to edit CMakeList.txt.
Maintaining CMakeList.txt in SES
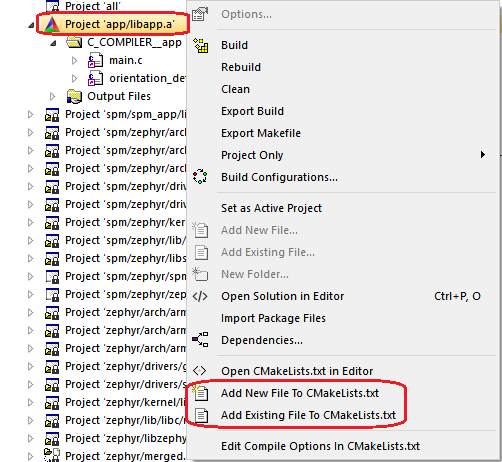
To add a file in SES, right-click Project ‘app/libapp.a’ in the Project Explorer. Select either Add new file to CMakeLists.txt to create a file and add it or Add existing file to CMakeLists.txt to add a file that already exists.
Adding files in SES
To edit compilation options in SES, right-click Project ‘app/libapp.a’ in the Project Explorer and select Edit Compile Options in CMakeLists.txt.
In the window that is displayed, you can define compilation options for the project.
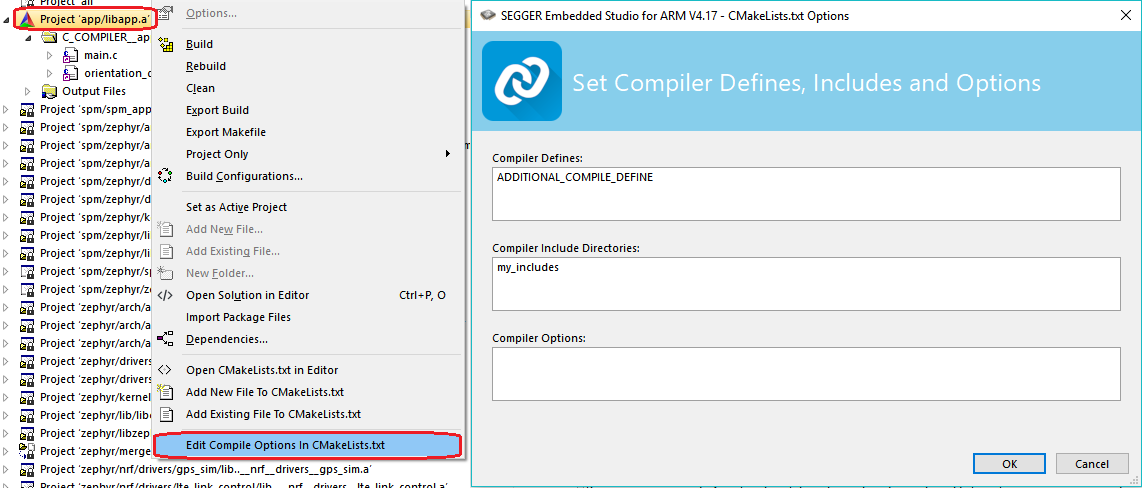
Setting compiler defines, includes, and options in SES
Note
These compilation options apply to the application project only. To manage Zephyr and other subsystems, go to Project -> Configure nRF Connect SDK Project.
SES tags in CMakeLists.txt
To be able to manage CMakeLists.txt with SES, the CMake commands that are specific to the nRF Connect SDK application must be marked so SES can identify them.
Therefore, they must be surrounded by # NORDIC SDK APP START and # NORDIC SDK APP END tags.
The following CMake commands can be managed by SES, if they target the app library:
target_sourcestarget_compile_definitionstarget_include_directoriestarget_compile_options
The CMakeLists.txt files for the sample applications in the nRF Connect SDK are tagged as required.
Therefore, if you always use SES to maintain them, you do not need to worry about tagging.
Typically, the CMakeLists.txt files include at least the main.c file as source:
# NORDIC SDK APP START
target_sources(app PRIVATE src/main.c)
# NORDIC SDK APP END
Configuring your application
If your application uses a provided library or targets a specific board, you might want to change the default configuration of the library or board. There are different ways of doing this, but not all will store your configuration permanently.
The default configuration for a library is specified in its Kconfig file.
Similarly, the default configuration for a board is specified in its *_defconfig file (and its Kconfig.defconfig file, see Write your devicetree in the Zephyr documentation for more information).
The configuration for your application, which might override some default options of the libraries or the board, is specified in a prj.conf file in the application directory.
For detailed information about configuration options, see Kconfig Configuration in the Zephyr documentation.
Changing the configuration permanently
To configure your application and maintain the configuration when you clean the build directory, add your changes to the prj.conf file in your application directory.
In this file, you can specify different values for configuration options that are defined by a library or board, and you can add configuration options that are specific to your application.
See Setting Kconfig configuration values in the Zephyr documentation for information on how to edit the prj.conf file.
If you work with SES, the prj.conf file is read when you open a project.
This means that after you edit this file, you must re-open your project.
Note
It is possible to change the default configuration for a library by changing the Kconfig file of the library.
However, best practice is to override the configuration in the application configuration file prj.conf.
Changing the configuration temporarily
When building your application, the different Kconfig and *_defconfig files and the prj.conf file are merged together.
The combined configuration is saved in a zephyr/.config file in your build directory.
This means that this file is available when building the application, but it is deleted when you clean the build directory.
To quickly test different configuration options, or to build your application in different variants, you can update the .config file in the build directory.
Changes are picked up immediately, and you do not need to re-open the project in SES.
While it is possible to edit the .config file directly, you should use SES or a tool like menuconfig or guiconfig to update it.
These tools present all available options and allow you to select the ones that you need.
To edit the file in SES, select Project -> Configure nRF Connect SDK Project. If your application contains more than one image (see Multi-image builds), you must select the correct target. To configure the parent image (the main application), select menuconfig. The other options allow you to configure the child images.
See Interactive Kconfig interfaces in the Zephyr documentation for instructions on how to run menuconfig or guiconfig.
To locate a specific configuration option, use the filter (Jump to in menuconfig and guiconfig). The documentation for each configuration option also lists the menu path where the option can be found.
Important
All changes to the .config file are lost when you clean your build directory.
You can save it to another location, but you must then manually copy it back to your build directory.
Providing CMake options
You can provide additional options for building your application to the CMake process, which can be useful, for example, to switch between different build scenarios. These options are specified when CMake is run, thus not during the actual build, but when configuring the build.
If you work with SES, you can specify global CMake options that are used for all projects, and you can modify these options when you open a project:
Specify global CMake options in the SES options before opening a project. Click Tools > Options, select the nRF Connect tab, and specify a value for Additional CMake options.
Specify project-specific CMake options when opening the nRF Connect SDK project. Click File > Open nRF Connect SDK project, select Extended Settings, and specify the options in the Extra CMake Build Options field. This field is prepopulated with the global CMake options, and you can modify them, remove them, or add to them for the current project.
If you work on the command line, pass the additional options to the west build command.
The options must be added after a -- at the end of the command.
See One-Time CMake Arguments for more information.
Configuring build types
Build types enable you to use different sets of configuration options for each board.
You can create several build type .conf files per board and select one of them when building the application.
This means that you do not have to use one prj.conf file for your project and modify it each time to fit your needs.
Note
Creating build types and selecting them is optional. This is a feature specific to the application development in nRF Connect SDK.
Creating build type files
To create custom build type files for your application instead of using a single prj.conf file, complete the following steps:
During application development, follow the procedure for creating the application until after the step where you create the
CMakeLists.txtfile.In the
CMakeLists.txtfile, define the file name pattern for configuration files. For example:set(CONF_FILE "app_${CMAKE_BUILD_TYPE}.conf")
In this define,
CMAKE_BUILD_TYPEwill be used for selecting the build type.Optionally, include an if statement that checks for the presence of the selected build type configuration files. For an example, see
applications/nrf_desktop/CMakeLists.txt.Continue the application creation procedure by setting the Kconfig configuration options.
Save the
.conffile in the application directory with a name that matches the file name pattern defined in CMakeLists. For example,app_ZRelease.conf. In this file name,ZReleaseis the build type name.
You can now select build types in SES or from command line.
Selecting a build type in SES
To select the build type in SEGGER Embedded Studio:
Go to File > Open nRF Connect SDK project, select the current project, and specify the board name and build directory.
Select Extended Settings.
In the Extra CMake Build Options field, specify
-DCMAKE_BUILD_TYPE=selected_build_type. For example, forZReleaseset the following value:-DCMAKE_BUILD_TYPE=ZRelease.Do not select Clean Build Directory.
Click OK to re-open the project.
Note
You can also specify the build type in the Additional CMake Options field in Tools -> Options -> nRF Connect. However, the changes will only be applied after re-opening the project. Reloading the project is not sufficient.
Selecting a build type from command line
To select the build type when building the application from command line, specify the build type by adding the -- -DCMAKE_BUILD_TYPE=selected_build_type to the west build command.
For example, you can build the ZRelease firmware for the PCA20041 board by running the following command in the project directory:
west build -b nrf52840_pca20041 -d build_pca20041 -- -DCMAKE_BUILD_TYPE=ZRelease
The build_pca20041 parameter specifies the output directory for the build files.