Installing the nRF Connect SDK manually
The recommended way to get started with the nRF Connect SDK is to use nRF Connect for Desktop. See the Installing the nRF Connect SDK through nRF Connect for Desktop section for information about how to install the nRF Connect SDK through nRF Connect for Desktop.
Note
If you use nRF Connect for Desktop to install the nRF Connect SDK, you can skip this section of the documentation. If you prefer to install the toolchain manually, or if you run into problems during the installation process, see the following documentation for instructions.
To manually install the nRF Connect SDK, you must install all required tools and clone the nRF Connect SDK repositories. See the following sections for detailed instructions.
The first two steps, Installing the required tools and Installing the toolchain, are identical to the installation in Zephyr. If you already have your system set up to work with the Zephyr OS, you can skip these steps.
See Supported operating systems for information on the supported operating systems and Zephyr features.
Installing the required tools
The installation process is different depending on your operating system.
The recommended way for installing the required tools on Windows is to use Chocolatey, a package manager for Windows. Chocolatey installs the tools so that you can use them from a Windows command prompt.
To install the required tools, follow the Install dependencies section for Windows in Zephyr’s Getting Started Guide.
To install the required tools on Linux, follow the Install dependencies section for Linux in Zephyr’s Getting Started Guide. Additional information is available in the Install Requirements and Dependencies section.
Note
You do not need to install the Zephyr SDK. We recommend to install the compiler toolchain separately, as detailed in Installing the toolchain.
To install the required tools, follow the Install dependencies section for macOS in Zephyr’s Getting Started Guide.
Install Homebrew and install the required tools using the brew command line tool.
Also see macOS alternative setup instructions for additional information.
Installing the toolchain
To be able to cross-compile your applications for Arm targets, you must install version 9-2019-q4-major of the GNU Arm Embedded Toolchain.
Important
Make sure to install the version that is mentioned above. Other versions might not work with this version of the nRF Connect SDK.
Note that other versions of the nRF Connect SDK might require a different toolchain version.
To set up the toolchain, complete the following steps:
Download the GNU Arm Embedded Toolchain for your operating system.
Extract the toolchain into a folder of your choice. We recommend to use the folder
c:\gnuarmembon Windows and~/gnuarmembon Linux or macOS.Make sure that the folder name does not contain any spaces or special characters.
If you want to build and program applications from the command line, define the environment variables for the GNU Arm Embedded toolchain. Depending on your operating system:
Open a command prompt and enter the following commands (assuming that you have installed the toolchain to
c:\gnuarmemb; if not, change the value for GNUARMEMB_TOOLCHAIN_PATH):set ZEPHYR_TOOLCHAIN_VARIANT=gnuarmemb set GNUARMEMB_TOOLCHAIN_PATH=c:\gnuarmemb
Open a terminal window and enter the following commands (assuming that you have installed the toolchain to
~/gnuarmemb; if not, change the value for GNUARMEMB_TOOLCHAIN_PATH):export ZEPHYR_TOOLCHAIN_VARIANT=gnuarmemb export GNUARMEMB_TOOLCHAIN_PATH="~/gnuarmemb"
Open a terminal window and enter the following commands (assuming that you have installed the toolchain to
~/gnuarmemb; if not, change the value for GNUARMEMB_TOOLCHAIN_PATH):export ZEPHYR_TOOLCHAIN_VARIANT=gnuarmemb export GNUARMEMB_TOOLCHAIN_PATH="~/gnuarmemb"
Set the environment variables persistently. Depending on your operating system:
Add the environment variables as system environment variables or define them in the
%userprofile%\zephyrrc.cmdfile as described in Setting up the build environment. This will allow you to avoid setting them every time you open a command prompt.Define the environment variables in the
~/.zephyrrcfile as described in Setting up the build environment. This will allow you to avoid setting them every time you open a terminal window.Define the environment variables in the
~/.zephyrrcfile as described in Setting up the build environment. This will allow you to avoid setting them every time you open a terminal window.
Getting the nRF Connect SDK code
The nRF Connect SDK consists of a set of Git repositories.
Every nRF Connect SDK release consists of a combination of these repositories at different revisions. The revision of each of those repositories is determined by the current revision of the main (or manifest) repository, sdk-nrf.
Note
The latest state of development is on the master branch of the sdk-nrf repository. To ensure a usable state, the sdk-nrf repository defines the compatible states of the other repositories. However, this state is not necessarily tested. For a higher degree of quality assurance, check out a tagged release.
Therefore, unless you are familiar with the development process, you should always work with a specific release of the nRF Connect SDK.
To manage the combination of repositories and versions, the nRF Connect SDK uses West (Zephyr’s meta-tool).
The main repository, sdk-nrf, contains a west manifest file, west.yml, that determines the revision of all other repositories.
This means that sdk-nrf acts as the manifest repository, while the other repositories are project repositories.
You can find additional information about the repository and development model in the development model section.
See the west documentation for detailed information about the tool itself.
Installing west
Install west by entering the following command:
pip3 install west
pip3 install --user west
pip3 install west
You only need to do this once.
Like any other Python package, the west tool is updated regularly. Therefore, remember to regularly check for updates:
pip3 install -U west
pip3 install --user -U west
pip3 install -U west
Cloning the repositories
Tip
If you cloned the nRF Connect SDK repositories before they were moved to the nrfconnect GitHub organization and want to update them, follow the instructions in Pointing the repositories to the right remotes after they were moved.
To clone the repositories, complete the following steps:
Create a folder named
ncs. This folder will hold all nRF Connect SDK repositories.Open a command window in the
ncsfolder.Determine what revision of the nRF Connect SDK you want to work with. The recommended way is to work with a specific release.
To work with a specific release, the revision is the corresponding tag (for example,
v1.4.0). You can find the tag in the Release notes of the release.To work with a development tag, the revision is the corresponding tag (for example,
v1.2.99-dev1)To work with a branch, the revision is the branch name (for example,
masterto work with the latest state of development).To work with a specific state, the revision is the SHA (for example,
224bee9055d986fe2677149b8cbda0ff10650a6e).
Initialize west with the revision of the nRF Connect SDK that you want to check out, replacing NCS_revision with the revision:
west init -m https://github.com/nrfconnect/sdk-nrf --mr NCS_revision
For example, to check out the v1.4.0 release, enter the following command:
west init -m https://github.com/nrfconnect/sdk-nrf --mr v1.4.0
To check out the latest state of development, enter the following command:
west init -m https://github.com/nrfconnect/sdk-nrf --mr master
Note
If you get an error message when running west, update west to the latest version. See Troubleshooting West if you need more information.
Initializing west with a specific revision of the manifest file does not lock your repositories to this version. Checking out a different branch or tag in the sdk-nrf repository and running
west updatechanges the version of the nRF Connect SDK that you work with.This will clone the manifest repository sdk-nrf into
nrf.Enter the following command to clone the project repositories:
west update
Export a Zephyr CMake package. This allows CMake to automatically load the boilerplate code required for building nRF Connect SDK applications:
west zephyr-export
Your directory structure now looks similar to this:
ncs
 |___ .west
 |___ bootloader
 |___ modules
 |___ nrf
 |___ nrfxlib
 |___ zephyr
 |___ ...
Note that there are additional folders, and that the structure might change. The full set of repositories and folders is defined in the manifest file.
Updating the repositories
If you work with a specific release of the nRF Connect SDK, you do not need to update your repositories, because the release will not change. However, you might want to switch to a newer release or check out the latest state of development.
To manage the nrf repository (the manifest repository), use Git.
To make sure that you have the latest changes, run git fetch origin to fetch the latest code from the sdk-nrf repository.
Checking out a branch or tag in the nrf repository gives you a different version of the manifest file.
Running west update will then update the project repositories to the state specified in this manifest file.
Note
If you get an error message when running west, update west to the latest version. See Troubleshooting West if you need more information.
For example, to switch to release v1.4.0 of the nRF Connect SDK, enter the following commands in the ncs/nrf directory:
git fetch origin
git checkout v1.4.0
west update
To update to a particular revision (SHA), make sure that you have that particular revision locally before you check it out (by running git fetch origin):
git fetch origin
git checkout 224bee9055d986fe2677149b8cbda0ff10650a6e
west update
To switch to the latest state of development, enter the following commands:
git fetch origin
git checkout origin/master
west update
Note
Run west update every time you change or modify the current working branch (for example, when you pull, rebase, or check out a different branch).
This will bring the project repositories to the matching revision defined by the manifest file.
Pointing the repositories to the right remotes after they were moved
Before nRF Connect SDK version 1.3.0, the Git repositories were moved from the NordicPlayground GitHub organization to the nrfconnect organization.
They were also renamed, replacing the fw-nrfconnect- prefix with sdk-.
If you cloned the repositories before the move, your local repositories and forks of the nRF Connect SDK repositories are automatically be redirected to the new ones. However, you should point them directly to their new locations as described in this section.
The full list of repositories with their old and new URLs can be found in the following table:
Old URL |
New URL |
File system path |
|---|---|---|
|
||
|
||
|
||
|
||
|
Before you change the remotes, rename any personal forks that you have of the nRF Connect SDK repositories to their new names.
To do so, visit your personal fork in a browser and edit the name there.
For example, to rename the fw-nrfconnect-nrf repository, access your fork on GitHub (for example, https://github.com/<username>/fw-nrfconnect-nrf), switch to the Settings tab, and change the name in the Repository name field to sdk-nrf.
Then rename the actual remotes. To do so, go to your local copy of each of the repositories listed in the table above and enter the following command:
git remote set-url remote_name new_url
Replace remote_name with the name of your remote (for example, origin for your fork or ncs for the upstream repository) and new_url with the URL of your fork or the new URL from the table above. If you are unsure about the remotes that are configured in your local repository, enter git remote -v.
For example, to point your existing fw-nrfconnect-nrf clone to its new URL, enter the following command:
cd ncs/nrf
git remote set-url origin https://github.com/nrfconnect/sdk-nrf
Similarly, to point your existing fw-nrfconnect-zephyr clone to the new URL, enter the following command:
cd ncs/zephyr
git remote set-url ncs https://github.com/nrfconnect/sdk-zephyr
Additional information about remotes and how to handle them can be found in Forking a repository of the nRF Connect SDK.
Installing additional Python dependencies
The nRF Connect SDK requires additional Python packages to be installed.
Use the following commands to install the requirements for each repository.
Open a command prompt in the ncs folder and enter the following commands:
pip3 install -r zephyr/scripts/requirements.txt
pip3 install -r nrf/scripts/requirements.txt
pip3 install -r bootloader/mcuboot/scripts/requirements.txt
Open a terminal window in the ncs folder and enter the following commands:
pip3 install --user -r zephyr/scripts/requirements.txt
pip3 install --user -r nrf/scripts/requirements.txt
pip3 install --user -r bootloader/mcuboot/scripts/requirements.txt
Open a terminal window in the ncs folder and enter the following commands:
pip3 install -r zephyr/scripts/requirements.txt
pip3 install -r nrf/scripts/requirements.txt
pip3 install -r bootloader/mcuboot/scripts/requirements.txt
Installing SEGGER Embedded Studio Nordic Edition
You must install SEGGER Embedded Studio (SES) Nordic Edition to be able to open and compile projects in the nRF Connect SDK.
SEGGER Embedded Studio is free of charge for use with Nordic Semiconductor devices.
To install SEGGER Embedded Studio Nordic Edition, complete the following steps:
Download the package for your operating system:
Extract the downloaded package in the directory of your choice.
Register and activate a free license. SEGGER Embedded Studio is free of charge for use with Nordic Semiconductor devices, but you still need to request and activate a license. Complete the following steps:
Run the file
bin/emStudio. SEGGER Embedded Studio will open the Dashboard window and inform you about the missing license.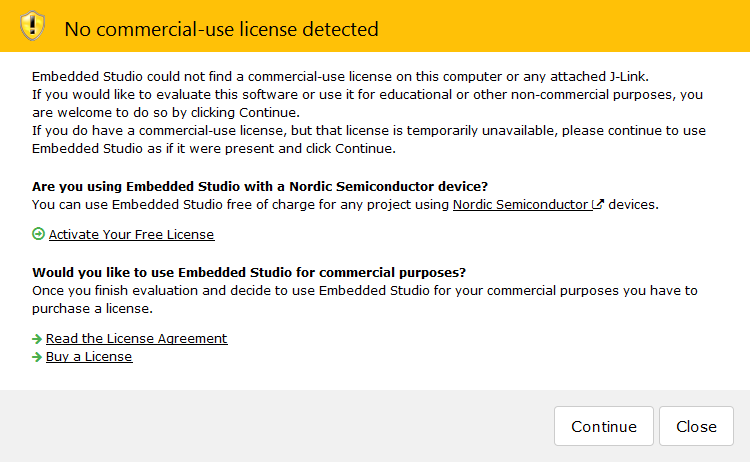
No commercial-use license detected SES prompt
Click Activate Your Free License. A request form appears.
Fill in your information and click Request License. The license is sent to you in an email.
After you receive your license key, click Enter Activation Key to activate the license.
Copy-paste the license key and click Install License. The license activation window will close and SES will open the Project Explorer window.
Setting up the build environment
Before you start building and programming a sample application, you must set up your build environment.
Setting up the SES environment
If you plan to build with SEGGER Embedded Studio, the first time you import an nRF Connect SDK project, SES might prompt you to set the paths to the Zephyr Base directory and the GNU ARM Embedded Toolchain. This must be done only once.
Complete the following steps to set up the SEGGER Embedded Studio environment:
Run the file
bin/emStudio.Select File -> Open nRF Connect SDK Project.
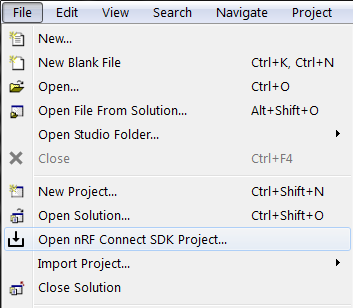
Open nRF Connect SDK Project menu
Set the Zephyr Base directory to the full path to
ncs/zephyr. The GNU ARM Embedded Toolchain directory is the directory where you installed the toolchain (for example,c:/gnuarmemb).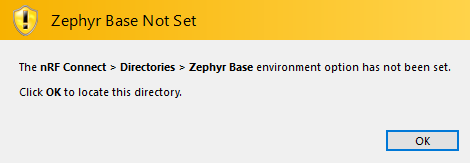
Zephyr Base Not Set prompt
Setting up executables
The process is different depending on your operating system.
Make sure the locations of tools are added to the PATH variable. On Windows, SES uses the PATH variable to find executables if they are not set in SES.
Make sure the locations of tools are added to the PATH variable. On Linux, SES uses the PATH variable to find executables if they are not set in SES.
If you start SES on macOS by running the file bin/emStudio, make sure to complete the following steps:
Specify the path to all executables under Tools -> Options (in the nRF Connect tab).
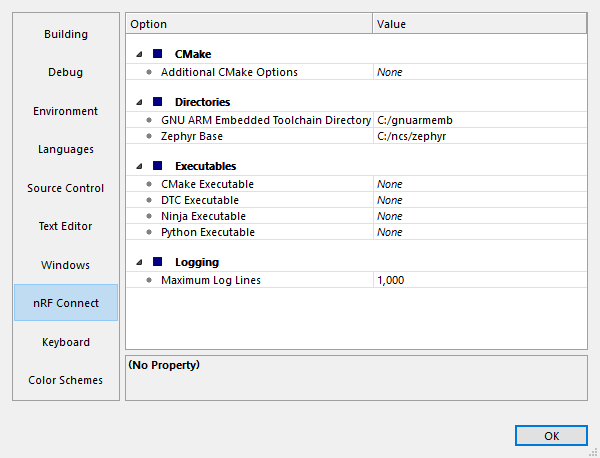
nRF Connect SDK options in SES (Windows)
Use this section to change the SES environment settings later as well.
Specify the path to the west tool as additional CMake option, replacing path_to_west with the path to the west executable (for example,
/usr/local/bin/west):-DWEST=path_to_west
If you start SES from the command line, it uses the global PATH variable to find the executables. You do not need to explicitly configure the executables in SES.
Regardless of how you start SES, if you get an error that a tool or command cannot be found, first make sure that the tool is installed. If it is installed, verify that its path is configured correctly in the SES settings or in the PATH variable.
Changing the SES environment settings
If you want to change the SES environment settings, click Tools -> Options and select the nRF Connect tab, as shown on the following screenshot from the Windows installation.
nRF Connect SDK options in SES (Windows)
If you want to configure tools that are not listed in the SES options, add them to the PATH variable.
Setting up the command line build environment
If you want to build and program your application from the command line, you must set up your build environment by defining the required environment variables every time you open a new command prompt or terminal window.
See Important Environment Variables information about the various relevant environment variables.
Define the required environment variables as follows, depending on your operating system:
Navigate to the ncs folder and enter the following command: zephyr\zephyr-env.cmd
If you need to define additional environment variables, create the file %userprofile%\zephyrrc.cmd and add the variables there.
This file is loaded automatically when you run the above command.
Navigate to the ncs folder and enter the following command: source zephyr/zephyr-env.sh
If you need to define additional environment variables, create the file ~/.zephyrrc and add the variables there.
This file is loaded automatically when you run the above command.
Navigate to the ncs folder and enter the following command: source zephyr/zephyr-env.sh
If you need to define additional environment variables, create the file ~/.zephyrrc and add the variables there.
This file is loaded automatically when you run the above command.
You must also make sure that nrfjprog (part of the nRF Command Line Tools) is installed and its path is added to the environment variables. The west command programs the board by using nrfjprog by default. For more information on nrfjprog, see programming development boards using nrfjprog.