nRF9160: AWS FOTA
The Amazon Web Services firmware over-the-air (AWS FOTA) sample shows how to perform an over-the-air firmware update of an nRF9160 device via MQTT and HTTP. It is similar to the nRF9160: HTTP application update, except that the firmware download is triggered through an AWS IoT job.
Overview
The sample connects to the configured AWS IoT MQTT broker and subscribes to several topics related to AWS IoT jobs. When an update job is created on the AWS IoT service, the sample receives a notification through MQTT.
Triggered by the notification, the sample retrieves the metadata for the update job over MQTT. This metadata contains the location of the new firmware image (which is generated when building the sample, but you must upload it to a server). The sample then retrieves the firmware image over HTTP and replaces the current firmware with the downloaded firmware.
See AWS FOTA for information about the download procedure. The AWS IoT Developer Guide contains all required information about the Amazon Web Services IoT service.
Note
A file server instance that hosts the new firmware image is required for this sample. You can set up and use your own AWS S3 server bucket to host the firmware described in the Setting up an AWS S3 bucket section.
Creating a thing in AWS IoT
Before you can run this sample, you must create a thing for your development kit in AWS IoT so that AWS knows about your kit. This thing must be connected to a security policy. For testing, you can use a permissive policy, but make sure to update the policy to be more restrictive before you go into production. See AWS IoT Developer Guide: Basic Policy Variables and AWS IoT Developer Guide: Security Best Practices for more information about policies.
To create a thing for your kit:
Log on to the AWS IoT console.
Go to Secure -> Policies and select Create a policy.
Enter a name and define your policy. For testing purposes, you can use the following policy (switch to Advanced mode to copy and paste it):
{
   "Version": "2012-10-17",
   "Statement": [
       {
         "Effect": "Allow",
         "Action": "iot:*",
         "Resource": "*"
       }
    ]
 }
Go to Manage -> Things and select Register a thing or Create (depending on whether you already have a thing registered).
Select Create a single thing.
Enter a name. The default name used by the sample is
nrf-IMEI, where IMEI is the IMEI number of your kit. If you choose a different name, make sure to configure a custom client ID in the sample before you build it.Accept the defaults and continue to the next step.
Select Create certificate to generate new certificates. Alternatively, you can use existing certificates. In this case, follow the instructions in AWS IoT.
Download the certificates for later use. You need the thing certificate (
*-certificate.pem.crt), the private key (*.private.pem.key), and the root CA (choose the Amazon Root CA 1,AmazonRootCA1.pem).Click Activate to activate the certificates.
Click Attach a policy to continue to the next step.
Select the policy that you created in step 3 and click Register Thing.
Updating the certificates
The certificates that you created or added for your thing in AWS IoT must be stored on your kit so that it can connect to AWS IoT. There are two different ways of doing this:
- Add the certificates to the sample code:
If you add the certificates to the sample code, the sample will store them on your kit automatically.
Warning
The sample will overwrite the certificates stored with the configured
security tag.You should provision the certificates only once and then update the sample configuration to use the existing certificates. When provisioning the certificates, they are stored in the application binary and visible in the modem trace information, which is a security risk.
Open the
certificates.hfile in thesrcfolder of the sample.Add the three certificates in the given format. Make sure to not add whitespace except for the
\nline breaks.Before programming the sample, configure it to provision the certificates from the
certificates.hfile (PROVISION_CERTIFICATES) and to use a different security tag (CLOUD_CERT_SEC_TAG).
- Use LTE Link Monitor to write the certificates to the kit:
The nRF Connect LTE Link Monitor provides a certificate manager that you can use to store the certificates on your kit:
Make sure that you have the AT client sample programmed on your kit.
Put the modem in offline state.
Paste the three certificates into the respective fields.
Choose a security tag.
Click Update certificates.
Before programming the sample, make sure to configure the
security tagto the one that you chose.
Setting up an AWS S3 bucket
The firmware files for download must be stored in a bucket on an AWS S3 server. To do this, set up your own bucket.
When setting up your own bucket, make sure to configure the permissions as shown in the following screenshot:
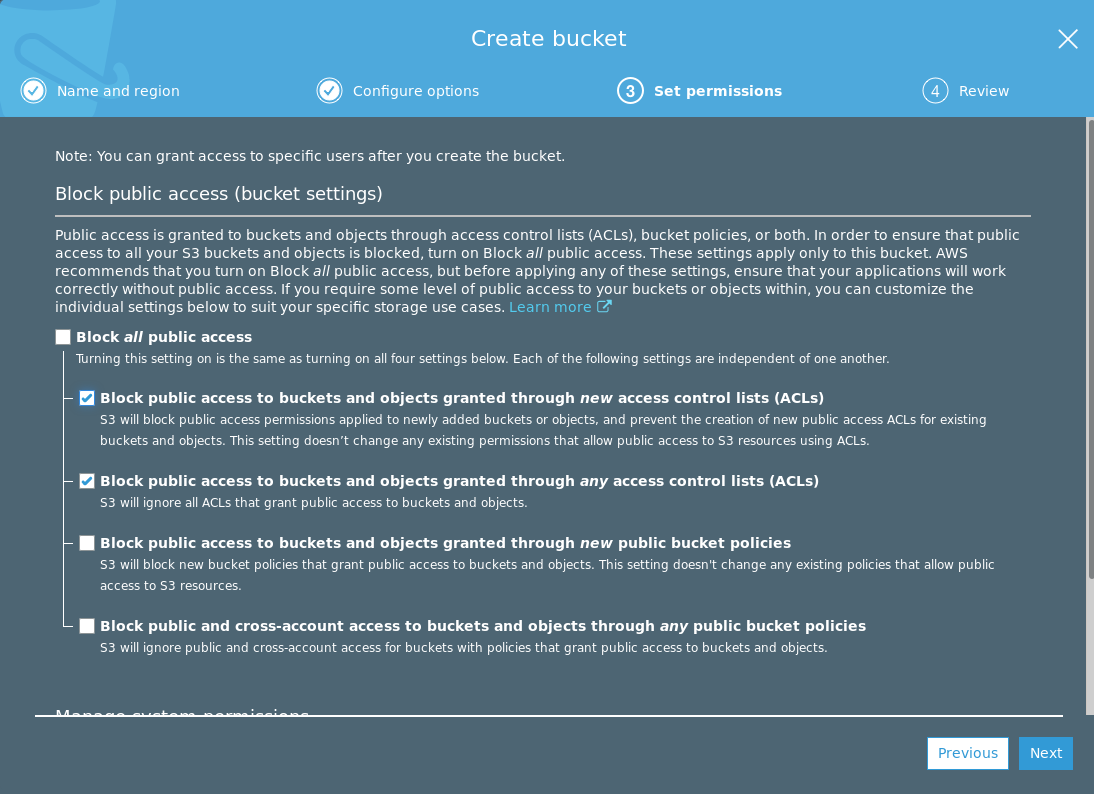
To update the permissions for an existing bucket, select your bucket and navigate to Permissions > Block public access.
In addition to the permissions, you must configure a bucket policy. To determine a suitable security scheme for your application, see AWS S3 Developer Guide: Using Bucket Policies and User Policies and AWS S3 Developer Guide: Bucket Policy Examples. To configure the policy, select your bucket and navigate to Permissions > Bucket Policy.
For testing purposes, you can use the following, very permissive, bucket policy (replace bucket_name with the name of your bucket):
{    "Version": "2012-10-17",
     "Statement": [
         {
             "Effect": "Allow",
             "Principal": "*",
             "Action": "s3:GetObject",
             "Resource": "arn:aws:s3:::bucket_name/*"
         }
      ]
 }
Requirements
The sample supports the following development kit:
Hardware platforms |
PCA |
Board name |
Build target |
|---|---|---|---|
PCA10090 |
|
The sample requires an AWS account with access to Simple Storage Service (S3) and the IoT Core service.
The sample is configured to compile and run as a non-secure application on nRF91’s Cortex-M33. Therefore, it automatically includes the Secure Partition Manager that prepares the required peripherals to be available for the application.
You can also configure it to use TF-M instead of Secure Partition Manager.
Building and running
This sample can be found under samples/nrf9160/aws_fota in the nRF Connect SDK folder structure.
The sample is built as a non-secure firmware image for the nrf9160dk_nrf9160ns build target. Because of this, it automatically includes the Secure Partition Manager. You can also configure it to use TF-M instead of SPM.
See Building and programming a sample application for information about how to build and program the application.
Sample configuration
Before you build the sample, check and update the following configuration options:
-
APP_VERSION- Application version¶ The version string is printed when the sample starts. Use this information to verify that the FOTA update worked.
-
CLOUD_CERT_SEC_TAG- Security tag for TLS credentials¶ By default, the sample uses the certificates that are stored with the security tag for nRF Connect for Cloud. To use different certificates, configure a different security tag. If you used LTE Link Monitor to store the certificates, make sure to configure the security tag to the same that you used to store them.
-
MQTT_BROKER_HOSTNAME- AWT IoT MQTT broker hostname¶ By default, the sample uses nRF Connect for Cloud’s MQTT broker. Change this value to AWS IoT’s MQTT broker. To find the address of the AWS IoT MQTT broker, open the AWS IoT console, go to Test and select View endpoint from the Connected as XXX drop-down menu.
-
USE_CLOUD_CLIENT_ID- Custom MQTT client ID¶ The client ID links your kit to the thing in AWS IoT. By default, the client ID is
nrf-IMEI, where IMEI is the IMEI number of your kit. If you chose a different name for your thing in AWS IoT, check this option and specify the AWS IoT thing name as client ID.
-
USE_NRF_CLOUD- Use nRF Connect for Cloud¶ If this option is checked, the sample uses the certificates that are stored in the modem with the nRF Connect for Cloud security tag.
Uncheck this option if you want to use the certificates added to the
certificates.hfile.
-
PROVISION_CERTIFICATES- Provision certificates from the certificates.h file¶ If this option is checked, the sample stores the certificates from the
certificates.hfile with the security tag that is defined asSecurity tag for TLS credentials.Warning
The sample will overwrite the certificates stored with the configured
security tag.You should provision the certificates only once and then update the sample configuration to use the existing certificates. When provisioning the certificates, they are stored in the application binary and visible in the modem trace information, which is a security risk.
For all other values, use the default values unless you are using a custom MQTT server.
Testing
After programming the sample to your development kit, test it by performing the following steps:
Connect to the kit with a terminal emulator (for example, PuTTY). See How to connect with PuTTY for the required settings.
Reset the kit.
Confirm that the sample prints the configured application version and connects to AWS IoT. You should see output like the following:
***** Booting Zephyr OS build v1.14.99-ncs3-snapshot2-1281-g40b430ba977c *****

The MQTT AWS Jobs FOTA Sample, version: v1.0.0
nrf_inbuilt_key_delete(42, 0) => result=0
nrf_inbuilt_key_delete(42, 1) => result=0
nrf_inbuilt_key_delete(42, 2) => result=0
nrf_inbuilt_key_write => result=0
nrf_inbuilt_key_write => result=0
nrf_inbuilt_key_write => result=0
LTE Link Connecting ...
LTE Link Connected!
IPv4 Address 127.0.0.1
client_id: nrf-aws-fota
[mqtt_evt_handler:129] MQTT client connected!
[00:00:14.106,140] <inf> aws_jobs: Subscribe: $aws/things/nrf-aws-fota/jobs/notify-next
Log on to the AWS IoT console, go to Manage -> Things, and select your thing.
Go to Shadow and confirm that the application version (
nrfcloud__dfu_v1__app_v) is the one that you configured for the sample.In the Sample configuration, change the application version. Then rebuild the application, but do not program it.
Go to AWS S3 console and sign in.
Go to the bucket you have created.
Click Upload and select the file
app_update.bin(located in thezephyrsubfolder of your build directory).Click the file you uploaded in the bucket and check the Object URL field to find the download URL for the file.
Create a job document (a text file) with the following content, replacing host_url with the server part of the URL that you created (for example,
s3.amazonaws.com) and file_path with the path and file name (for example,nordic-firmware-files/app_update.bin):{ "operation": "app_fw_update", "fwversion": "v1.0.2", "size": 181124, "location": { "protocol": "http:", "host": "host_url", "path": "file_path" } }See AWS IoT Developer Guide: Jobs for more information about AWS jobs.
Log on to the AWS S3 console.
Select the bucket, click Upload, and select your job document. Use the default settings when uploading the file.
Log on to the AWS IoT console, go to Manage -> Jobs, and select Create a job.
Click Create custom job and enter a unique job ID. Select your device and the job file that you uploaded to AWS S3. Use the default settings for all other options.
Since the sample is configured to subscribe to the
app_fw_updatejob topic, it picks up the job automatically. This can take several minutes. Select the job in AWS IoT to confirm that it is in progress. Note that it might show as in progress on the overview, while it is actually queued.In the terminal emulator, observe that the new firmware image is downloaded and installed. You should see output similar to the following:
...
[00:02:03.748,931] <inf> download_client: Downloaded 135168/201232 bytes (67%)
[00:02:03.794,494] <inf> fota_flash_block: Erasing sector at offset 0x00021000
[00:02:04.893,188] <inf> download_client: Downloaded 139264/201232 bytes (69%)
[00:02:04.938,720] <inf> fota_flash_block: Erasing sector at offset 0x00022000
[00:02:05.933,013] <inf> download_client: Downloaded 143360/201232 bytes (71%)
[00:02:05.978,546] <inf> fota_flash_block: Erasing sector at offset 0x00023000
...
[00:05:20.585,266] <inf> aws_fota: Firmware download completed
When the kit resets, observe that the sample prints the new application version.
Log on to the AWS IoT console, go to Manage -> Things, and select your thing.
Go to Shadow and confirm that the application version has updated.
Troubleshooting
- ERROR: mqtt_connect -45:
Error -45 (“operation is not supported on socket”) indicates an error with the configured certificates. Check that you added the certificates correctly in
certificates.hand that you did not mix up the different certificates. Certificates must be formatted correctly, without extra whitespace.- Content range is not defined:
If you host the firmware image on a different server than in an S3 bucket, this error indicates that the Content-Range field is missing in the HTTP GET header. To fix this problem, configure the host server to provide this field. If you are using an S3 bucket, make sure that you have configured it as described in Setting up an AWS S3 bucket. Also, confirm that your file is available from the browser without being logged into your AWS account.
Dependencies
This sample uses the following nRF Connect SDK libraries:
It uses the following sdk-nrfxlib library:
It uses the following Zephyr library:
In addition, it uses the following sample: