On Windows, because of the Windows path length limitations, the build can fail with errors related to permissions or missing files if some paths in the build are too long.
To avoid this issue, shorten the build folder name, for example, from build_nrf5340dk_nrf5340_cpuapp_ns to build, or shorten the path to the build folder in some other way.
The nRF Connect for Visual Studio Code extension is a complete IDE for developing applications for nRF91, nRF53 and nRF52 Series devices. This includes an interface to the compiler and linker, an RTOS-aware debugger, a seamless interface to the nRF Connect SDK, and a serial terminal. For detailed instructions, see the nRF Connect for Visual Studio Code documentation site.
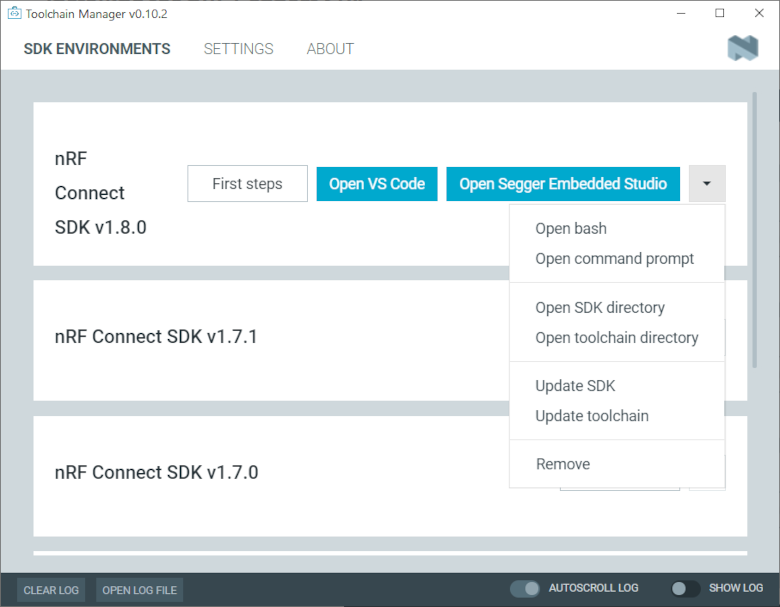
If you have installed the nRF Connect SDK using the Toolchain Manager, click the Open Segger Embedded Studio button next to the version you installed to start SES.
If you have installed SES manually, run the emStudio executable file from the bin directory.
The Toolchain Manager options after installing the nRF Connect SDK version
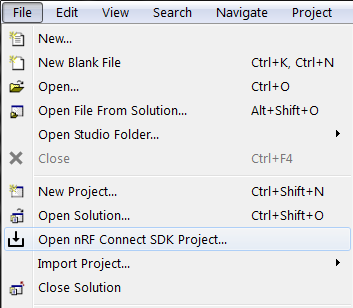
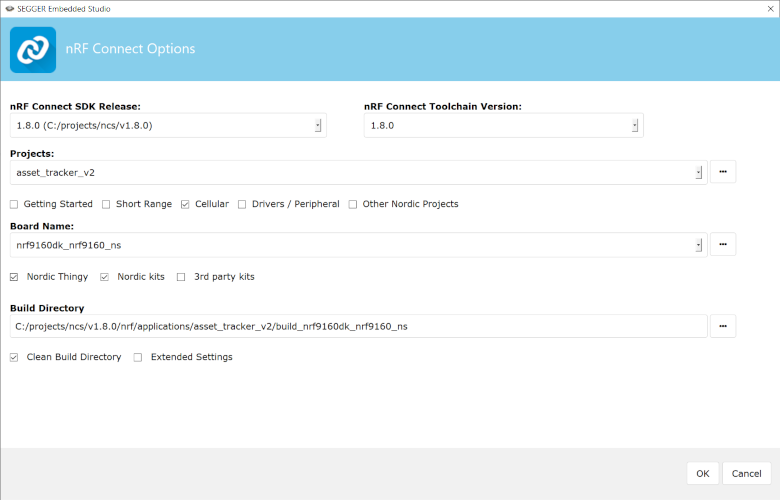
To add a project to SES, you must specify the following information:
nRF Connect SDK Release - Select the nRF Connect SDK version that you want to work with.
The drop-down list contains the current version of all nRF Connect SDK installation directories that SES knows about.
To add a missing nRF Connect SDK installation directory to that list, run westzephyr-export in the installation repository or define the Zephyr base to point to the directory (see Set up the build environment in SES).
nRF Connect Toolchain Version - If you used the Toolchain Manager to install the nRF Connect SDK, select the version of the toolchain that works with the selected nRF Connect SDK version.
Otherwise, select NONE and make sure that your SES environment is configured correctly (see Set up the build environment in SES).
Note
The drop-down list contains only toolchain versions that are compatible with the selected nRF Connect SDK version.
Projects - Select the project that you want to work with.
The drop-down list contains a selection of applications from the sdk-nrf and sdk-zephyr repositories.
Select any of the checkboxes underneath to add the applications from that area to the drop-down list.
To add projects to the drop-down list, for example, your own custom projects, click … and select the folder that contains the projects that you want to add.
Board Name - Select the board that you want to work with.
The drop-down list contains the build targets for all Nordic Semiconductor boards that are defined in the sdk-nrf and sdk-zephyr repositories.
Select any of the checkboxes underneath to add the build targets from that area to the drop-down list.
To add build targets to the drop-down list, for example, targets for your own custom board, click … and select the folder that contains the board definitions.
Build Directory - Select the folder in which to run the build.
The field is filled automatically based on the selected board name, but you can specify a different directory.
Clean Build Directory - Select this option to ensure that you are not building with an outdated build cache.
Extended Settings - Select this option to display a field where you can specify additional CMake options to be used for building.
See Providing CMake options.
The following figure shows an example configuration for the Asset Tracker v2 application built for the nrf9160dk_nrf9160_ns build target:
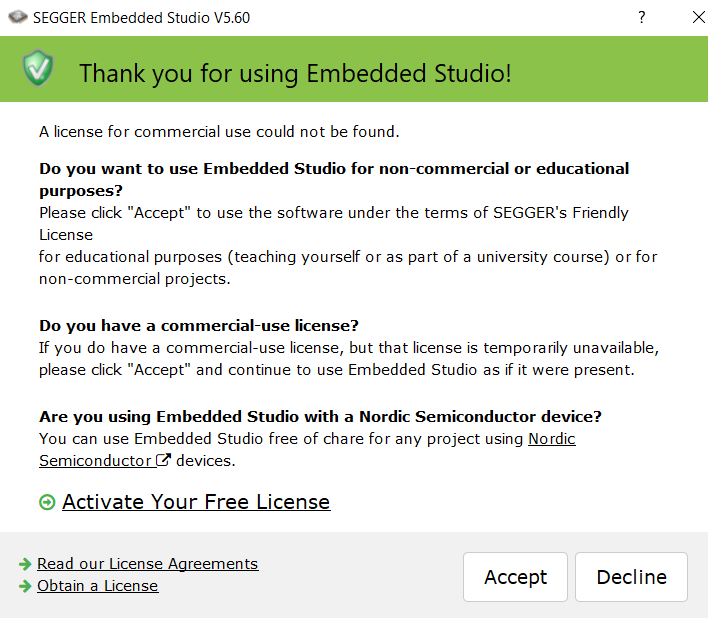
If you are adding the project for the first time, you need to request and activate a license.
The following notification appears after you click OK to add the project to SES:
This issue might be caused by a variety of problems, such as incorrectly specified project file paths.
SES helps you to identify the source of the issue by providing a text output with detailed information about the error.
Make sure to click OK on the error pop-up message and then inspect the text output in SES.
Build and program your project.
The required steps differ depending on if you build a single application or a multi-image project (such as the nRF9160 samples, which include SPM).
Important
If you are working with an nRF9160 DK, make sure to select the correct controller before you program the application to your development kit.
Set the SW10 switch (marked debug/prog) in the NRF91 position to program the main controller, or in the NRF52 position to program the board controller.
In nRF9160 DK v0.9.0 and earlier, the switch is called SW5.
See the Device programming section in the nRF9160 DK User Guide for more information.
To build and program an application:
Select your project in the Project Explorer.
The project name displays in bold when it is selected.
From the menu, select Build > Build Solution.
Alternatively, if you are working with a single-image application, you can choose the Build and Debug option that builds the application and programs it to a connected development kit when the build has completed.
When the build completes, you can program the application to a connected development kit:
For a single-image application, select Target > Download zephyr/zephyr.elf.
For a multi-image application, depending on your build target:
If you are programming a SoC from the nRF53 Series and you also need to update the network core, you must add the network core project in SEGGER Embedded Studio and complete the additional steps, as described in the Multi-image build section of Working with nRF5340 DK.
This is because programming the merged.hex file at this stage updates only the application core.
If you are not programming an nRF53 Series SoC or you do not need to update the network core, select Target > Download zephyr/merged.hex.
If a “Project out-of-date” warning appears, click No to ignore it and leave the option to show the dialog again selected:
If you click Yes and disable the option to show the dialog again, you will enter a loop because of a “no input files” error.
To restore the default settings, select Tools > Options > Building and set Confirm Automatically Build Before Debug to Yes.
To inspect the details of the code that was programmed and the memory usage, click Debug > Go.
Note
In a multi-image build, this allows you to debug the source code of your application only.
If you get an error that a tool or command cannot be found, first make sure that the tool is installed.
If it is installed, verify that its location is correct in the PATH variable or, if applicable, in the SES settings.
Go to the specific application directory.
For example, to build the nRF9160: AT Client sample, run the following command to navigate to its directory:
cd nrf/samples/nRF9160/at_client
Build the application using the west command.
The build target is specified by the parameter build_target in the west command as follows:
west build -b build_target
Note
You can run the west command with optional parameters:
directory_name - To build from a directory other than the application directory, use directory_name to specify the application directory.
build_target@board_revision - To get extra device tree overlays with new features available for a board version.
The board_revision is printed on the label of your DK, just below the PCA number.
For example, if you run the west build command with an additional parameter @1.0.0 for nRF9160 build target, it adds the external flash on the nRF9160 DK that was available since board version 0.14.0.
For more information on other optional build parameters, run the westbuild-h help text command.
See Board names for more information on the supported boards and build targets.
To reuse an existing build directory for building another application for another board or build target, pass -p=auto to westbuild.
If you want to configure your application, run the following west command:
After running the westbuild command, the build files can be found in build/zephyr.
For more information on the contents of the build directory, see Build Directory Contents.
Important
If you are working with an nRF9160 DK, make sure to select the correct controller before you program the application to your development kit.
Set the SW10 switch (marked debug/prog) in the NRF91 position to program the main controller, or in the NRF52 position to program the board controller.
In nRF9160 DK v0.9.0 and earlier, the switch is called SW5.
See the Device programming section in the nRF9160 DK User Guide for more information.
Connect the development kit to your PC using a USB cable.
Note
To program the nRF52840 Dongle instead of a development kit, skip the following instructions and follow the programming instructions in nRF52840 Dongle.
Power on the development kit.
Program the application to the kit using the following command:
west flash --erase
This command clears the full flash memory before programming, which is the recommended approach.
If the application depends on other flash memory areas (for example, if it uses the Settings partition where bonding information is stored), erasing the full kit before programming ensures that these areas are updated with the new content.
As an alternative, you can also clear only those flash memory pages that are to be overwritten with the new application.
With such approach, the old data in other areas will be retained.
To erase only the areas of flash memory that are required for programming the new application, use the following command:
west flash
The westflash command automatically resets the kit and starts the application.
For more information on building and programming using the command line, see the Zephyr documentation on Building, Flashing and Debugging.