Modifying an application
For simplicity, this guide will refer to both samples and applications as “applications”.
After programming and testing an application, you probably want to make some modifications to the application, for example, add your own files with additional functionality, change compilation options, or update the default configuration.
Adding files and changing compiler settings
The nRF Connect SDK build system is based on Zephyr, whose build system is based on CMake. For more information about how the build system works in Zephyr, see Build and Configuration Systems and Application Development in the Zephyr documentation.
In the nRF Connect SDK, the application is a CMake project.
As such, the application controls the configuration and build process of itself, Zephyr, and sourced libraries.
The application’s CMakeLists.txt file is the main CMake project file and the source of the build process configuration.
Zephyr provides a CMake package that must be loaded by the application into its CMakeLists.txt file.
When loaded, the application can reference items provided by both Zephyr and the nRF Connect SDK.
Loading Zephyr’s CMake package creates the app CMake target.
You can add application source files to this target from the application CMakeLists.txt file.
To update the CMakeLists.txt file, either edit it directly or use SEGGER Embedded Studio (SES) to maintain it.
Editing CMakeLists.txt directly
You can add source files to the app CMake target with the target_sources() function provided by CMake.
Pay attention to the following configuration options:
If your application is complex, you can split it into subdirectories. These subdirectories can provide their own
CMakeLists.txtfiles.The build system searches for header files in include directories. Add additional include directories for your application with the
target_include_directories()function provided by CMake. For example, if you want to include anincdirectory, the code would look like the following:target_include_directories(app PRIVATE inc)
See the CMake documentation and Build System (CMake) in the Zephyr documentation for more information about how to edit CMakeLists.txt.
Maintaining CMakeLists.txt in SES
You must tag the CMakeLists.txt files properly before adding them to a project in SES.
Projects in the sdk-nrf repository already have these tags, but projects from Zephyr and other repositories do not.
Follow the steps in SES tags in CMakeLists.txt to manually add tags when using CMakeLists.txt files that are not located in the sdk-nrf repository.
To add a file in SES, right-click Project ‘app/libapp.a’ in the Project Explorer. Select either Add new file to CMakeLists.txt to create a file and add it or Add existing file to CMakeLists.txt to add a file that already exists.
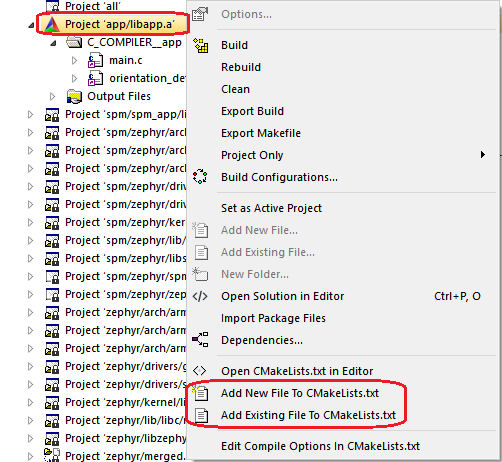
Adding files in SES
To edit compilation options in SES, right-click Project ‘app/libapp.a’ in the Project Explorer and select Edit Compile Options in CMakeLists.txt.
In the window that is displayed, you can define compilation options for the project.
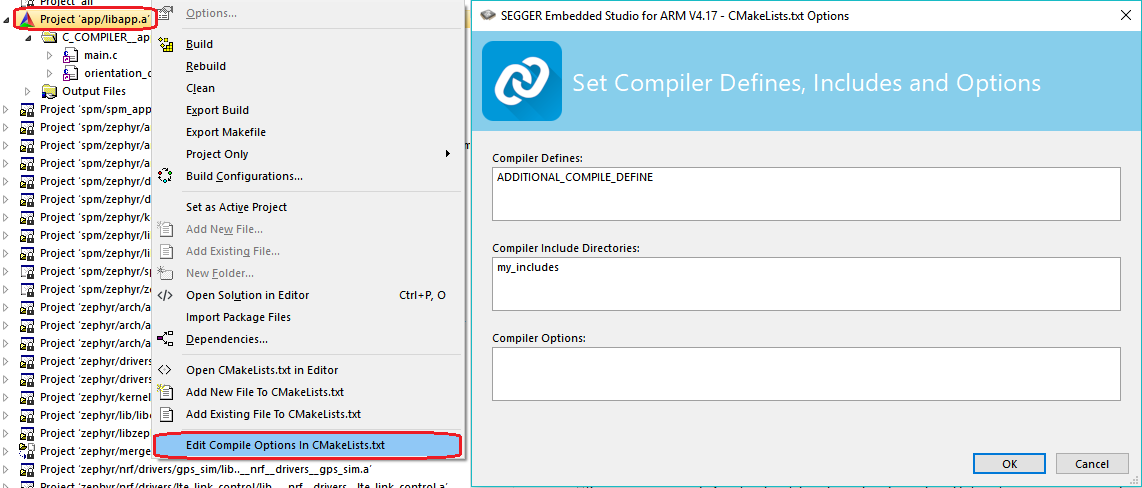
Setting compiler defines, includes, and options in SES
Note
These compilation options apply to the application project only. To manage Zephyr and other subsystems, go to Project > Configure nRF Connect SDK Project.
Advanced compiler settings
The application has full control over the build process.
Using Zephyr’s configuration options is the standard way of controlling how the system is built.
These options can be found under Zephyr’s menuconfig Build and Link Features > Compiler Options.
For example, to turn off optimizations, select CONFIG_NO_OPTIMIZATIONS.
Compiler options not controlled by the Zephyr build system can be controlled through the CONFIG_COMPILER_OPT Kconfig option.
Configuring your application
You might want to change the default options of the application. There are different ways of doing this, but not all will store your configuration permanently.
Configuration system overview
Zephyr and the nRF Connect SDK use several configuration systems, each system with a specialized syntax and purpose.
The nRF Connect SDK consists of the following configuration sources:
Devicetree source (DTS) files for hardware-related options.
Kconfig files for software-related options.
Partition Manager files for memory layout configuration. This is an nRF Connect SDK configuration system that is not available in Zephyr.
To read more about Zephyr’s configuration system, see Build and Configuration Systems in the Zephyr documentation.
Memory layout configuration
The Partition Manager is specific to the nRF Connect SDK. If enabled, it provides the memory layout configuration. The layout is impacted by various elements, such as Kconfig configuration options or the presence of child images. Partition Manager ensures that all required partitions are in the correct place and have the correct size.
If enabled, the memory layout can be controlled in the following ways:
Dynamically (default) - In this scenario, the layout is impacted by various elements, such as Kconfig configuration options or the presence of child images. Partition Manager ensures that all required partitions are in the correct place and have the correct size.
Statically - In this scenario, you need to provide the static configuration. See Static configuration for information about how to do this.
After CMake has run, a single partitions.yml file with the complete memory layout will have been created in the build directory.
This process also creates a set of header files that provides defines, which can be used to refer to memory layout elements.
For more information, see Partition Manager.
Child images
The nRF Connect SDK build system allows the application project to become a root for the sub-applications known in the nRF Connect SDK as child images. Examples of child images are bootloader images, network core images, or security-related images. Each child image is a separate application.
For more information, see Multi-image builds.
Changing the configuration temporarily
When building your application, the different .config, *_defconfig files and the prj.conf file are merged together and then processed by Kconfig.
The resulting configuration is written to the zephyr/.config file in your build directory.
This means that this file is available when building the application, but it is deleted when you clean the build directory with the pristine target (see Zephyr’s Rebuilding an Application for more information).
To quickly test different configuration options, or to build your application in different variants, you can update the .config file in the build directory.
Changes are picked up immediately, and you do not need to re-open the project in SES.
While it is possible to edit the .config file directly, you should use SES or a tool like menuconfig or guiconfig to update it.
These tools present all available options and allow you to select the ones that you need.
To edit the file in SES, select Project > Configure nRF Connect SDK Project. If your application contains more than one image (see Multi-image builds), you must select the correct target. To configure the parent image (the main application), select menuconfig. The other options allow you to configure the child images.
See Interactive Kconfig interfaces in the Zephyr documentation for instructions on how to run menuconfig or guiconfig.
To locate a specific configuration option, use the filter (Jump to in menuconfig and guiconfig). The documentation for each configuration option also lists the menu path where the option can be found.
Changing the configuration permanently
To configure your application and maintain the configuration when you clean the build directory pristinely, you need to specify the configuration in one of the permanent configuration files.
This will be either the default prj.conf file of the application or an extra Kconfig fragment.
In these files, you can specify different values for configuration options that are defined by a library or board, and you can add configuration options that are specific to your application.
See Setting Kconfig configuration values in the Zephyr documentation for information on how to change the configuration permanently.
Tip
Reconfiguring through menuconfig only changes the specific setting and the invisible options that are calculated from it.
It does not adjust visible symbols that have already defaulted to a value even if this default calculation is supposed to be dependent on the changed setting.
This may result in a bloated configuration compared to changing the setting directly in prj.conf.
See the section Stuck symbols in menuconfig and guiconfig on the Kconfig - Tips and Best Practices in the Zephyr documentation for more information.
If you work with SES, the prj.conf file is read when you open a project.
The file will be reloaded when CMake re-runs.
This will happen automatically when the application is rebuilt, but can also be requested manually by using the Project > Run CMake… option.
Configuring in the VS Code extension
The nRF Connect for Visual Studio Code extension lets you modify your build configuration for custom boards, add additional CMake build arguments, select Kconfig fragments, and more. For detailed instructions, see the nRF Connect for Visual Studio Code documentation site.
Providing CMake options
You can provide additional options for building your application to the CMake process, which can be useful, for example, to switch between different build scenarios. These options are specified when CMake is run, thus not during the actual build, but when configuring the build.
If you work with SES, you can specify global CMake options that are used for all projects, and you can modify these options when you open a project:
Specify global CMake options in the SES options before opening a project. Click Tools > Options, select the nRF Connect tab, and specify a value for Additional CMake options.
Specify project-specific CMake options when opening the nRF Connect SDK project. Click File > Open nRF Connect SDK project, select Extended Settings, and specify the options in the Extra CMake Build Options field. This field is prepopulated with the global CMake options, and you can modify them, remove them, or add to them for the current project.
If you work on the command line, pass the additional options to the west build command.
The options must be added after a -- at the end of the command.
See One-Time CMake Arguments for more information.
Configuring build types
When the CONF_FILE variable contains a single file and this file follows the naming pattern prj_<buildtype>.conf, then the build type will be inferred to be <buildtype>.
The build type cannot be set explicitly.
The <buildtype> can be any string, but it is common to use release and debug.
For information about how to set variables, see Important Build System Variables in the Zephyr documentation.
The Partition Manager’s static configuration can also be made dependent on the build type.
When the build type has been inferred, the file pm_static_<buildtype>.yml will have precedence over pm_static.yml.
The child image Kconfig configuration can also be made dependent on the build type.
The child image Kconfig file is named <child_image>.conf instead of prj.conf, but otherwise follows the same pattern as the parent Kconfig.
The Devicetree configuration is not affected by the build type.
Note
For an example of an application that is using build types, see the nRF Desktop application (nRF Desktop build types) or the nRF Machine Learning application (nRF Machine Learning build types).
Selecting a build type in the VS Code extension
To select the build type in the nRF Connect for Visual Studio Code extension:
When Building an application as described in the nRF Connect for Visual Studio Code extension documentation, follow the steps for setting up the build configuration.
In the Add Build Configuration screen, select the desired
.conffile from the Configuration drop-down menu.Fill in other configuration options, if applicable, and click Build Configuration.
Selecting a build type in SES
To select the build type in SEGGER Embedded Studio:
Go to File > Open nRF Connect SDK project, select the current project, and specify the board name and build directory.
Select Extended Settings.
In the Extra CMake Build Options field, specify
-DCONF_FILE=prj_<buildtype>.conf, where <buildtype> in the file name corresponds to the desired build type. For example, for a build type namedrelease, set the following value:-DCONF_FILE=prj_release.conf.Do not select Clean Build Directory.
Click OK to re-open the project.
Note
You can also specify the build type in the Additional CMake Options field in Tools > Options > nRF Connect. However, the changes will only be applied after re-opening the project. Reloading the project is not sufficient.
Selecting a build type from command line
To select the build type when building the application from command line, specify the build type by adding the following parameter to the west build command:
-- -DCONF_FILE=prj_selected_build_type.conf
For example, you can replace the selected_build_type variable to build the release firmware for nrf52840dk_nrf52840 by running the following command in the project directory:
west build -b nrf52840dk_nrf52840 -d build_nrf52840dk_nrf52840 -- -DCONF_FILE=prj_release.conf
The build_nrf52840dk_nrf52840 parameter specifies the output directory for the build files.