Getting started with nRF7002 EK
This section gets you started with your nRF7002 Evaluation Kit (EK) using the nRF Connect SDK.
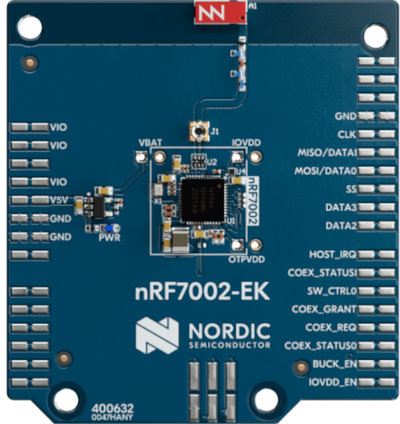
The nRF7002 EK is a versatile evaluation kit in the form of an Arduino shield. The kit can be used to provide Wi-Fi® connectivity and Wi-Fi-based locationing to compatible development or evaluation boards through the nRF7002 Wi-Fi 6 companion IC.
The nRF7002 EK features the nRF7002 companion IC. In addition, the shield may be used to emulate the nRF7001 and nRF7000 companion IC variants.
If this is your first time developing with a Nordic Semiconductor DK, read the appropriate getting started tutorial first:
Overview
The nRF7002 EK (PCA63556) is designed to provide Wi-Fi connectivity and Wi-Fi (SSID) scanning capabilities through the nRF7002 companion IC to a compatible host development board.
The nRF7002 EK features an Arduino shield form factor and interface connector that allows it to be used with Arduino compatible boards, such as the nRF52840 DK, nRF5340 DK, nRF9160 DK, or nRF9161 DK. This interface is used to connect the nRF7002 companion device to a host System on Chip (SoC), Microprocessor Unit (MPU), or Microcontroller Unit (MCU).

nRF7002 EK
Pin assignment for Arduino interface connector
The Arduino interface of the nRF7002 EK is compatible with the nRF52840 DK, the nRF5340 DK, and an nRF91 Series DK. The interface connectors are described in the following table:
Arduino pin name |
nRF7002 Signal |
Function |
|---|---|---|
D0 |
IOVDD_EN |
Enable power to I/O interface |
D1 |
BUCK_EN |
Enable power to nRF7002 |
D2 |
COEX_STATUS0 |
Coexistence status 0 |
D3 |
COEX_REQ |
Coexistence request from host |
D4 |
COEX_GRANT |
Coexistence grant to host |
D5 |
SW_CTRL0 |
Switch control 0 |
D6 |
COEX_STATUS1 |
Coexistence status 1 |
D7 |
HOST_IRQ |
Interrupt request to host |
D8 |
DATA2 |
QSPI data line 2 |
D9 |
DATA3 |
QSPI data line 3 |
D10 |
SS |
Slave select |
D11 |
MISO/DATA1 |
QSPI/SPI Data line 1/ Slave Out |
D12 |
MOSI/DATA0 |
QSPI/SPI Data line 0/ Slave In |
D13 |
CLK |
QSPI/SPI Clock |
GND |
GND |
Ground |
AREF |
N.C. |
Not used |
SDA |
N.C. |
Not used |
SCL |
N.C. |
Not used |
Note
UART1 cannot be used and must be disabled on the nRF9160 DK, as UART1 RXD and TXD conflict with pins P0.00 and P0.01 (Arduino pins D0 and D1).
These correspond to the IOVDD-CTRL-GPIOS and BUCKEN-GPIOS signals in the nRF7002 EK, respectively.
For an nRF7002 EK connected to an nRF9160 DK, you can find example overlays at the following paths:
sdk-nrf/boards/shields/nrf7002ek/boards/nrf9160dk_nrf9160_ns.overlaysdk-nrf/samples/cellular/lwm2m_client/boards/nrf9160dk_with_nrf7002ek.overlay
Minimum requirements
Make sure you have all the required hardware and that your computer and mobile device both have one of the supported operating systems.
Hardware
One of the following development kits:
nRF52840 DK
nRF5340 DK
nRF9160 DK
nRF9161 DK
nRF7002 EK
A suitable battery
Micro-USB 2.0 cable
USB-C charger
Jumper wires
Software
On your computer, one of the following operating systems:
Microsoft Windows
macOS
Ubuntu Linux
The operating system versions that support the nRF Connect SDK tools are listed in the Supported operating systems section.
Installing the required software
Install nRF Connect for Desktop. After installing and starting the application, install the Programmer app.
Building and programming
To add support for the nRF7002 EK on an application running on a compatible host development board, the SHIELD setting must be specified.
To add support for the nRF7002 EK and the nRF7002 IC, set -DSHIELD=nrf7002ek when you invoke west build or cmake in your nRF Connect SDK application.
To emulate support for the nRF7001 or nRF7000 ICs, specify -DSHIELD=nrf7002ek_nrf7001 or -DSHIELD=nrf7002ek_nrf7000, respectively.
Alternatively, add the shield in the project’s CMakeLists.txt file, specifying the below settings, depending on which IC is to be used:
set(SHIELD nrf7002ek)
set(SHIELD nrf7002ek_nrf7001)
set(SHIELD nrf7002ek_nrf7000)
To build with the nRF Connect for VS Code extension, specify -DSHIELD=nrf7002ek in the Extra CMake arguments field.
See Providing CMake options for instructions on how to provide CMake options.
To build for the nRF7002 EK and the nRF7002 IC with nRF5340 DK, use the nrf5340dk/nrf5340/cpuapp build target with the CMake SHIELD variable set to nrf7002ek.
For example, you can use the following command when building on the command line:
west build -b nrf5340dk/nrf5340/cpuapp -- -DSHIELD=nrf7002ek
To build for the nRF7002 EK and the nRF7001 or nRF7000 ICs, you can use the corresponding shield name in the above command.
Next steps
You have now completed getting started with the nRF7002 EK. See the following links for where to go next:
Installation and Configuration and building documentation to install the nRF Connect SDK and learn more about its development environment.
The EK User Guide for detailed information related to the nRF7002 EK.
