Getting started with nRF7002 EB
This section gets you started with your nRF7002 Expansion Board (EB) using the nRF Connect SDK.
The nRF7002 EB can be used to provide Wi-Fi® connectivity to compatible development or evaluation boards through the nRF7002 Wi-Fi 6 companion IC.
The nRF7002 EB has a Printed Circuit Board (PCB) edge connector that can be used with a compatible development board such as the Nordic Thingy:53, an IoT prototyping platform from Nordic Semiconductor. There are also castellated holes on the side of the board that allow the EB to be used as a breakout board that can be soldered to other PCB assemblies.
If this is your first time developing with a Nordic Semiconductor DK, read the appropriate getting started tutorial first:
Overview
The nRF7002 EB (PCA63561) features a PCB edge connector and castellated holes to provide Wi-Fi connectivity through the nRF7002 companion IC.
The PCB edge connector is used to provide Wi-Fi connectivity to a development board with a compatible connector such as the Nordic Thingy:53, where it connects nRF7002 to nRF5340, which acts as a host. The EB can also be used to provide Wi-Fi capabilities to develop Wi-Fi applications with another System on Chip (SoC), MPU, or MCU host by using the castellated edge holes on the sides of the board.

nRF7002 EB
Pin assignment for PCB edge connector
The pinout of the PCB edge connector is shown in the following table.
Pin number |
Signal |
Function |
|---|---|---|
1 |
N.C. |
Not used |
2 |
N.C. |
Not used |
3 |
VIO |
IO supply voltage |
4 |
N.C. |
Not used |
5 |
ST0 |
Coexistence Interface Status/Priority signal |
6 |
REQ |
Coexistence Interface Request signal |
7 |
N.C. |
Not used |
8 |
CLK |
SPI Clock signal |
9 |
EN |
Power Enable signal |
10 |
N.C. |
Not used |
11 |
N.C. |
Not used |
12 |
N.C. |
Not used |
13 |
N.C. |
Not used |
14 |
VBAT |
Supply voltage |
15 |
GRT |
Coexistence Interface Grant signal |
16 |
D0 |
SPI MOSI signal |
17 |
D1 |
SPI MISO signal |
18 |
CS |
SPI Chip Select signal |
19 |
IRQ |
Host Interrupt signal |
20 |
GND |
Ground |
Castellated edge holes
Castellated edge holes on the sides of the board connects the nRF7002 EB to the nRF7002 companion IC. The following figure and table show the pinout for the nRF7002 EB.
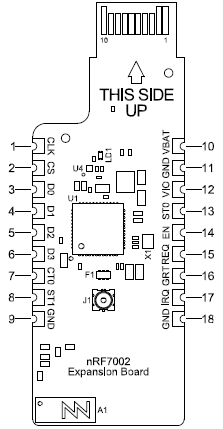
Castellated edge hole numbering
Pin number |
Signal |
Function |
|---|---|---|
1 |
CLK |
QSPI Clock/SPI Clock signal |
2 |
SS |
QSPI Slave Select/SPI Chip Select signal |
3 |
D0 |
QSPI DATA0/SPI_MOSI signal |
4 |
D1 |
QSPI DATA1/ SPI_MISO signal |
5 |
D2 |
QSPI DATA2 signal |
6 |
D3 |
QSPI DATA3 signal |
7 |
CT0 |
SW_CTRL0 (not supported on the nRF7002 EB) |
8 |
ST1 |
SW_CTRL1 |
9 |
GND |
Ground |
10 |
VBAT |
Supply voltage |
11 |
GND |
Ground |
12 |
VIO |
IO supply voltage |
13 |
ST0 |
Coexistence Interface Status/Priority signal |
14 |
EN |
Power Enable signal |
15 |
REQ |
Coexistence Interface Request signal |
16 |
GRT |
Coexistence Interface Grant signal |
17 |
IRQ |
Host Interrupt signal |
18 |
GND |
Ground |
Minimum requirements
Make sure you have all the required hardware and that your computer and mobile device both have one of the supported operating systems.
Hardware
Nordic Thingy:53
nRF7002 EB
A suitable battery
Micro-USB 2.0 cable
USB-C charger
Jumper wires
Software
On your computer, one of the following operating systems:
Microsoft Windows
macOS
Ubuntu Linux
The operating system versions that support the nRF Connect SDK tools are listed in the Supported operating systems section.
Installing the required software
Install nRF Connect for Desktop. After installing and starting the application, install the Programmer app.
Building and programming
To build for the nRF7002 EB with Thingy:53, use the thingy53_nrf5340_cpuapp build target with the CMake SHIELD variable set to nrf7002eb.
For example, you can use the following command when building on the command line:
west build -b thingy53_nrf5340_cpuapp -- -DSHIELD=nrf7002eb
To build for a custom target, set -DSHIELD=nrf7002eb when you invoke west build or cmake in your nRF Connect SDK application.
Alternatively, add the shield in the project’s CMakeLists.txt file by using the following command:
set(SHIELD nrf7002eb)
To build with the nRF Connect for VS Code extension, specify -DSHIELD=nrf7002eb in the Extra Cmake arguments field.
See Providing CMake options for instructions on how to provide CMake options.
Next steps
You have now completed getting started with the nRF7002 EB. See the following links for where to go next:
Installation and Configuration and building documentation to install the nRF Connect SDK and learn more about its development environment.
The EB User Guide for detailed information related to the nRF7002 EB.