nRF9160: HTTP application update
The HTTP application update sample demonstrates how to do a basic firmware over-the-air (FOTA) update. It uses the FOTA download library to download two image files from a remote server and program them to flash memory.
Requirements
The sample supports the following development kit:
Hardware platforms |
PCA |
Board name |
Build target |
|---|---|---|---|
PCA10090 |
|
The sample also requires two signed firmware images that have to be available for download from an HTTP server. The images are generated automatically when building the sample, but you must upload them to a server and configure the location from where they can be downloaded.
Overview
The sample connects to an HTTP server to download one of two signed firmware images:
One image has the
application versionset to1.The other has the
application versionset to2.
The sample updates between the two images, either from version 1 to version 2 or from version 2 to version 1.
By default, the images are saved to the MCUboot second-stage bootloader secondary slot. To be used by MCUboot, the downloaded images must be signed using imgtool.
Building and running
This sample can be found under samples/nrf9160/http_update/application_update in the nRF Connect SDK folder structure.
See Building and programming an application for information about how to build and program the application.
The sample is configured to compile and run as a non-secure application on nRF91’s Cortex-M33. Therefore, it automatically includes the Secure Partition Manager that prepares the required peripherals to be available for the application.
You can also configure it to use TF-M instead of Secure Partition Manager.
Specifying the image files
Before building the sample, you must specify where the image files are located. If you do not want to host the files yourself, you can upload them to a public S3 bucket on Amazon Web Services (AWS).
Two options configure the names of the updated image files:
CONFIG_DOWNLOAD_FILE_V1- it configures the file name of the version 1 of the update image.CONFIG_DOWNLOAD_FILE_V2- it configures the file name of the version 2 of the update image.
To set these Kconfig options, follow these steps:
Select Project > Configure nRF Connect SDK Project.
Navigate to HTTP application update sample and specify both the download hostname (
CONFIG_DOWNLOAD_HOST) and the names of the files that have to be downloaded (CONFIG_DOWNLOAD_FILE_V1andCONFIG_DOWNLOAD_FILE_V2).Click Configure to save the configuration.
Locate your
prj.confproject configuration file.Change the
CONFIG_DOWNLOAD_HOSToption to indicate the hostname of the server where the image file is located (for examplewebsite.net).Change the
CONFIG_DOWNLOAD_FILE_V1andCONFIG_DOWNLOAD_FILE_V2options to indicate the names and paths of the image files (for exampledownload/app_update.bin).
You can then use the prj.conf project configuration file in your builds from the command line or using the nRF Connect for Visual Studio Code extension.
See the Building and running section for more information.
If you do not want to host the image file, you can also upload it to a public S3 bucket on Amazon Web Services (AWS).
Setting up an AWS S3 bucket
The firmware files for download must be stored in a bucket on an AWS S3 server. To do this, set up your own bucket.
When setting up your own bucket, make sure to configure the permissions as shown in the following screenshot:
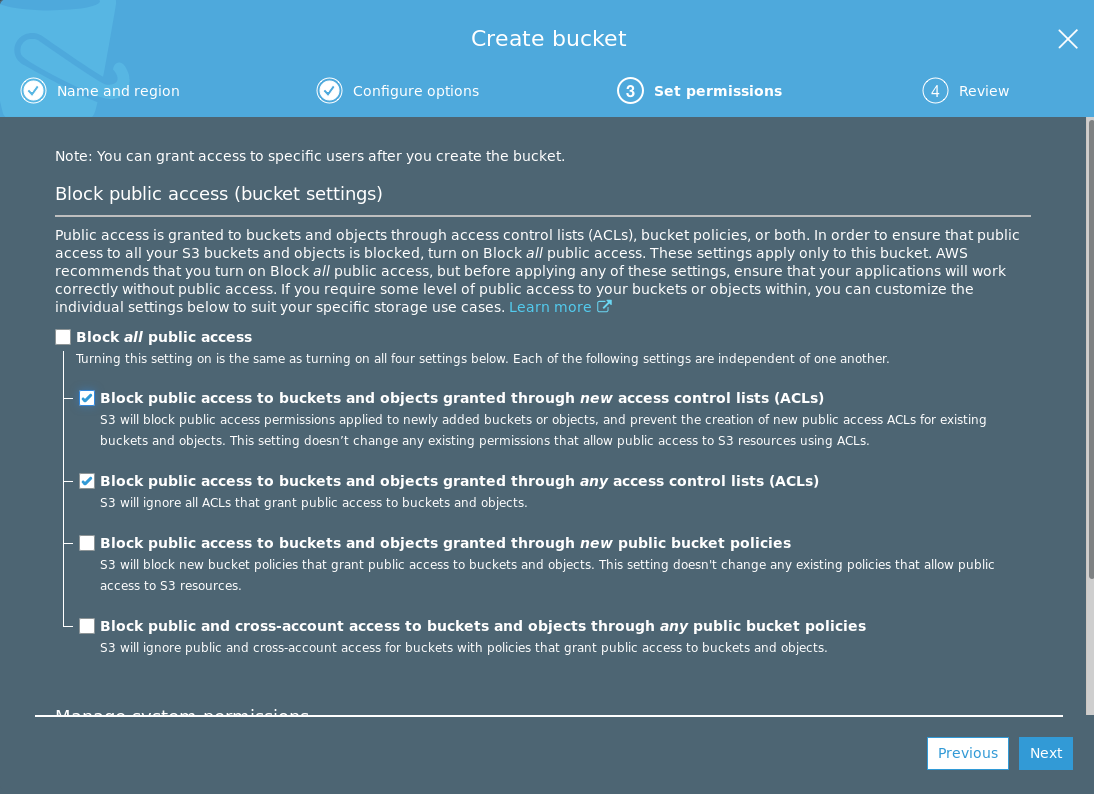
To update the permissions for an existing bucket, select your bucket and navigate to Permissions > Block public access.
In addition to the permissions, you must configure a bucket policy. To determine a suitable security scheme for your application, see AWS S3 Developer Guide: Using Bucket Policies and User Policies and AWS S3 Developer Guide: Bucket Policy Examples. To configure the policy, select your bucket and navigate to Permissions > Bucket Policy.
For testing purposes, you can use the following, very permissive, bucket policy (replace bucket_name with the name of your bucket):
{    "Version": "2012-10-17",
     "Statement": [
         {
             "Effect": "Allow",
             "Principal": "*",
             "Action": "s3:GetObject",
             "Resource": "arn:aws:s3:::bucket_name/*"
         }
      ]
 }
Hosting your image on an AWS S3 Server
To upload the file to a public S3 bucket, perform the following steps:
Go to AWS S3 console and sign in.
Go to the bucket you have created.
Click Upload and select the file
app_update.bin. It is located in thezephyrsubfolder of your build directory.Click the file you uploaded in the bucket and check the Object URL field to find the download URL for the file.
Remember to do the following when specifying the filenames:
Use the
<bucket-name>.s3.<region>.amazonaws.compart of the URL as the hostname of the server hosting the images, without includinghttps://.Specify the file names as the remaining part of the URL.
Follow the steps mentioned in the Specifying the image files section to upload both images.
Testing
After programming the sample to your development kit, test it by performing the following steps:
Upload the file
app_update.binwith the application image version 1 to the server you have chosen. To upload the file on nRF Connect for Cloud, click Upload for the firmware URL that you generated earlier, then select the fileapp_update.binand upload it. Remember to rename the file to match theCONFIG_DOWNLOAD_FILE_V1configuration option.Configure the application image version to be 2 and rebuild the application.
Upload the file
app_update.binwith the application image version 2 to the server you have chosen.Reset your nRF9160 DK to start the application.
Open a terminal emulator and observe that an output similar to the following is printed:
SPM: prepare to jump to Non-Secure image
***** Booting Zephyr OS v1.13.99 *****
Observe that LED 1 is lit. This indicates that version 1 of the application is running.
Press Button 1 on the nRF9160 DK or type “download” in the terminal emulator to start the download process, and wait until
Download completeis printed in the terminal.Press the RESET button on the kit or type “reset” in the terminal emulator. MCUboot will now detect the downloaded image and program it to flash memory. This can take up to a minute. Nothing is printed in the terminal while the writing is in progress.
Observe that LED 1 and LED 2 are lit. This indicates that version 2 or higher of the application is running.
You can now downgrade the application by repeating the button presses or typing “download” in the terminal emulator. Observe that after the second update only LED 1 is lit. This indicates that the application image has been downgraded to version 1. Any further updates will toggle between the versions.
Dependencies
This sample uses the following nRF Connect SDK libraries:
It uses the following sdk-nrfxlib library:
It uses the following Zephyr libraries:
It also uses the MCUboot bootloader.