Bluetooth Fast Pair: Locator tag
This sample demonstrates how to use Google Fast Pair with the nRF Connect SDK to create a locator tag device that is compatible with the Android Find My Device app. Locator tag is a small electronic device that can be attached to an object or a person, and is designed to help locate them in case they are missing.
Google Fast Pair Service (GFPS) is a standard for pairing Bluetooth® and Bluetooth LE devices with as little user interaction required as possible. Google Fast Pair standard also supports the Find My Device Network (FMDN) extension that is the main focus of this sample demonstration. For detailed information, see the official Fast Pair Find My Device Network extension documentation.
This sample follows the Fast Pair Device Feature Requirements for Locator Tags documentation and uses the Fast Pair configuration for the locator tag use case. The software maturity level for the locator tag use case is outlined in the Google Fast Pair use case support table.
Requirements
The sample supports the following development kits:
Hardware platforms |
PCA |
Board name |
Board target |
|---|---|---|---|
PCA20053 |
|
||
PCA10156 |
|
||
PCA10095 |
|
||
PCA10040 |
|
||
PCA10056 |
|
||
PCA10100 |
|
Overview
The sample works as a Fast Pair locator tag and is compatible with the Android Find My Device app.
FMDN provisioning
You can add the device that runs the sample code to the Find My Device app in a process called FMDN provisioning. The process is triggered automatically as a subsequent step of the Fast Pair procedure.
To trigger the Fast Pair Procedure, move your Android device close to the locator tag that is advertising in the Fast Pair discoverable mode. Your smartphone detects the tag’s advertising packets and displays the half-sheet notification which you can use to start the procedure. The FMDN provisioning process automatically follows the Fast Pair procedure. During the provisioning, the device is linked with the Google account of its new owner.
Using a provisioned device
Once provisioned, the accessory starts to advertise the FMDN payload. This payload is used by nearby Android devices to report the accessory location to its owner.
You can manage your provisioned device in the Find My Device app. The application displays a map in your item view. It helps you determine the approximate location of your device. You can also play a sound on the nearby tagged accessory with the Find My Device app to make it easier to find.
Synchronization mode
In the provisioned state, the accessory attempts to synchronize its beacon clock after the system reboot (for example, due to battery replacement). In this case, it broadcasts the Fast Pair not discoverable advertising payload to indicate that the Android device needs to synchronize with the locator tag. The smartphone detects the Fast Pair advertising, connects to the accessory, and exchanges the necessary data to synchronize its beacon clock with the current clock value of the connected device. After the successful synchronization, the locator tag stops the Fast Pair not discoverable advertising. From now on, the accessory uses only the FMDN payload for the advertising process.
Note
The Android device uses a throttling mechanism to prevent the beacon clock synchronization from happening more than once every 24 hours. The provisioning operation is also considered a clock synchronization event and requires a 24-hour wait period before the next synchronization attempt.
Identification mode
In the provisioned state, you can enter the identification mode for a limited time. This mode allows the connected peer to read identifying information from the locator tag. An example of such identifying information is reading the Bluetooth GAP Device Name over Bluetooth. The identification mode also allows for reading the Identifier Payload defined in the Detecting Unwanted Location Trackers (DULT) specification. The timeout for identification mode is handled by the DULT subsystem and was introduced to improve user privacy.
Recovery mode
In the provisioned state, you can enter the recovery mode for a limited time. This mode allows the Android device to recover a lost provisioning key from the locator tag.
FMDN unprovisioning
You can remove your device from the Find My Device app in a symmetrical operation, called unprovisioning. Once unprovisioned, the accessory stops broadcasting the FMDN advertising payload.
During the unprovisioning, the device link with the owner’s Google account is removed. To bring the accessory back to its initial state and make provisioning available for the next owner, you need to perform a factory reset.
After the factory reset operation, the Fast Pair discoverable advertising gets automatically disabled to prevent a restart of the Fast Pair procedure. You need to press a button to set your accessory in the Fast Pair discoverable advertising mode and make it available for the next FMDN provisioning.
Fast Pair advertising policy
The sample manages Fast Pair advertising, which remains turned on if at least one of the following triggers requests it:
UI trigger, which occurs after a button action.
FMDN provisioning trigger, which occurs on the Account Key write operation during the FMDN provisioning operation.
Beacon clock synchronization trigger, which occurs after the system bootup if the device is provisioned.
DFU mode trigger, which occurs upon a DFU mode change.
If the Fast Pair advertising is enabled, the sample will automatically select the correct advertising mode:
Fast Pair discoverable advertising - Selected when there is no Account Key stored on the device.
Fast Pair not discoverable advertising - Selected when an Account Key is stored on the device.
To fully disable Fast Pair advertising, all trigger requests must be removed. However, not all triggers can be manually disabled by the user, as the FMDN provisioning and Beacon clock synchronization triggers are managed by the sample automatically and are required for it to work correctly. This approach ensures that Fast Pair advertising remains enabled as long as any of the modules needs it, preventing premature disabling.
The sample automatically disables the advertising by removing the trigger requests right before the factory reset operation. To start Fast Pair discoverable advertising after the FMDN unprovisioning and factory reset operations, you need to activate the UI trigger.
Note
The Bluetooth advertising is active only until the Fast Pair Provider connects to a Bluetooth Central. Once connected, you can still request to turn on the advertising, but it will only activate after you disconnect.
Device Firmware Update (DFU)
The locator tag sample uses the MCUboot bootloader firmware image, enabling application firmware image upgrades through the MCUboot and NSIB procedure. Over-the-air updates are supported using MCUmgr’s Simple Management Protocol (SMP) over Bluetooth.
To enable the DFU functionality use the SB_CONFIG_APP_DFU sysbuild Kconfig option.
It is enabled by default if the MCUboot bootloader image is used.
To select a specific version of the application, change the VERSION file in the sample root directory.
See the Application version management for details.
Note
Ensure that the FMDN firmware version defined by the following Kconfig options matches the version in the VERSION file:
The bootloader configuration varies depending on the board target:
Bootloader configuration |
Board targets |
|---|---|
MCUboot, direct-xip mode without revert |
|
MCUboot, overwrite only mode |
|
DFU mode
You can perform the DFU procedure by entering the DFU mode for a limited time. The DFU mode is accessible regardless of the current FMDN provisioning state.
This mode allows the connected peer to access the SMP GATT Service. Access to this service is restricted only to the DFU mode as a security measure. This restriction helps satisfy FMDN privacy requirements, which prohibit the locator tag device from sharing identifying information, such as firmware version, with connected peers during standard operation. Moreover, after entering the DFU mode, the SMP GATT Service UUID is present in the Fast Pair advertising payload which helps to filter and find the devices that are in the DFU mode. It is located in advertising data when Fast Pair advertising is in the discoverable mode, or in the scan response data when it is in the not discoverable mode.
Fast Pair device registration
Before you can use your device as a Fast Pair Provider, the device model must be registered with Google. This is required to obtain the Model ID and Anti-Spoofing Private Key. You can either register your own device or use the debug Model ID and Anti-Spoofing Public/Private Key pair obtained by Nordic Semiconductor for development purposes.
Note
To support the locator tag use case, you must select Locator Tag option in the Device Type list when registering your device model.
To use the FMDN extension, you must also set the Find My Device option to true during device model registration.
If the Model ID and Anti-Spoofing Private Key are not specified, the following default debug Fast Pair model is used:
NCS locator tag:
Device Name: NCS locator tag
Model ID:
0x4A436BAnti-Spoofing Private Key (base64, uncompressed):
rie10A7ONqwd77VmkxGsblPUbMt384qjDgcEJ/ctT9Y=Device Type: Locator Tag
Notification Type: Fast Pair
Data-Only connection: true
No Personalized Name: true
Find My Device: true
For details, see Provisioning the device in the Fast Pair user guide.
Important
This is the debug Fast Pair provisioning data obtained by Nordic for the development purposes. Do not use it in production.
To test with the debug mode Model ID, you must configure the Android device to include the debug results while displaying the nearby Fast Pair Providers. For details, see Verifying Fast Pair in the GFPS documentation.
Tip
The sample encodes TX power in the advertising set data that includes the Fast Pair payload. There is no need to provide the TX power value during device model registration.
User interface
The user interface of the sample depends on the hardware platform you are using.
- LED 1:
Indicates that the firmware is running and informs about the state of the DFU mode. Depending on the DFU mode state:
Blinks at a 1 second interval if the DFU mode is disabled.
Blinks at a 0.25 second interval if the DFU mode is enabled.
- LED 2:
Indicates that the ringing action is in progress. Depending on the ringing state:
Lit if the device is ringing.
Off if the device is not ringing.
- LED 3:
Depending on the FMDN provisioning state and the Fast Pair advertising state:
Lit if the device is provisioned and Fast Pair advertising is disabled.
Blinks at a 0.25 second interval if the device is provisioned and Fast Pair advertising is enabled.
Blinks at a 1 second interval if the device is not provisioned and Fast Pair advertising is enabled.
Off if the device is not provisioned and Fast Pair advertising is disabled.
- LED 4:
Depending on the states of the recovery mode and the identification mode:
Lit if both modes are active on the device.
Off if both modes are inactive on the device.
Blinks at a 0.5 second interval if the identification mode is active on the device and the recovery mode is inactive on the device.
Blinks at a 1 second interval if the recovery mode is active on the device and the identification mode is inactive on the device.
- Button 1:
Sends a request to turn on Fast Pair advertising or removes such a request. This action controls the UI trigger for Fast Pair advertising. See the Fast Pair advertising policy section for details.
- Button 2:
Stops the ongoing ringing action.
- Button 3:
Decrements the battery level by 10% (the default value in the CONFIG_APP_BATTERY_LEVEL_DECREMENT Kconfig option), starting from the full battery level of 100%. In the default sample configuration, with the
CONFIG_BT_FAST_PAIR_FMDN_BATTERY_DULTKconfig option enabled, pressing the button when the battery level is lower than the decrement value transitions the device back to the starting point of 100%. You can disable the defaultCONFIG_BT_FAST_PAIR_FMDN_BATTERY_DULTKconfig setting to transition through the mode in which the battery level indication is not supported (refer to the last point in the list). The battery level is encoded in the FMDN advertising set according to the following rules:Normal battery level (starting point, as derived from the 100% battery level) - The battery level is higher than 40% and less than or equal to 100%. The lower threshold, 40%, is controlled by the
CONFIG_BT_FAST_PAIR_FMDN_BATTERY_LEVEL_LOW_THRKconfig option.Low battery level - The battery level is higher than 10% and less than or equal to 40%. The lower threshold, 10%, is controlled by the
CONFIG_BT_FAST_PAIR_FMDN_BATTERY_LEVEL_CRITICAL_THRKconfig option.Critically low battery level (battery replacement needed soon) - The battery level is higher than or equal to 0% and less than or equal to 10%.
Battery level indication unsupported - Occurs when the special
BT_FAST_PAIR_FMDN_BATTERY_LEVEL_NONEvalue is used. This battery level is unavailable in the default sample configuration. You can disable theCONFIG_BT_FAST_PAIR_FMDN_BATTERY_DULTKconfig option to reach this mode when transitioning from the critically low battery level to the full battery level of 100%.
In the default sample configuration, with the
CONFIG_BT_FAST_PAIR_FMDN_BATTERY_DULTKconfig option enabled, the battery level is also encoded in the Battery Level response of the Accessory Non-owner Service (ANOS), which is set according to the following rules:Full battery level (starting point, as derived from the 100% battery level) - The battery level is higher than 80% and less than or equal to 100%. The lower threshold, 80%, is controlled by the
CONFIG_DULT_BATTERY_LEVEL_MEDIUM_THRKconfig option.Medium battery level - The battery level is higher than 40% and less than or equal to 80%. The lower threshold, 40%, is controlled by the
CONFIG_DULT_BATTERY_LEVEL_LOW_THRKconfig option.Low battery level - The battery level is higher than 10% and less than or equal to 40%. The lower threshold, 10%, is controlled by the
CONFIG_DULT_BATTERY_LEVEL_CRITICAL_THRKconfig option.Critically low battery level (battery replacement needed soon) - The battery level is higher than or equal to 0% and less than or equal to 10%.
- Button 4:
When pressed during the application bootup, resets the accessory to its default factory settings.
The triggered action varies depending on how long the button was held:
From 0 to 3 seconds:
Requests the FMDN subsystem to enable the identification mode for five minutes. This timeout value is defined by the
CONFIG_DULT_ID_READ_STATE_TIMEOUTKconfig option according to the DULT specification requirements.From 3 to 7 seconds:
Enables the recovery mode for one minute as defined by the
CONFIG_BT_FAST_PAIR_FMDN_READ_MODE_FMDN_RECOVERY_TIMEOUTKconfig option.From 7 seconds or more:
Enables the DFU mode for five minutes.
- LED 0:
Indicates that the firmware is running and informs about the state of the DFU mode. Depending on the DFU mode state:
Blinks at a 1 second interval if the DFU mode is disabled.
Blinks at a 0.25 second interval if the DFU mode is enabled.
- LED 1:
Indicates that the ringing action is in progress. Depending on the ringing state:
Lit if the device is ringing.
Off if the device is not ringing.
- LED 2:
Depending on the FMDN provisioning state and the Fast Pair advertising state:
Lit if the device is provisioned and Fast Pair advertising is disabled.
Blinks at a 0.25 second interval if the device is provisioned and Fast Pair advertising is enabled.
Blinks at a 1 second interval if the device is not provisioned and Fast Pair advertising is enabled.
Off if the device is not provisioned and Fast Pair advertising is disabled.
- LED 3:
Depending on the states of the recovery mode and the identification mode:
Lit if both modes are active on the device.
Off if both modes are inactive on the device.
Blinks at a 0.5 second interval if the identification mode is active on the device and the recovery mode is inactive on the device.
Blinks at a 1 second interval if the recovery mode is active on the device and the identification mode is inactive on the device.
- Button 0:
Sends a request to turn on Fast Pair advertising or removes such a request. This action controls the UI trigger for Fast Pair advertising. See the Fast Pair advertising policy section for details.
- Button 1:
Stops the ongoing ringing action.
- Button 2:
Decrements the battery level by 10% (the default value in the CONFIG_APP_BATTERY_LEVEL_DECREMENT Kconfig option), starting from the full battery level of 100%. In the default sample configuration, with the
CONFIG_BT_FAST_PAIR_FMDN_BATTERY_DULTKconfig option enabled, pressing the button when the battery level is lower than the decrement value transitions the device back to the starting point of 100%. You can disable the defaultCONFIG_BT_FAST_PAIR_FMDN_BATTERY_DULTKconfig setting to transition through the mode in which the battery level indication is not supported (refer to the last point in the list). The battery level is encoded in the FMDN advertising set according to the following rules:Normal battery level (starting point, as derived from the 100% battery level) - The battery level is higher than 40% and less than or equal to 100%. The lower threshold, 40%, is controlled by the
CONFIG_BT_FAST_PAIR_FMDN_BATTERY_LEVEL_LOW_THRKconfig option.Low battery level - The battery level is higher than 10% and less than or equal to 40%. The lower threshold, 10%, is controlled by the
CONFIG_BT_FAST_PAIR_FMDN_BATTERY_LEVEL_CRITICAL_THRKconfig option.Critically low battery level (battery replacement needed soon) - The battery level is higher than or equal to 0% and less than or equal to 10%.
Battery level indication unsupported - Occurs when the special
BT_FAST_PAIR_FMDN_BATTERY_LEVEL_NONEvalue is used. This battery level is unavailable in the default sample configuration. You can disable theCONFIG_BT_FAST_PAIR_FMDN_BATTERY_DULTKconfig option to reach this mode when transitioning from the critically low battery level to the full battery level of 100%.
In the default sample configuration, with the
CONFIG_BT_FAST_PAIR_FMDN_BATTERY_DULTKconfig option enabled, the battery level is also encoded in the Battery Level response of the Accessory Non-owner Service (ANOS), which is set according to the following rules:Full battery level (starting point, as derived from the 100% battery level) - The battery level is higher than 80% and less than or equal to 100%. The lower threshold, 80%, is controlled by the
CONFIG_DULT_BATTERY_LEVEL_MEDIUM_THRKconfig option.Medium battery level - The battery level is higher than 40% and less than or equal to 80%. The lower threshold, 40%, is controlled by the
CONFIG_DULT_BATTERY_LEVEL_LOW_THRKconfig option.Low battery level - The battery level is higher than 10% and less than or equal to 40%. The lower threshold, 10%, is controlled by the
CONFIG_DULT_BATTERY_LEVEL_CRITICAL_THRKconfig option.Critically low battery level (battery replacement needed soon) - The battery level is higher than or equal to 0% and less than or equal to 10%.
- Button 3:
When pressed during the application bootup, resets the accessory to its default factory settings.
The triggered action varies depending on how long the button was held:
From 0 to 3 seconds:
Requests the FMDN subsystem to enable the identification mode for five minutes. This timeout value is defined by the
CONFIG_DULT_ID_READ_STATE_TIMEOUTKconfig option according to the DULT specification requirements.From 3 to 7 seconds:
Enables the recovery mode for one minute as defined by the
CONFIG_BT_FAST_PAIR_FMDN_READ_MODE_FMDN_RECOVERY_TIMEOUTKconfig option.From 7 seconds or more:
Enables the DFU mode for five minutes.
- RGB LED:
Thingy:53 displays the application state in the RGB scale using LED1. The LED1 displays a color sequence with each blink that indicates the overall application state.
Each color of the LED indicates the different application state:
Green - Indicates that firmware is running.
Blue - Indicates that the device is provisioned.
Yellow - Indicates that the identification mode is active.
Red - Indicates that the recovery mode is active.
White - Indicates that the Fast Pair advertising is active.
Purple - Indicates that the DFU mode is active.
- Speaker/Buzzer:
Produces sound when the ringing action is in progress and to indicate a new button action.
- Button (SW3):
When pressed during the application bootup, resets the accessory to its default factory settings.
When pressed, stops the ongoing ringing action.
When released, the triggered action varies depending on how long the button was held:
From 1 to 3 seconds (notified by one short beep):
Sends a request to turn on Fast Pair advertising or removes such a request. This action controls the UI trigger for Fast Pair advertising. See the Fast Pair advertising policy section for details.
From 3 to 5 seconds (notified by two short beeps):
Requests the FMDN subsystem to enable the identification mode for five minutes. This timeout value is defined by the
CONFIG_DULT_ID_READ_STATE_TIMEOUTKconfig option according to the DULT specification requirements.From 5 to 7 seconds (notified by three short beeps):
Enables the recovery mode for one minute as defined by the
CONFIG_BT_FAST_PAIR_FMDN_READ_MODE_FMDN_RECOVERY_TIMEOUTKconfig option.From 7 to 10 seconds (notified by four short beeps):
Enables the DFU mode for five minutes.
From 10 seconds or more (notified by one longer beep):
No action - allows to not perform any button operation.
Configuration
See Configuring and building for information about how to permanently or temporarily change the configuration.
Configuration options
The following Kconfig options are specific to the Fast Pair locator tag sample.
- SB_CONFIG_APP_DFU
The sample sysbuild configuration option enables the Device Firmware Update (DFU) functionality. The value of this option is propagated to the application configuration option CONFIG_APP_DFU. On multi-core devices, it adds the Kconfig fragment to the network core image configuration which speeds up the DFU process. By default, this option is enabled if the MCUboot bootloader image is used.
- CONFIG_APP_DFU
The sample application configuration option enables the Device Firmware Update (DFU) functionality. The value of this option is set based on the sysbuild configuration option SB_CONFIG_APP_DFU.
The following Kconfig options are specific to the chosen hardware platform.
- CONFIG_APP_BATTERY_LEVEL_DECREMENT
The sample configuration defines the decrement value used to simulate the battery level on the development kit. The battery level is defined in percentages and ranges from 0% to 100%. By default, the decrement level is set to 10%.
- CONFIG_APP_BATTERY_POLL_INTERVAL
The sample configuration defines the polling interval in seconds for measuring battery level. By default, the interval is set to 60 seconds.
- CONFIG_APP_UI_SPEAKER_FREQ
The sample configuration defines the frequency in hertz units for sounds generated by the speaker. By default, the frequency is set to 4000 Hz.
Building and running
This sample can be found under samples/bluetooth/fast_pair/locator_tag in the nRF Connect SDK folder structure.
When built as firmware image for a board target with the */ns variant, the sample has Cortex-M Security Extensions (CMSE) enabled and separates the firmware between Non-Secure Processing Environment (NSPE) and Secure Processing Environment (SPE).
Because of this, it automatically includes the Trusted Firmware-M (TF-M).
To read more about CMSE, see Processing environments.
To build the sample, follow the instructions in Building an application for your preferred building environment. See also Programming an application for programming steps and Testing and optimization for general information about testing and debugging in the nRF Connect SDK.
Note
When building repository applications in the SDK repositories, building with sysbuild is enabled by default.
If you work with out-of-tree freestanding applications, you need to manually pass the --sysbuild parameter to every build command or configure west to always use it.
When building the sample, you can provide the Fast Pair Model ID (FP_MODEL_ID) and the Fast Pair Anti-Spoofing Key (FP_ANTI_SPOOFING_KEY) as CMake options.
If the data is not provided, the sample uses the default provisioning data obtained for the NCS locator tag (the locator tag debug Fast Pair Provider).
See Provisioning the device for details.
Note
You cannot use the sample without the Fast Pair provisioning data. Programming the device with the sample firmware without providing the proper Fast Pair provisioning data results in assertion failure during boot.
Release build
To build the sample in a release variant, set the FILE_SUFFIX=release CMake option.
The build will use the prj_release.conf configuration file instead of prj.conf.
Check the contents of both files to learn which configuration changes you should apply when preparing the production build of your end product.
Note
The sample does not support the DFU functionality.
The release build reduces the code size and RAM usage of the sample by disabling logging functionality and performing other optimizations.
Additionally, it enables the Link Time Optimization (LTO) configuration through the CONFIG_LTO Kconfig option, which further reduces the code size.
LTO is an advanced compilation technique that optimizes across all compiled units of an application at the link stage, rather than optimizing each unit separately.
Note
Support for the LTO is experimental.
See Providing CMake options for detailed instructions on how to add the FILE_SUFFIX=release option to your build.
For example, when building from the command line, you can add it as follows:
west build -b board_target -- -DFILE_SUFFIX=release
Testing
Note
Images in the testing section are generated for the debug device model registered by Nordic Semiconductor in the Google Nearby Console (see Fast Pair device registration). The debug device model name is covered by asterisks and the default Fast Pair logo is displayed instead of the one specified during the device model registration.
If the test Android device uses a primary email account that is not on Google’s email allow list for the FMDN feature, testing steps will fail at the FMDN provisioning stage for the default debug (uncertified) device model. To be able to test with debug device models, register your development email account by completing Google’s device proposal form. You can find the link to the device proposal form in the Fast Pair Find My Device Network extension specification.
After programming the sample to your development kit, complete the following steps to test it:
Connect to the kit that runs this sample with a terminal emulator (for example, nRF Connect Serial Terminal). See Testing and optimization for the required settings and steps.
Reset the development kit.
Observe that LED 1 is blinking to indicate that firmware is running.
Observe that LED 3 is blinking in 1 second intervals, which indicates that the device is not provisioned as an FMDN beacon and the Fast Pair discoverable advertising is enabled. The Fast Pair Provider is ready for the FMDN provisioning.
Move the Android device close to your locator tag device.
Wait for the notification from your Android device about the detected Fast Pair Provider.
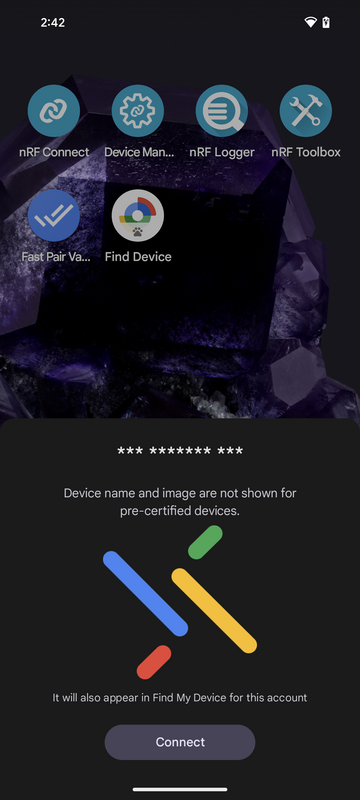
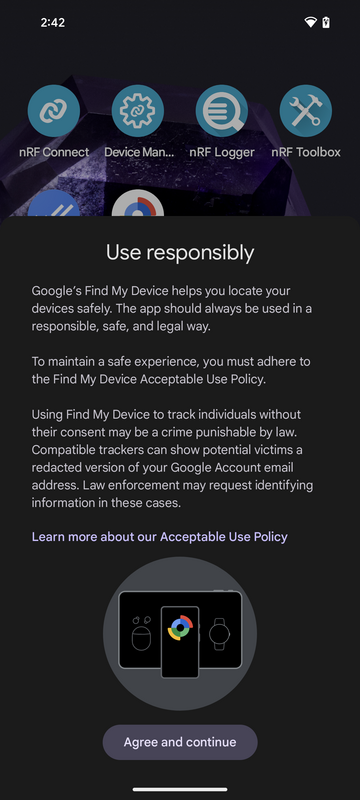
Initiate the connection and trigger the Fast Pair procedure by tapping the Connect button. After the procedure is complete, you will see a pop-up with the Acceptable Use Policy for the Find My Device app.
If you want to start the FMDN provisioning, accept the Acceptable Use Policy by tapping the Agree and continue button.
Wait for the Android device’s notification that indicates completion of the provisioning process.
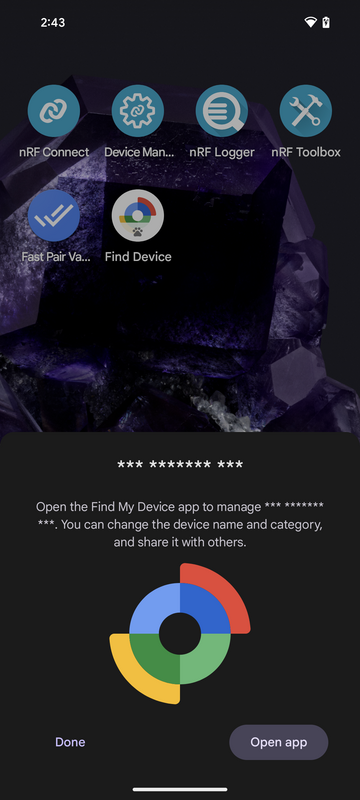
Observe that LED 3 is lit, which indicates that the device is provisioned as an FMDN beacon and the Fast Pair advertising is disabled.
Open the Find My Device app by tapping the Open app button.
In your accessory view, tap the Find nearby button.
Observe in the Find nearby view that the grey shape shrinks when you move your Android device further away from your locator tag device. The shape also grows when you move your Android device closer to the locator tag. The closest proximity level is indicated by the device logo displayed inside the grey shape.
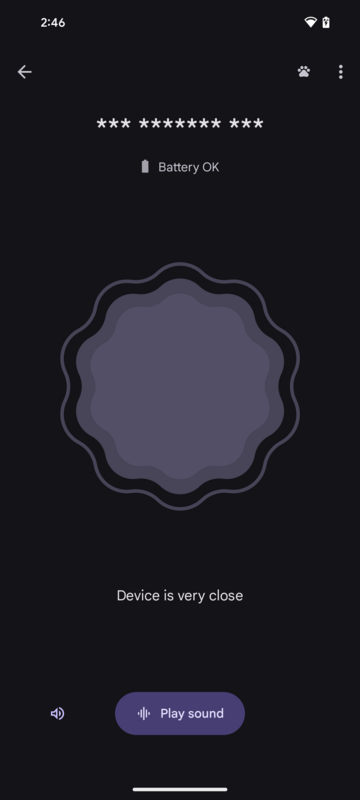
Start the ringing action on your device by tapping the Play sound button.
Observe that LED 2 is lit, which indicates that the ringing action is in progress.
Stop the ringing action in one of the following ways:
Press Button 2 on the locator tag device.
Tap the Stop sound button in the Find My Device app.
Observe that LED 2 is off, which indicates that your accessory is no longer ringing.
Press Button 3 a few times to change the normal (default) battery level to low battery level.
See that the Android notification with the Device with low battery label is displayed after a while.
Exit the Find nearby view and return to the main accessory view.
Open Device details by tapping the cog icon, located below the map view, next to the accessory name.
Start the unprovisioning operation by tapping the Remove from Find My Device button at the bottom of the screen.
Confirm the operation by tapping the Remove button in the Remove from Find My Device view.
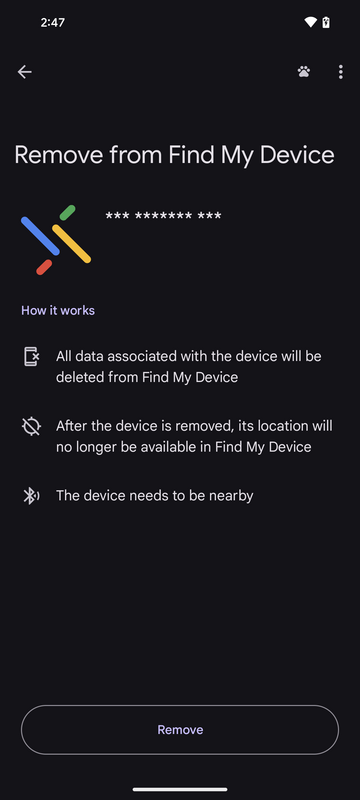
Reconfirm the procedure by tapping the Remove button in the Android pop-up window.
Wait for the unprovisioning operation to complete.
Observe that LED 3 is off, which indicates that the device is no longer provisioned as an FMDN beacon and the Fast Pair advertising is disabled.
Observe that the Android does not display a notification about the detected Fast Pair Provider, as the locator tag device disables advertising after the unprovisioning operation.
Press Button 1 to request turning on the Fast Pair advertising in discoverable mode and to restart the FMDN provisioning process.
Connect to the kit that runs this sample with a terminal emulator (for example, nRF Connect Serial Terminal). See Testing and optimization for the required settings and steps.
Reset the development kit.
Observe that LED 0 is blinking to indicate that firmware is running.
Observe that LED 2 is blinking in 1 second intervals, which indicates that the device is not provisioned as an FMDN beacon and the Fast Pair discoverable advertising is enabled. The Fast Pair Provider is ready for the FMDN provisioning.
Move the Android device close to your locator tag device.
Wait for the notification from your Android device about the detected Fast Pair Provider.
Initiate the connection and trigger the Fast Pair procedure by tapping the Connect button. After the procedure is complete, you will see a pop-up with the Acceptable Use Policy for the Find My Device app.
If you want to start the FMDN provisioning, accept the Acceptable Use Policy by tapping the Agree and continue button.
Wait for the Android device’s notification that indicates completion of the provisioning process.
Observe that LED 2 is lit, which indicates that the device is provisioned as an FMDN beacon and the Fast Pair advertising is disabled.
Open the Find My Device app by tapping the Open app button.
In your accessory view, tap the Find nearby button.
Observe in the Find nearby view that the grey shape shrinks when you move your Android device further away from your locator tag device. The shape also grows when you move your Android device closer to the locator tag. The closest proximity level is indicated by the device logo displayed inside the grey shape.
Start the ringing action on your device by tapping the Play sound button.
Observe that LED 1 is lit, which indicates that the ringing action is in progress.
Stop the ringing action in one of the following ways:
Press Button 1 on the locator tag device.
Tap the Stop sound button in the Find My Device app.
Observe that LED 1 is off, which indicates that your accessory is no longer ringing.
Press Button 2 a few times to change the normal (default) battery level to low battery level.
See that the Android notification with the Device with low battery label is displayed after a while.
Exit the Find nearby view and return to the main accessory view.
Open Device details by tapping the cog icon, located below the map view, next to the accessory name.
Start the unprovisioning operation by tapping the Remove from Find My Device button at the bottom of the screen.
Confirm the operation by tapping the Remove button in the Remove from Find My Device view.
Reconfirm the procedure by tapping the Remove button in the Android pop-up window.
Wait for the unprovisioning operation to complete.
Observe that LED 2 is off, which indicates that the device is no longer provisioned as an FMDN beacon and the Fast Pair advertising is disabled.
Observe that the Android does not display a notification about the detected Fast Pair Provider, as the locator tag device disables advertising after the unprovisioning operation.
Press Button 0 to request turning on the Fast Pair advertising in discoverable mode and to restart the FMDN provisioning process.
Clock synchronization
Testing steps for the clock synchronization feature require a second Android device. The device must be registered to a different Google account from the first Android device.
To test this feature, complete the following steps:
Go to the Testing section and follow the instructions on performing the FMDN provisioning operation.
Observe that LED 3 is lit, which indicates that the device is provisioned as an FMDN beacon.
Power off the development kit and wait for 24 hours.
Power off the Android device that you used to perform the FMDN provisioning operation.
Power on the development kit.
Connect to the kit that runs this sample with a terminal emulator (for example, nRF Connect Serial Terminal). See Testing and optimization for the required settings and steps.
Use your second Android device configured for a different account, and start the nRF Connect for Mobile application.
Wait for the SCANNER tab of the mobile application to populate the scanning list.
Observe that the device advertising the Fast Pair Service UUID (0xFE2C) AD type with the Fast Pair Account Data payload is present in the scanning list. This entry indicates that the development kit is in the clock synchronization mode, and it is advertising the Fast Pair not discoverable payload.
Note
By default, the nRF Connect for Mobile application filters advertising packets used by ecosystems like Google or Apple. You need to take additional steps to see the Fast Pair advertising on the scanning list:
In the SCANNER tab of the nRF Connect for Mobile application, tap the No filter white bar below the SCANNER label.
In the drop-down menu for the filtering configuration, tap the three-dot icon in the Exclude option.
In the exclude configuration menu, uncheck the Google option to remove the filtering for Google-related advertising like the Fast Pair advertising.
Close the exclude configuration menu and the filtering configuration drop-down.
Tap the SCAN button to restart the scanning activity.
Power on the first Android device that you used to perform the FMDN provisioning operation.
In the terminal, observe the message confirming that your first Android device connected to the development kit and synchronized the clock value:
FMDN: clock information synchronized with the authenticated Bluetooth peer
Go back to your second Android device and refresh the scanning list in the nRF Connect for Mobile application.
Observe that the entry for the device advertising the Fast Pair Service UUID AD type is no longer present in the scanning list. The missing entry indicates that the development kit is no longer in the clock synchronization mode, and it is not advertising the Fast Pair not discoverable payload.
In your first Android device, open the Find My Device app. Navigate to your accessory view, and tap the Find nearby button.
Start the ringing action on your device by tapping the Play sound button.
Observe that LED 2 is lit to confirm that the Android device is able to connect to your development kit after a clock synchronization.
Go to the Testing section and follow the instructions on performing the FMDN provisioning operation.
Observe that LED 2 is lit, which indicates that the device is provisioned as an FMDN beacon.
Power off the development kit and wait for 24 hours.
Power off the Android device that you used to perform the FMDN provisioning operation.
Power on the development kit.
Connect to the kit that runs this sample with a terminal emulator (for example, nRF Connect Serial Terminal). See Testing and optimization for the required settings and steps.
Use your second Android device configured for a different account, and start the nRF Connect for Mobile application.
Wait for the SCANNER tab of the mobile application to populate the scanning list.
Observe that the device advertising the Fast Pair Service UUID (0xFE2C) AD type with the Fast Pair Account Data payload is present in the scanning list. This entry indicates that the development kit is in the clock synchronization mode, and it is advertising the Fast Pair not discoverable payload.
Note
By default, the nRF Connect for Mobile application filters advertising packets used by ecosystems like Google or Apple. You need to take additional steps to see the Fast Pair advertising on the scanning list:
In the SCANNER tab of the nRF Connect for Mobile application, tap the No filter white bar below the SCANNER label.
In the drop-down menu for the filtering configuration, tap the three-dot icon in the Exclude option.
In the exclude configuration menu, uncheck the Google option to remove the filtering for Google-related advertising like the Fast Pair advertising.
Close the exclude configuration menu and the filtering configuration drop-down.
Tap the SCAN button to restart the scanning activity.
Power on the first Android device that you used to perform the FMDN provisioning operation.
In the terminal, observe the message confirming that your first Android device connected to the development kit and synchronized the clock value:
FMDN: clock information synchronized with the authenticated Bluetooth peer
Go back to your second Android device and refresh the scanning list in the nRF Connect for Mobile application.
Observe that the entry for the device advertising the Fast Pair Service UUID AD type is no longer present in the scanning list. The missing entry indicates that the development kit is no longer in the clock synchronization mode, and it is not advertising the Fast Pair not discoverable payload.
In your first Android device, open the Find My Device app. Navigate to your accessory view, and tap the Find nearby button.
Start the ringing action on your device by tapping the Play sound button.
Observe that LED 1 is lit to confirm that the Android device is able to connect to your development kit after a clock synchronization.
Performing the DFU procedure
To perform the DFU procedure, complete the following steps:
Observe that LED 1 is blinking at a 1 second interval, which indicates that the DFU mode is disabled.
Press the Button 4 for 7 seconds or more to enter the DFU mode.
Observe that LED 1 is blinking at a 0.25 second interval, which indicates that the DFU mode is enabled.
Observe that LED 3 is blinking, which indicates that the Fast Pair advertising is enabled.
Perform DFU using the nRF Connect Device Manager mobile app:
Generate the DFU package by building your application with the FOTA support over Bluetooth Low Energy. You can find the generated
dfu_application.ziparchive in the build directory.Note
For each image included in the DFU-generated package, use a higher version number than your currently active firmware. Otherwise, the DFU target may reject the FOTA process due to a downgrade prevention mechanism.
Download the
dfu_application.ziparchive to your device. See Output build files (image files) for more information about the contents of update archive.Note
nRF Connect for Desktop does not currently support the FOTA process.
Use the nRF Connect Device Manager mobile app to update your device with the new firmware.
Ensure that you can access the
dfu_application.ziparchive from your phone or tablet.In the mobile app, scan and select the device to update.
Switch to the Image tab.
Tap the SELECT FILE button and select the
dfu_application.ziparchive.Tap the START button.
Note
When performing a FOTA update with the iOS app for samples using random HCI identities, ensure that the Erase application settings option is deselected before starting the procedure. Otherwise, the new image will boot with random IDs, causing communication issues between the app and the device.
Initiate the DFU process of transferring the image to the device:
If you are using an Android device, select a mode in the dialog window, and tap the START button.
If you are using an iOS device, tap the selected mode in the pop-up window.
Note
For samples using random HCI identities, the Test and Confirm mode should not be used.
Wait for the DFU to finish and then verify that the application works properly.
Observe that LED 0 is blinking at a 1 second interval, which indicates that the DFU mode is disabled.
Press the Button 3 for 7 seconds or more to enter the DFU mode.
Observe that LED 0 is blinking at a 0.25 second interval, which indicates that the DFU mode is enabled.
Observe that LED 2 is blinking, which indicates that the Fast Pair advertising is enabled.
Perform DFU using the nRF Connect Device Manager mobile app:
Generate the DFU package by building your application with the FOTA support over Bluetooth Low Energy. You can find the generated
dfu_application.ziparchive in the build directory.Note
For each image included in the DFU-generated package, use a higher version number than your currently active firmware. Otherwise, the DFU target may reject the FOTA process due to a downgrade prevention mechanism.
Download the
dfu_application.ziparchive to your device. See Output build files (image files) for more information about the contents of update archive.Note
nRF Connect for Desktop does not currently support the FOTA process.
Use the nRF Connect Device Manager mobile app to update your device with the new firmware.
Ensure that you can access the
dfu_application.ziparchive from your phone or tablet.In the mobile app, scan and select the device to update.
Switch to the Image tab.
Tap the SELECT FILE button and select the
dfu_application.ziparchive.Tap the START button.
Note
When performing a FOTA update with the iOS app for samples using random HCI identities, ensure that the Erase application settings option is deselected before starting the procedure. Otherwise, the new image will boot with random IDs, causing communication issues between the app and the device.
Initiate the DFU process of transferring the image to the device:
If you are using an Android device, select a mode in the dialog window, and tap the START button.
If you are using an iOS device, tap the selected mode in the pop-up window.
Note
For samples using random HCI identities, the Test and Confirm mode should not be used.
Wait for the DFU to finish and then verify that the application works properly.
Disabling the locator tag
The following instructions on disabling the locator tag apply to the default debug device model registered for this sample (see the Fast Pair device registration section), and are used for demonstration purposes.
To disable the locator tag device, complete the following steps:
Find the power switch on the device.
Turn off the locator tag by sliding the switch to the off position.
Observe that the on-device LEDs are turned off.
Note
Vendor-specific instructions on disabling the unknown trackers are registered on mobile platforms, like Android and iOS, for each device model.
Fast Pair Validator app
You can test the sample against the Eddystone test suite from the Fast Pair Validator app.
Note
To start testing the FMDN solution with the Fast Pair Validator app, use your project in the Google Nearby Console and the Fast Pair device model that is defined in the scope of your project. The default debug device model from Nordic Semiconductor cannot be used for this purpose. Additionally, you must sign into the Fast Pair Validator app using an email address associated with your project in the Google Nearby Console.
After programming the sample to your development kit, complete the following steps to test it:
Open the Fast Pair Validator app on your Android device.
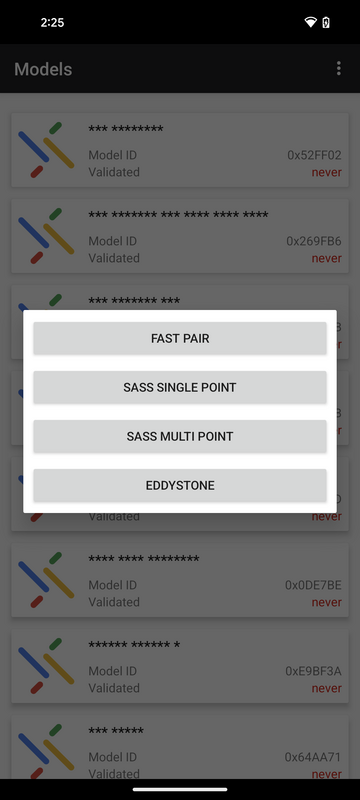
In the app list, tap on the target device model that matches your flashed firmware.
Select the correct test category by tapping the EDDYSTONE button.
In the Eddystone test view, choose a test case by tapping the START button next to it.
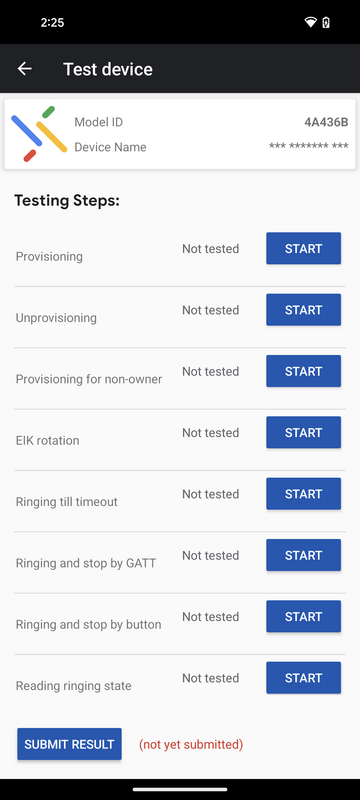
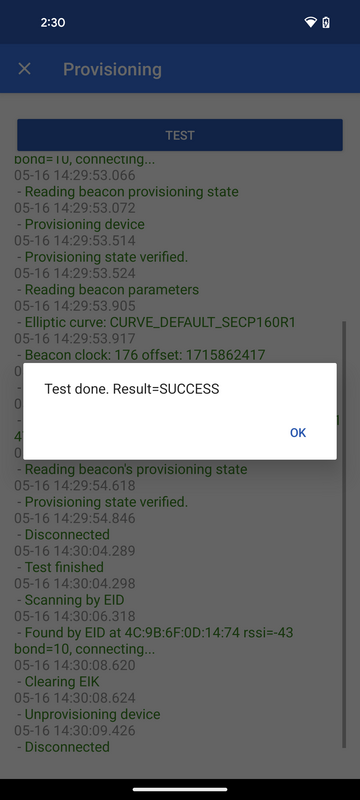
In the chosen test view, run the test case by tapping the TEST button.
Follow the pop-up instructions during the test execution.
Important
Use your locator tag device button interface to comply with the instructions during the test execution:
Please put the headset into pairing mode - Ensure that your device advertises in the Fast Pair discoverable mode or switch to this mode by pressing Button 1.
After you close this dialog, as soon as you hear device ringing, press a button on the device to stop ringing - Stop the ringing action by pressing Button 2 once the LED 2 is lit.
Before you close this dialog, press the button on the device to allow reading its identifier - Enter the identification mode by shortly pressing Button 4. The LED 4 should start blinking at half-second intervals after the button press.
Wait until the test case execution completes.
Exit the test case view by tapping on the cross icon in the upper left corner.
Start another test case or exit the Fast Pair Validator app.
Note
Each test case is concluded with the unprovisioning operation that disables the Fast Pair advertising in the discoverable mode. To set your locator tag device back into the pairing mode, press Button 1.
Open the Fast Pair Validator app on your Android device.
In the app list, tap on the target device model that matches your flashed firmware.
Select the correct test category by tapping the EDDYSTONE button.
In the Eddystone test view, choose a test case by tapping the START button next to it.
In the chosen test view, run the test case by tapping the TEST button.
Follow the pop-up instructions during the test execution.
Important
Use your locator tag device button interface to comply with the instructions during the test execution:
Please put the headset into pairing mode - Ensure that your device advertises in the Fast Pair discoverable mode or switch to this mode by pressing Button 0.
After you close this dialog, as soon as you hear device ringing, press a button on the device to stop ringing - Stop the ringing action by pressing Button 1 once the LED 1 is lit.
Before you close this dialog, press the button on the device to allow reading its identifier - Enter the identification mode by shortly pressing Button 3. The LED 3 should start blinking at half-second intervals after the button press.
Wait until the test case execution completes.
Exit the test case view by tapping on the cross icon in the upper left corner.
Start another test case or exit the Fast Pair Validator app.
Note
Each test case is concluded with the unprovisioning operation that disables the Fast Pair advertising in the discoverable mode. To set your locator tag device back into the pairing mode, press Button 0.
Dependencies
The sample uses subsystems and firmware components available in the nRF Connect SDK. For details, see the following sections.
Fast Pair GATT Service
This sample uses the Google Fast Pair Service (GFPS) and its dependencies and is configured to meet the requirements of the Fast Pair standard together with its FMDN extension. For details about integrating Fast Pair in the nRF Connect SDK, see Google Fast Pair integration.
This sample enables the SB_CONFIG_BT_FAST_PAIR Kconfig option.
With this option enabled, the build system calls the Fast Pair provision script, which automatically generates a hexadecimal file containing Fast Pair Model ID and Anti Spoofing Private Key.
For more details about enabling Fast Pair for your application, see the Enabling Fast Pair in Kconfig section in the Fast Pair integration guide.
Bluetooth LE advertising data providers
The Bluetooth LE advertising providers are used to generate Bluetooth advertising and scan response data for the Fast Pair advertising set. The sample uses the following providers to generate the advertising packet payload:
Advertising flags provider (
CONFIG_BT_ADV_PROV_FLAGS)TX power provider (
CONFIG_BT_ADV_PROV_TX_POWER)Google Fast Pair provider (
CONFIG_BT_ADV_PROV_FAST_PAIR)
The sample uses the Bluetooth device name provider (CONFIG_BT_ADV_PROV_DEVICE_NAME) provider to generate the scan response data.
When the DFU functionality is enabled (CONFIG_APP_DFU), the sample uses the SMP GATT Service UUID provider. The SMP UUID is placed in the advertising data when Fast Pair advertising is in the discoverable mode, or in the scan response data when it is in the not discoverable mode.
Device Firmware Update (DFU)
This sample uses following components for the DFU functionality: