Bluetooth: Central HIDS
The Central HIDS sample demonstrates how to use the GATT Human Interface Device (HID) Service Client to interact with a HIDS server. Basically, the sample simulates a computer that connects to a mouse or a keyboard.
Overview
The sample scans available devices, searching for a HIDS server. If any HIDS server is found, the sample connects to it and discovers all characteristics.
If any input reports are detected, the sample subscribes to them to receive notifications. If any boot reports are detected, the behavior depends on if they are boot mouse reports or boot keyboard reports:
If a boot mouse report is detected, the sample subscribes to it.
If a boot keyboard report is detected, the sample subscribes to its input report, and the sample functionality of changing the CAPSLOCK LED is enabled (Button 1 and 3).
Requirements
One of the following development boards:
nRF9160 DK board (PCA10090) - see Working with nRF9160
nRF5340 PDK board (PCA10095) - see Working with nRF5340
nRF52840 DK board (PCA10056) - see Working with nRF52
nRF52 DK board (PCA10040) - see Working with nRF52
HIDS device to connect with (for example, another board running the Bluetooth: Peripheral HIDS mouse or Bluetooth: Peripheral HIDS keyboard sample, or a Bluetooth Low Energy dongle and nRF Connect for Desktop)
User interface
- Button 1:
Toggle the CAPSLOCK LED on the connected keyboard using Write without response. This function is available only if the connected keyboard is set to work in Boot Protocol Mode.
- Button 2:
Switch between Boot Protocol Mode and Report Protocol Mode. This function is available only if the connected peer supports the Protocol Mode Characteristic.
- Button 3:
Toggle the CAPSLOCK LED on the connected keyboard using Write with response. This function is available only if the connected HID has boot keyboard reports. It always writes CAPSLOCK information to the boot report, even if Report Protocol Mode is selected.
Building and Running
This sample can be found under samples/bluetooth/central_hids in the nRF Connect SDK folder structure.
See Building and programming a sample application for information about how to build and program the application.
Testing
After programming the sample to your board, you can test it either by connecting to another board that is running the Bluetooth: Peripheral HIDS keyboard sample, or by using nRF Connect for Desktop that emulates a HIDS server.
Testing with another board
Connect to the kit that runs this sample with a terminal emulator (for example, PuTTY). See How to connect with PuTTY for the required settings.
Reset the board.
Program the other board with the Bluetooth: Peripheral HIDS keyboard sample and reset it.
Wait until the HIDS keyboard is detected by the central. All detected descriptors are listed. In the terminal window, check for information similar to the following:
HIDS is ready to work
Subscribe to report id: 1
Subscribe to boot keyboard report
Press Button 1 and Button 2 one after another on the board that runs the keyboard sample and observe the notification values in the terminal window. See Bluetooth: Peripheral HIDS keyboard for the expected values:
Notification, id: 1, size: 8, data: 0x0 0x0 0xb 0x0 0x0 0x0 0x0 0x0
Notification, id: 1, size: 8, data: 0x0 0x0 0x0 0x0 0x0 0x0 0x0 0x0
Press Button 2 on the board that runs the Central HIDS sample and observe that the protocol mode is updated into boot mode:
Setting protocol mode: BOOT
Press Button 1 and Button 2 one after another on the board that runs the keyboard sample and observe the notification of the boot report values:
Notification, keyboard boot, size: 8, data: 0x0 0x0 0xf 0x0 0x0 0x0 0x0 0x0
Notification, keyboard boot, size: 8, data: 0x0 0x0 0x0 0x0 0x0 0x0 0x0 0x0
Press Button 1 and Button 3 one after another on the Central HIDS board and observe that LED 1 on the keyboard board changes its state. The following information is also displayed in the terminal window.
If Button 1 was pressed:
Caps lock send (val: 0x2)
Caps lock sent
If Button 3 was pressed:
Caps lock send using write with response (val: 0x2)
Capslock write result: 0
Received data (size: 1, data[0]: 0x2)
Testing with nRF Connect for Desktop
Connect to the kit that runs this sample with a terminal emulator (for example, PuTTY). See How to connect with PuTTY for the required settings.
Reset the board.
Start nRF Connect for Desktop and select the connected dongle that is used for communication.
Go to the Server setup tab. Click the dongle configuration and select Load setup. Load the
hids_keyboard.ncsfile that is located undersamples/bluetooth/central_hidsin the nRF Connect SDK folder structure.Click Apply to device.
Go to the Connection Map tab. Click the dongle configuration and select Advertising setup.
The current version of nRF Connect cannot store the advertising setup, so it must be configured manually. See the following image for the required target configuration:
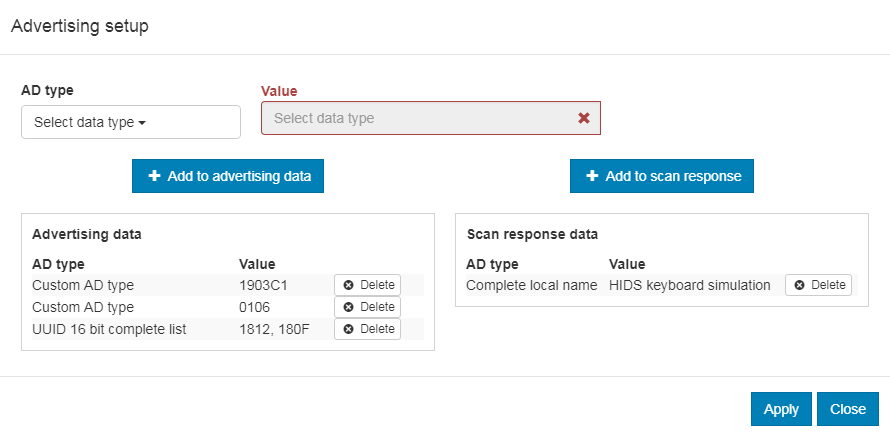
Advertising setup for HIDS keyboard simulator
Complete the following steps to configure the advertising setup:
Delete the default Complete local name from Advertising data.
Add a Custom AD type with AD type value set to
19and Value set to03c1. This is the GAP Appearance advertising data.Add a Custom AD type with AD type value set to
01and Value set to06. This is the AD data with “General Discoverable” and “BR/EDR not supported” flags set.Add a UUID 16 bit complete list with two comma-separated values:
1812and180F. These are the values for HIDS and BAS.Add a Complete local name of your choice to the Scan response data.
Click Apply and Close.
In the Adapter settings, choose Start advertising.
Wait until the board that runs the Central HIDS sample connects. All detected descriptors are listed. Check for information similar to the following:
HIDS is ready to work
Subscribe in report id: 1
Subscribe in boot keyboard report
Explore the first report inside Human Interface Device (the one with eight values). Change any of the values and note that the board logs the change.
Press Button 2 on the board and observe that the Protocol Mode value changes from
01to00.Press Button 1 and Button 3 one after another and observe that the Boot Keyboard Output Report value toggles between
00and02.
Dependencies
This sample uses the following nRF Connect SDK libraries:
In addition, it uses the following Zephyr libraries:
include/sys/byteorder.hinclude/zephyr/types.hlib/libc/minimal/include/errno.hinclude/sys/printk.h-
include/bluetooth/bluetooth.hinclude/bluetooth/gatt.hinclude/bluetooth/hci.hinclude/bluetooth/conn.hinclude/bluetooth/uuid.h