 |
nRF51 IoT SDK
|
|
nRF51 IoT SDK
|
These example applications demonstrate how Nordic's IPv6 stack and the smartCoAP library can be used to talk to a cloud service. A protocol extension for CoAP enables CoAP clients to observe resources and retrieve updates from a server about changes in the representation of a resource. In Exosite's service a dataport corresponds to a resource.
One of the example applications can periodically update the state of a dataport, while the other one can receive notifications about these updates. A dataport in Exosite's service is uniquely identified with the following parameters through the CoAP API of the service:
These parameters need to be hardcoded in the main.c file of both applications. After creating an Exosite account, use your private CIK to update the examples. For a more detailed description, please study the documentation of Exosite's CoAP API.
The setup of the example applications is presented in Figure 1.

The result of message exchanges is transmitted through the serial device and a terminal program (for example PUTTY) can be used to monitor the COM port of each development kit through a terminal session.
The sequence of messages exchanged between the example applications and the servers is shown in Figure 2.
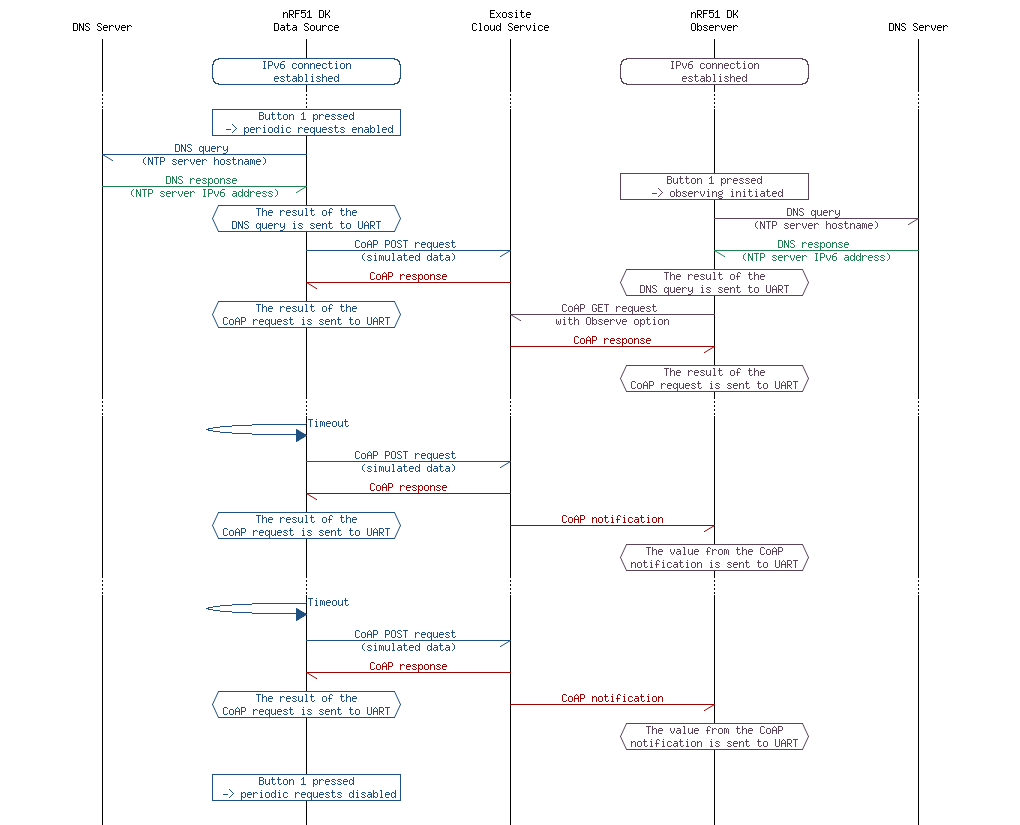
This application serves as a data source sending periodic updates with simulated data to a resource in the cloud service.
The hostname of the Exosite server and the IPv6 address of a DNS server are hardcoded in main.c. Pressing Button 1 once enables periodic updates of the dataport on the server with simulated data. Before the first update, the hostname of the server is resolved to an IPv6 address. Once the response from the DNS server is received, a CoAP POST request is sent.
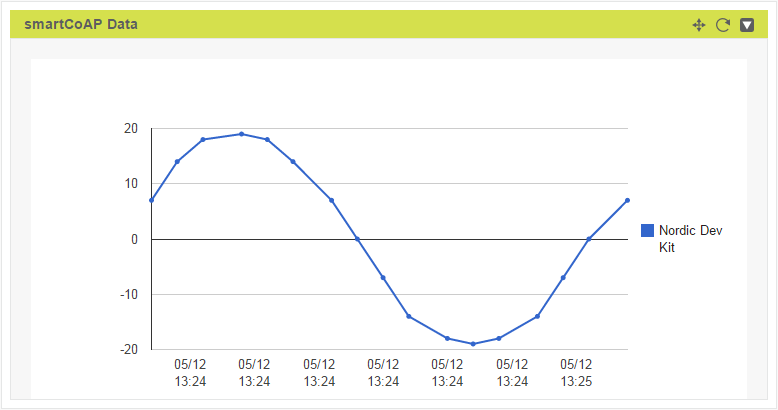
The result of the CoAP requests is transmitted through the serial device and a terminal program (for example PUTTY) can be used to monitor the COM port through a terminal session. If the request is successful, a new datapoint is registered on the server and appears in the widget on the web interface (Figure 3).
This section summarizes the usage of nRF51 resources and common modules in the examples apart from the IoT 6lowpan and IPv6 stack library.
| Module | Inclusion/Usage | Description |
|---|---|---|
| Timer | 2 | Two timers are used one for IoT timer, and second for buttons |
| Buttons | 1 | Buttons are used for initiating CoAP requests. See Button assignments section for details. |
| LEDs | 4 | LEDs are used to indicate the application states. See LED assignments section for details. |
| Adv Data Encoder | Yes | The device name used is 'ExositeDataSrc', IPSP Service UUID is included in the UUID list. |
| Scheduler | Yes | Scheduler is used for processing stack events. |
| UART Trace | Included not enabled | Tracing is included but not enabled by default. |
The name of this example is iot_ipv6_coap_exosite_data_source. The source code and project files of the example can be found in the following folder:
<InstallFolder>/Nordic/nrf51/examples/iot/cloud/coap/data_source
| LED 1 | LED 2 | LED 3 | LED 4 | |
|---|---|---|---|---|
| Blinking | Off | Off | Off | Device advertising as BLE peripheral. |
| On | Blinking | Off | Off | BLE link established, IPv6 interface down. |
| Off | On | Off | Off | IPv6 interface up, periodic requests disabled. |
| Off | On | Blinking | Off | Device busy: DNS query sent, hostname resolution in progress. |
| Off | On | On | Off | Periodic CoAP POST requests enabled. |
| Off | On | On | Blinking | Device busy: CoAP request sent, awaiting response. |
| On | On | On | On | Assertion failure in the application. |
| Button 1 |
|---|
| Toggle periodic CoAP requests. |
See Connecting devices to the router for a list of relevant Linux commands.
This application observes a resource in the cloud service.
The hostname of the Exosite server and the IPv6 address of a DNS server are hardcoded in main.c. Pressing Button 1 once sends a subscription request to the dataport on the server. Before the first subscription, the hostname of the server is resolved to an IPv6 address. Once the response from the DNS server is received, a CoAP GET request with the Observe option is sent. If the subscription is successful, the server will send a notification to the kit each time the dataport is updated by the data source application. The value from each notification is printed in a new line to give a representation of the data. The following is an example of a UART log excerpt:
[APPL]: Response to subscription request received.
[APPL]: Response Code : 69
[APPL]:                                  *
[APPL]:                                         *
[APPL]:                                                *
[APPL]:                                                    *
[APPL]:                                                     *
[APPL]:                                                    *
[APPL]:                                                *
[APPL]:                                         *
[APPL]:                                  *
[APPL]:                           *
[APPL]:                    *
[APPL]:                *
[APPL]:               *
[APPL]:                *
[APPL]:                    *
[APPL]:                           *
[APPL]:                                  *
This section summarizes the usage of nRF51 resources and common modules in the examples apart from the IoT 6lowpan and IPv6 stack library.
| Module | Inclusion/Usage | Description |
|---|---|---|
| Timer | 2 | Two timers are used one for IoT timer, and second for buttons |
| Buttons | 1 | Buttons are used for initiating CoAP requests. See Button assignments section for details. |
| LEDs | 4 | LEDs are used to indicate the application states. See LED assignments section for details. |
| Adv Data Encoder | Yes | The device name used is 'ExositeObserver', IPSP Service UUID is included in the UUID list. |
| Scheduler | Yes | Scheduler is used for processing stack events. |
| UART Trace | Included not enabled | Tracing is included but not enabled by default. |
The name of this example is iot_ipv6_coap_exosite_observer. The source code and project files of the example can be found in the following folder:
<InstallFolder>/Nordic/nrf51/examples/iot/cloud/coap/observer
| LED 1 | LED 2 | LED 3 | LED 4 | |
|---|---|---|---|---|
| Blinking | Off | Off | Off | Device advertising as BLE peripheral. |
| On | Blinking | Off | Off | BLE link established, IPv6 interface down. |
| Off | On | Off | Off | IPv6 interface up, periodic requests disabled. |
| Off | On | Blinking | Off | Device busy: DNS query sent, hostname resolution in progress. |
| Off | On | On | Off | Observing dataport resource. |
| Off | On | On | Blinking | Device busy: CoAP request sent, awaiting response. |
| On | On | On | On | Assertion failure in the application. |
| Button 1 |
|---|
| Start observing resource. |
See Connecting devices to the router for a list of relevant Linux commands.
Ensure that the dataport in the cloud service is updated repeatedly by the data source application. If only one kit is available, use the code below to start a simple Python program that updates the dataport through Exosite's HTTP API. The dataport can also be updated manually through Exosite Portal's web interface.
Test steps:
 1.8.3.1
