Creating Matter accessory device
The Matter accessory device is a basic node of the Matter network. The accessory is formed by the development kit and the application that is running the Matter stack and that is programmed on the development kit.
Once you are familiar with Matter in the nRF Connect SDK and you have tested some of the available Matter samples, you can use the Matter template sample to create your own custom accessory device application. For example, you can create a sensor application that uses a temperature sensor with an on/off switch, with the sensor periodically updating its measured value when it is active.
Creating a Matter accessory device consists of adding new application clusters to the Matter template sample. By default, the template sample includes only mandatory Matter clusters, necessary to commission the accessory into a Matter network.
Cluster is a representation of a single functionality within a Matter accessory. Each cluster contains attributes that are stored in the device’s memory and commands that can be used to modify or read the state of the device, including the cluster attributes. Clusters appropriate for a single device type such as a sensor or a light bulb are organized into an addressable container that is called an endpoint.
An application can implement appropriate callback functions to be informed about specific cluster state changes. These functions can be used to alter device’s behavior when the state of a cluster is changing as a result of some external event.
Read the following sections for detailed steps about how to expand the Matter template sample.
Requirements
To take advantage of this guide, you need to be familiar with Matter architecture and integration and Configuring Matter development environment, and have built and tested at least one of the available Matter samples.
Copy Matter template sample
Use the Matter Template sample as the base for building a sensor accessory device:
Make sure that you meet the requirements for building the sample.
Build and test the sample as described on its documentation page.
Copy the contents of the
samples/matter/templatedirectory to a new directory meant for your custom application. For example,samples/matter/sensor.
Edit clusters using the ZAP tool
Adding the functionalities for an on/off switch and a sensor requires adding new clusters.
Adding new application clusters can be achieved by modifying ZAP file, which can be found as src/template.zap.
This file is handled by ZCL Advanced Platform (ZAP tool), a third-party tool that is a generic templating engine for applications and libraries based on Zigbee Cluster Library.
This tool is provided with the Matter submodule.
To edit clusters using the ZAP tool, complete the following steps:
Open the
src/template.zapfor editing by running the following command:nrfconnect-dir/modules/lib/matter/scripts/tools/zap/run_zaptool.sh src/template.zap
The ZAP tool’s Zigbee Cluster Configurator window appears.
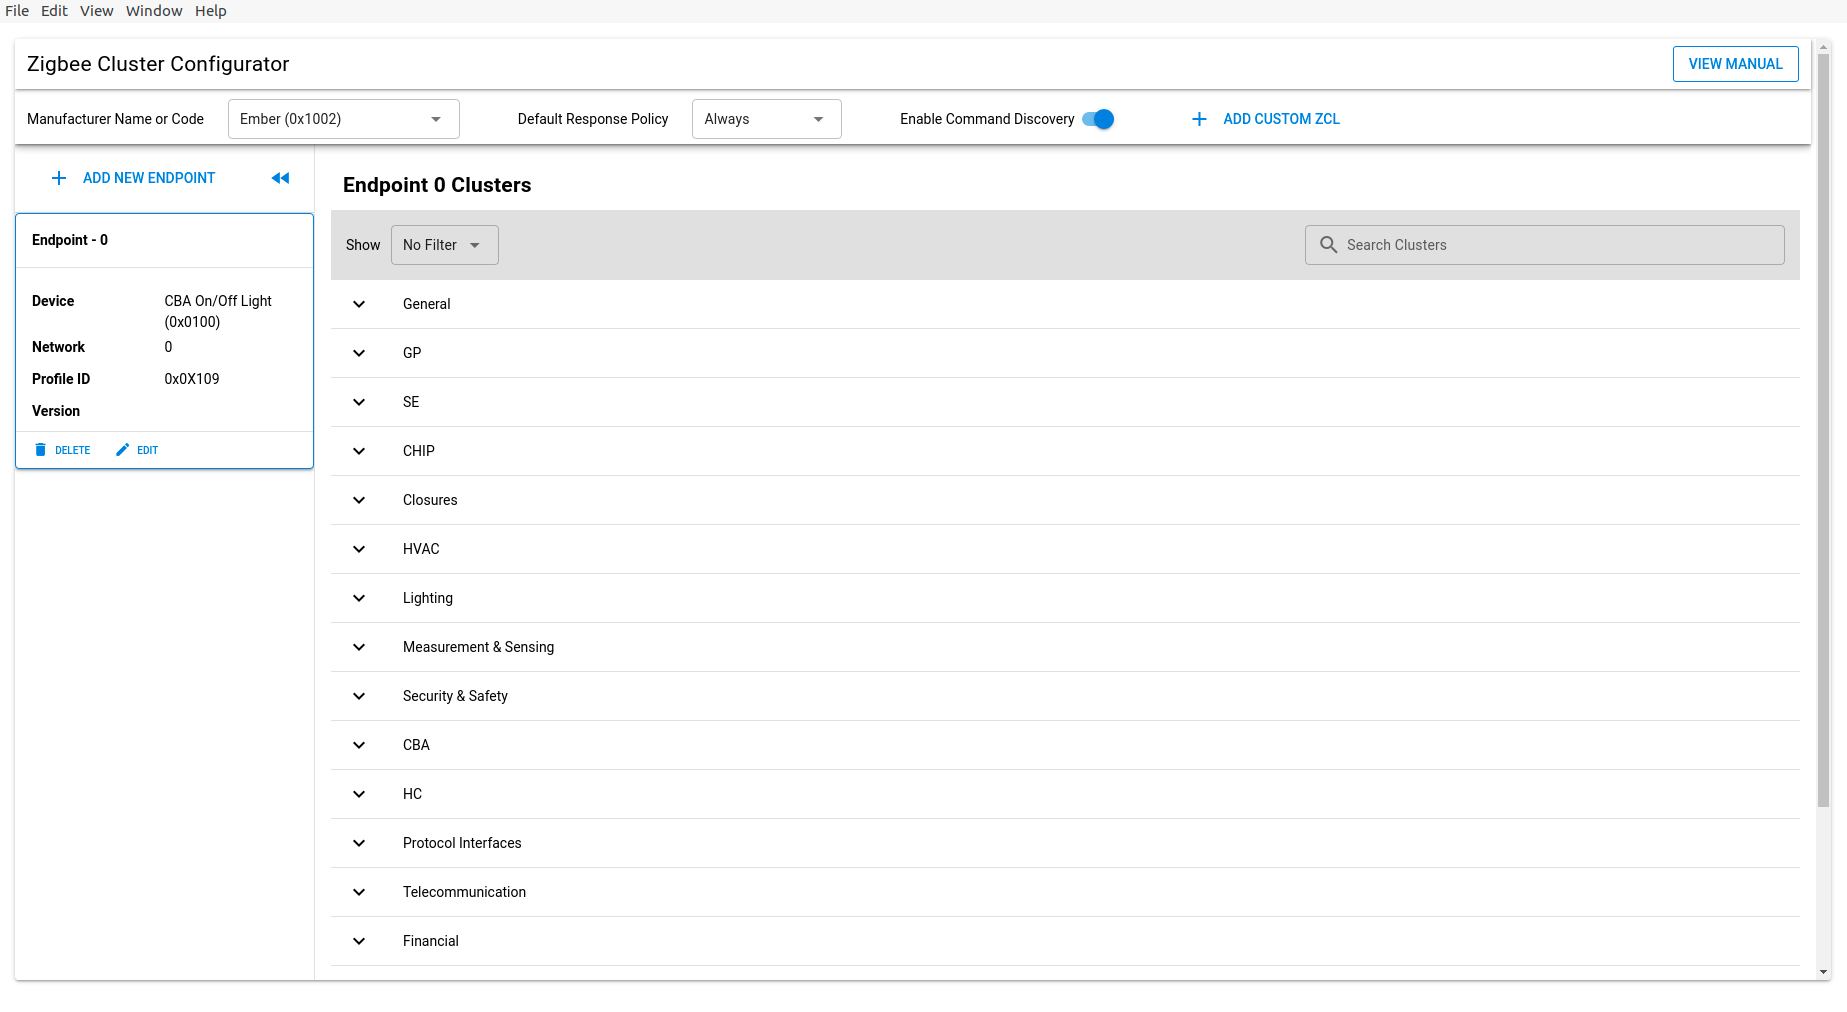
Zigbee Cluster Configurator window in ZAP tool
In the ZAP tool’s Create New Endpoint menu, create a new endpoint that represents the sensor device:
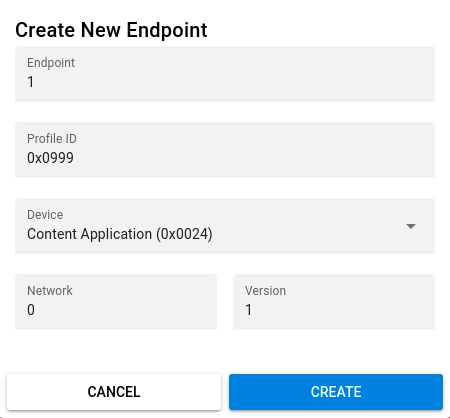
Create New Endpoint menu in ZAP tool
Configure the following clusters required for this endpoint:
Expand the General menu and configure the On/off cluster by setting the Server option from the drop-down menu.
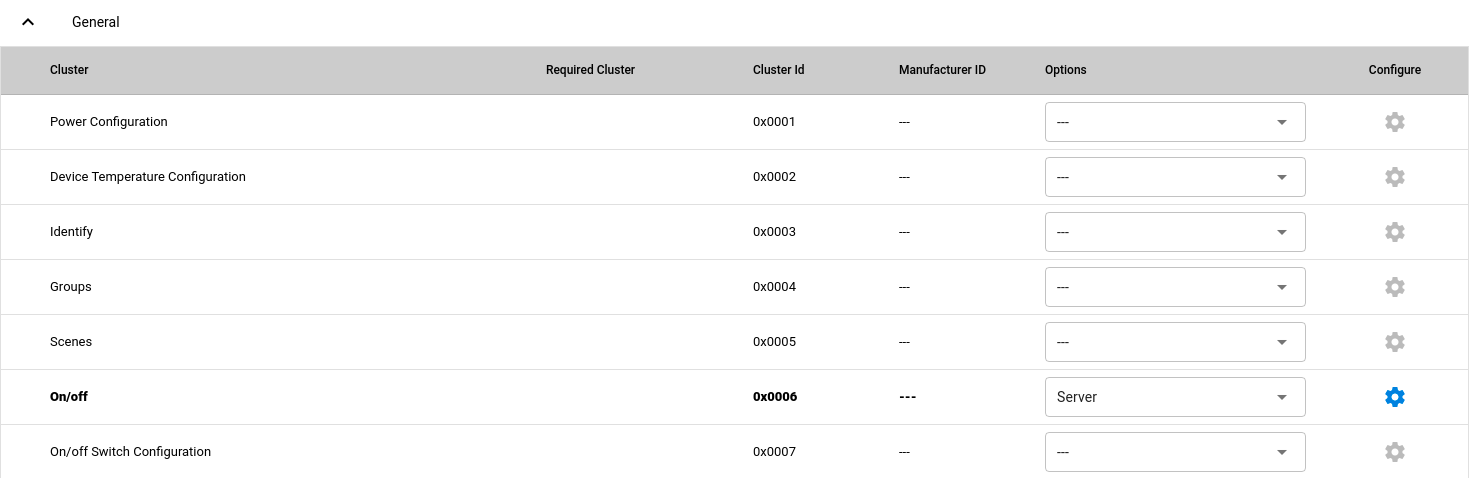
Configuring the On/off server cluster
Expand the Measurement & Sensing menu and configure the Temperature Measurement cluster by setting the Server option from the drop-down menu.
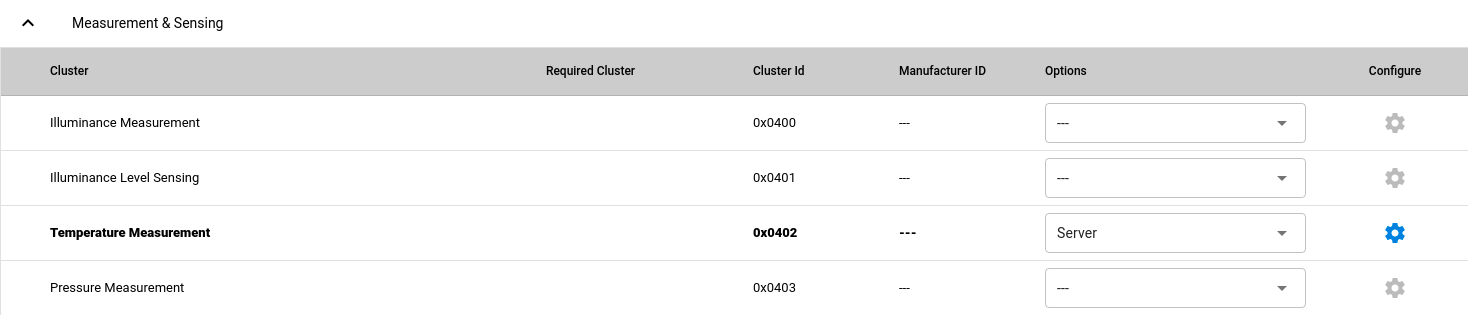
Configuring the Temperature Measurement server cluster
Go to the On/off cluster configuration and make sure that you have On and Off commands enabled:
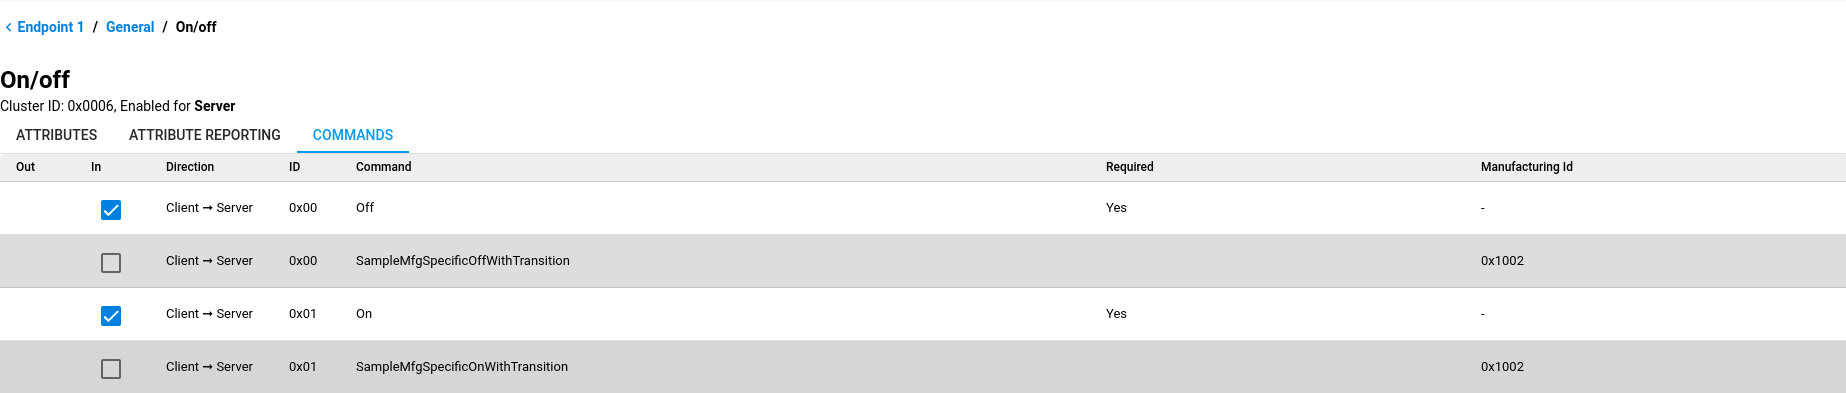
On/off cluster configuration
Save the file and exit.
Use the modified ZAP file to generate the C++ code that contains the selected clusters by running the following command in the
src/gen/directory:nrfconnect-dir/modules/lib/matter/scripts/tools/zap/generate.py src/template.zap
At this point, new clusters have been added to the Matter accessory.
Edit the main loop of the application
After adding clusters, you must modify the way in which the application interacts with the newly added clusters. This is needed to properly model the sensor’s behavior.
The src/app_task.cpp file contains the main loop of the application.
Complete the steps in the following subsections to modify the main loop.
Edit the event queue
The main application loop is based on an queue on which the events are posted by ZCL callbacks, the application itself or by other entities, such as Zephyr timers. In each iteration, the event is dequeued and a corresponding event handler is called.
Add new events
In the template sample application, the events are representing the following actions:
Pressing Button 1.
Releasing Button 1.
Factory reset timeout.
To model behaviour of a sensor, add the following new events to EventType in the src/app_event.h file:
Sensor activation.
Sensor deactivation.
Sensor measurement.
For example, the edited EventType can look like follows:
enum EventType : uint8_t { FunctionPress, FunctionRelease, FunctionTimer, SensorActivate, SensorDeactivate, SensorMeasure};
Add sensor timer
You need to make sure that the sensor is making measurements at the required time points.
For this purpose, use a Zephyr timer to post SensorMeasure events.
In the template sample, such a timer is being used to count down 6 seconds when Button 1 is being pressed to initiate the factory reset.
To add a new timer for the measurement event, edit the src/app_task.cpp file like follows:
k_timer sSensorTimer;

void SensorTimerHandler(k_timer *timer)
{
        GetAppTask().PostEvent(AppEvent{ AppEvent::SensorMeasure });
}

void StartSensorTimer(uint32_t aTimeoutMs)
{
        k_timer_start(&sSensorTimer, K_MSEC(aTimeoutMs), K_MSEC(aTimeoutMs));
}

void StopSensorTimer()
{
        k_timer_stop(&sSensorTimer);
}

int AppTask::Init()
{
        /*
        .      Original content
        */

        k_timer_init(&sSensorTimer, &SensorTimerHandler, nullptr);
        k_timer_user_data_set(&sSensorTimer, this);
        return 0;
}
If StartSensorTimer() is called, the SensorMeasure event is added to the event queue every aTimeoutMs milliseconds, as long as sSensorTimer has not been stopped.
Implement event handlers
When an event is dequeued, the application calls the event handler function. Because you have added new events, you must implement the corresponding handlers.
To add a new event handler, complete the following steps:
Edit the
src/app_task.cppfile like follows:void AppTask::SensorActivateHandler() { StartSensorTimer(500); } void AppTask::SensorDeactivateHandler() { StopSensorTimer(); } void AppTask::SensorMeasureHandler() { emberAfTemperatureMeasurementClusterSetMeasuredValueCallback(/* endpoint ID */ 1, /* temperature in 0.01*C */ int16_t(rand() % 5000)); }
With this addition, when
SensorMeasureHandler()is called, the Temperature Measurement cluster’s attribute is updated by calling a function from thetemperature-measurement-server.cpp, located atmodules/lib/matter/src/app/clusters/. If the sensor is active, the timer expiration event happens every half a second. This causes an invocation ofSensorMeasureHandler()and triggers an update of the sensor’s measured value. In the code fragment, the example value is updated randomly, but in a real sensor application it would be updated with the value obtained from external measurement.Declare these handler functions in
src/app_task.hto make sure the application builds properly.In the
src/app_task.cppfile, add cases for new events inDispatchEvent(), for example:void AppTask::DispatchEvent(const AppEvent &event) { switch (event.Type) { case AppEvent::FunctionPress: FunctionPressHandler(); break; case AppEvent::FunctionRelease: FunctionReleaseHandler(); break; case AppEvent::FunctionTimer: FunctionTimerEventHandler(); break; case AppEvent::SensorActivate: SensorActivateHandler(); break; case AppEvent::SensorDeactivate: SensorDeactivateHandler(); break; case AppEvent::SensorMeasure: SensorMeasureHandler(); break; default: LOG_INF("Unknown event received"); break; } }
Include headers for clusters’ callbacks
To have the required callback declaration for the Temperature Measurement cluster, make sure to include the following file in the src/app_task.cpp file:
#include <app/clusters/temperature-measurement-server/temperature-measurement-server.h>
Create a callback for sensor activation and deactivation
Up until now the events SensorActivate and SensorDeactivate are not present in the event queue.
This is because the attribute of the On/off cluster is not changed from within the AppTask.
It can only be changed externally, for example using the Matter controller.
However, the sensor application needs to know how this attribute is changing to know when the sensor is turned on and off. This means that there is a need to implement a callback function to post one of these events every time the On/off attribute changes.
To implement the callback function, create a new file, for example src/zcl_callbacks.cpp, and implement the callback in this file.
To see a list of callback functions that are customizable, open src/gen/callback-stub.cpp and look for functions with __attribute__((weak)).
It is sufficient just to implement emberAfPostAttributeChangeCallback (read the description in src/gen/callback-stub.cpp).
For example, the implementation can look like follows:
#include "app_task.h"

#include <app/common/gen/attribute-id.h>
#include <app/common/gen/attribute-type.h>
#include <app/common/gen/cluster-id.h>
#include <app/util/af-types.h>
#include <app/util/af.h>

using namespace ::chip;

void emberAfPostAttributeChangeCallback(EndpointId endpoint, ClusterId clusterId, AttributeId attributeId, uint8_t mask,
                                       uint16_t manufacturerCode, uint8_t type, uint16_t size, uint8_t *value)
{
        if (clusterId != ZCL_ON_OFF_CLUSTER_ID || attributeId != ZCL_ON_OFF_ATTRIBUTE_ID)
                return;

        GetAppTask().PostEvent(AppEvent(*value ? AppEvent::SensorActivate : AppEvent::SensorDeactivate));
}
Add new targets to CMakelists
To allow a proper build, you must update the CMakelists.txt file by adding the following targets:
$ZEPHYR_CONNECTEDHOMEIP_MODULE_DIR/src/app/clusters/on-off-server/on-off-server.cpp- for OnOff cluster callbacks.$ZEPHYR_CONNECTEDHOMEIP_MODULE_DIR/src/app/clusters/temperature-measurement-server/temperature-measurement-server.cpp- for TemperatureMeasurement cluster callbacks.src/zcl_callbacks.cpp- to include the callback implementation.
Testing the new sensor application
Note
Because of the limitations for reading the Temperature Measurement cluster attribute, commission the Matter device using the Python Controller when setting up Matter development environment.
To check if the sensor device is working, complete the following steps:
Connect the kit to the computer using a USB cable. The kit is assigned a COM port (Windows) or ttyACM device (Linux), which is visible in the Device Manager.
Connect to the kit with a terminal emulator (for example, PuTTY). See How to connect with PuTTY for the required settings.
Commission the device into a Thread network by following the guides linked on the Configuring Matter development environment page for the Matter controller you want to use. As part of this procedure, you will complete the following steps:
Configure Thread Border Router.
Build and install the Matter controller.
Commission the device.
Send Matter commands.
At the end of this procedure, LED 1 of the Matter device programmed with the sample starts flashing in the Short Flash Off state. This indicates that the device is fully provisioned, but does not yet have full Thread network connectivity.
Activate the sensor by running the following command on the On/off cluster with the correct node_ID assigned during commissioning:
zcl OnOff On node_ID 1 0
Read the measurement several times by checking value of
MeasuredValuein the Temperature Measurement cluster:zclread TemperatureMeasurement MeasuredValue node_ID 1 0
Deactivate the sensor by running the following command on the On/off cluster with the correct node_ID assigned during commissioning:
zcl OnOff Off node_ID 1 0
Read the measurement again. The measurement should not change.