M5StickC PLUS
Overview
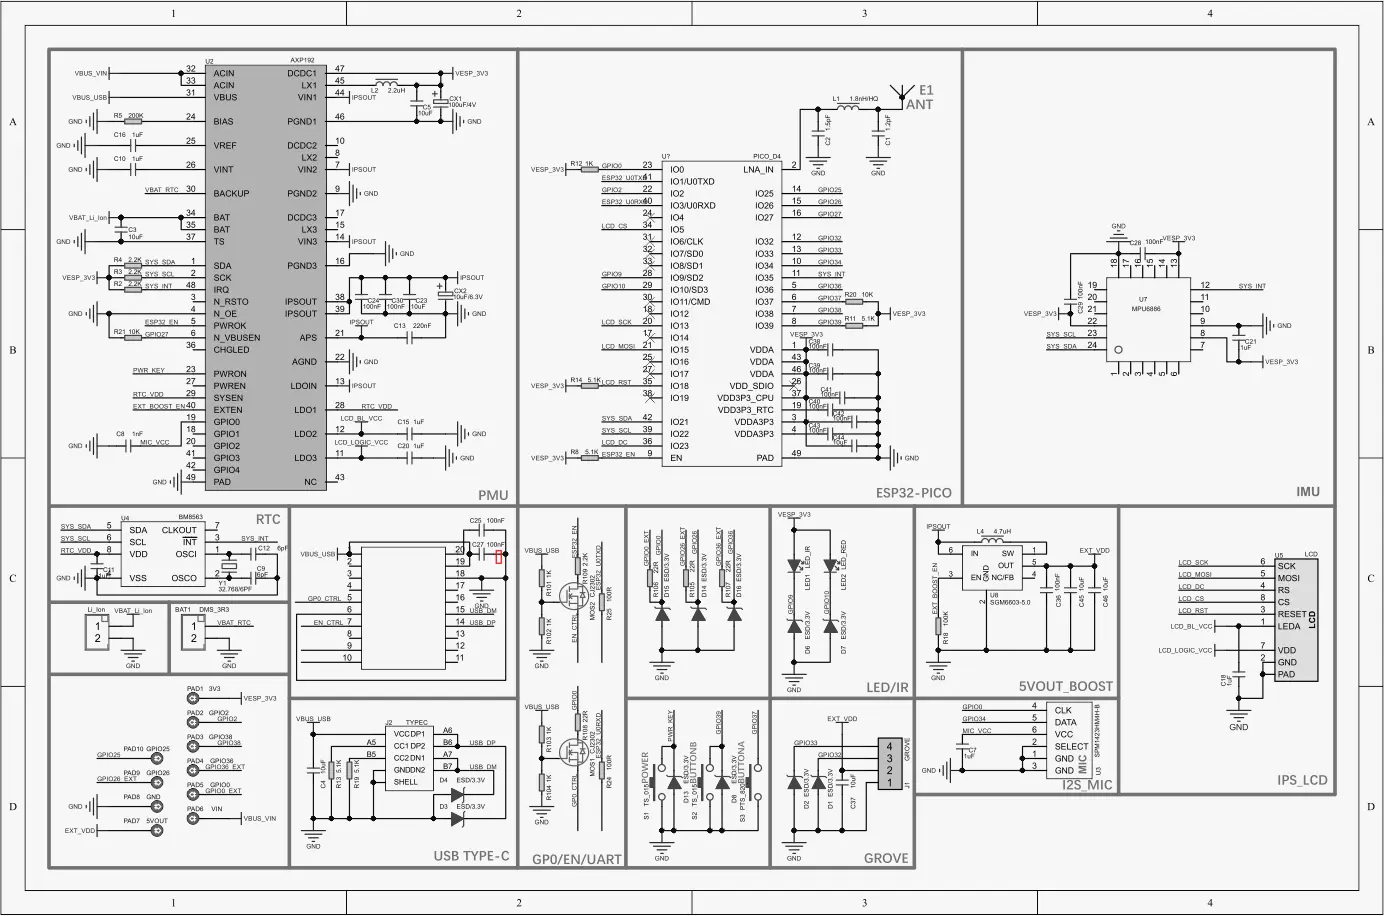
M5StickC PLUS, one of the core devices in M5Stacks product series, is an ESP32-based development board.
M5StickC PLUS features the following integrated components:
ESP32-PICO-D4 chip (240MHz dual core, 600 DMIPS, 520KB SRAM, Wi-Fi)
ST7789v2, LCD TFT 1.14”, 135x240 px screen
IMU MPU-6886
SPM-1423 microphone
RTC BM8563
PMU AXP192
120 mAh 3,7 V battery
Some of the ESP32 I/O pins are broken out to the board’s pin headers for easy access.
Functional Description
The following table below describes the key components, interfaces, and controls of the M5StickC PLUS board.
Key Component |
Description |
|---|---|
32.768 kHz RTC |
External precision 32.768 kHz crystal oscillator serves as a clock with low-power consumption while the chip is in Deep-sleep mode. |
ESP32-PICO-D4 module |
This ESP32-PICO-D4 module provides complete Wi-Fi and Bluetooth functionalities and integrates a 4-MB SPI flash. |
Diagnostic LED |
One user LED connected to the GPIO pin. |
USB Port |
USB interface. Power supply for the board as well as the communication interface between a computer and the board. Contains: TypeC x 1, GROVE(I2C+I/O+UART) x 1 |
Power Switch |
Power on/off button. |
A/B user buttons |
Two push buttons intended for any user use. |
LCD screen |
Built-in LCD TFT display (ST7789v2, 1.14”, 135x240 px) controlled by the SPI interface |
MPU-6886 |
The MPU-6886 is a 6-axis MotionTracking device that combines a 3-axis gyroscope and a 3-axis accelerometer. |
Built-in microphone |
The SPM-1423 I2S driven microphone. |
Start Application Development
Before powering up your M5StickC PLUS, please make sure that the board is in good condition with no obvious signs of damage.
System requirements
Prerequisites
Espressif HAL requires WiFi and Bluetooth binary blobs in order work. Run the command below to retrieve those files.
west blobs fetch hal_espressif
Note
It is recommended running the command above after west update.
Building & Flashing
ESP-IDF bootloader
The board is using the ESP-IDF bootloader as the default 2nd stage bootloader. It is build as a subproject at each application build. No further attention is expected from the user.
MCUboot bootloader
User may choose to use MCUboot bootloader instead. In that case the bootloader must be build (and flash) at least once.
There are two options to be used when building an application:
Sysbuild
Manual build
Note
User can select the MCUboot bootloader by adding the following line
to the board default configuration file.
`
CONFIG_BOOTLOADER_MCUBOOT=y
`
Sysbuild
The sysbuild makes possible to build and flash all necessary images needed to bootstrap the board with the ESP32 SoC.
To build the sample application using sysbuild use the command:
west build -b m5stickc_plus --sysbuild samples/hello_world
By default, the ESP32 sysbuild creates bootloader (MCUboot) and application images. But it can be configured to create other kind of images.
Build directory structure created by sysbuild is different from traditional Zephyr build. Output is structured by the domain subdirectories:
build/
├── hello_world
│   └── zephyr
│       ├── zephyr.elf
│       └── zephyr.bin
├── mcuboot
│    └── zephyr
│       ├── zephyr.elf
│       └── zephyr.bin
└── domains.yaml
Note
With --sysbuild option the bootloader will be re-build and re-flash
every time the pristine build is used.
For more information about the system build please read the Sysbuild (System build) documentation.
Manual build
During the development cycle, it is intended to build & flash as quickly possible. For that reason, images can be build one at a time using traditional build.
The instructions following are relevant for both manual build and sysbuild. The only difference is the structure of the build directory.
Note
Remember that bootloader (MCUboot) needs to be flash at least once.
Build and flash applications as usual (see Building an Application and Run an Application for more details).
# From the root of the zephyr repository
west build -b m5stickc_plus samples/hello_world
The usual flash target will work with the m5stickc_plus board
configuration. Here is an example for the Hello World
application.
# From the root of the zephyr repository
west build -b m5stickc_plus samples/hello_world
west flash
The default baud rate for the M5StickC PLUS is set to 1500000bps. If experiencing issues when flashing,
try using different values by using --esp-baud-rate <BAUD> option during
west flash (e.g. west flash --esp-baud-rate 115200).
You can also open the serial monitor using the following command:
west espressif monitor
After the board has automatically reset and booted, you should see the following message in the monitor:
***** Booting Zephyr OS vx.x.x-xxx-gxxxxxxxxxxxx *****
Hello World! m5stickc_plus
Debugging
M5StickC PLUS debugging is not supported due to pinout limitations.