Altera MAX10
Overview
The Zephyr kernel is supported on the Altera MAX10 Rev C development kit, using the Nios II Gen 2 soft CPU.
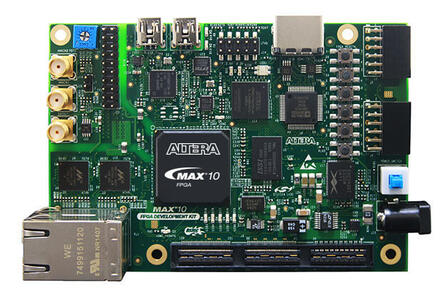
Altera’s MAX* 10 (Credit: Altera)
Hardware
DIP Switch settings
There are two sets of switches on the back of the board. Of particular importance is SW2:
Switch 2 (CONFIG_SEL) should be in the OFF (up) position so that the first boot image is CFM0
Switch 3 (VTAP_BYPASS) needs to be in the ON (down) position or the flashing scripts won’t work
Switch 4 (HSMC_BYPASSN) should be OFF (up)
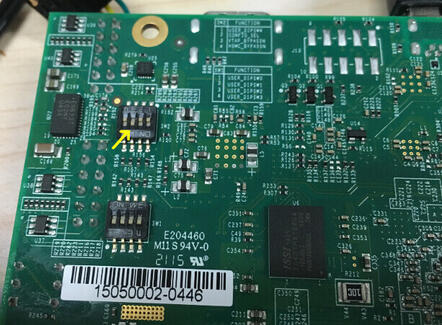
Other switches are user switches, their position is application-specific.
Necessary Software
You will need the Altera Quartus SDK in order to work with this device. The Altera Lite Distribution of Quartus may be obtained without charge.
For your convenience using the SDK tools (such as nios2-configure-sof),
you should put the binaries provided by the SDK
in your path. Below is an example, adjust ALTERA_BASE to where you installed the
SDK:
export ALTERA_BASE=/opt/altera_lite/16.0
export PATH=$PATH:$ALTERA_BASE/quartus/bin:$ALTERA_BASE/nios2eds/bin
You may need to adjust your udev rules so that you can talk to the USB Blaster II peripheral, which is the built-in JTAG interface for this device.
The following works for Fedora 23:
# For Altera USB-Blaster permissions.
SUBSYSTEM=="usb",\
ENV{DEVTYPE}=="usb_device",\
ATTR{idVendor}=="09fb",\
ATTR{idProduct}=="6010",\
MODE="0666",\
NAME="bus/usb/$env{BUSNUM}/$env{DEVNUM}",\
RUN+="/bin/chmod 0666 %c"
SUBSYSTEM=="usb",\
ENV{DEVTYPE}=="usb_device",\
ATTR{idVendor}=="09fb",\
ATTR{idProduct}=="6810",\
MODE="0666",\
NAME="bus/usb/$env{BUSNUM}/$env{DEVNUM}",\
RUN+="/bin/chmod 0666 %c"
You can test connectivity with the SDK jtagconfig tool, you should see something like:
$ jtagconfig
1) USB-BlasterII [1-1.2]
  031050DD   10M50DA(.|ES)/10M50DC
  020D10DD   VTAP10
Reference CPU
A reference CPU design of a Nios II/f core is included in the Zephyr tree in the soc/nios2/nios2f-zephyr/cpu directory.
Flash this CPU using the nios2-configure-sof SDK tool with the FPGA
configuration file
soc/nios2/nios2f-zephyr/cpu/ghrd_10m50da.sof:
$ nios2-configure-sof ghrd_10m50da.sof
This CPU is a Nios II/F core with a 16550 UART, JTAG UART, and the Avalon Timer. For any Nios II SOC definition, you can find out more details about the CPU configuration by inspecting system.h in the SOC’s include directory.
Console Output
16550 UART
By default, the kernel is configured to send console output to the 16550 UART. You can monitor this on your workstation by connecting to the top right mini USB port on the board (it will show up in /dev as a ttyUSB node), and then running minicom with flow control disabled, 115200-8N1 settings.
JTAG UART
You can also have it send its console output to the JTAG UART.
Enable jtag_uart node in altera_max10.dts or overlay file:
&jtag_uart {
    status = "okay";
    current-speed = <115200>;
};
To view these messages on your local workstation, run the terminal application in the SDK:
$ nios2-terminal
Programming and Debugging
Flashing
Flashing Kernel into UFM
The usual flash target will work with the altera_max10 board
configuration. Here is an example for the Hello World
application.
# From the root of the zephyr repository
west build -b altera_max10 samples/hello_world
west flash
Refer to Building an Application and Run an Application for more details.
This provisions the Zephyr kernel and the CPU configuration onto the board, using the scripts/support/quartus-flash.py script. After it completes the kernel will immediately boot.
Flashing Kernel directly into RAM over JTAG
The SDK included the nios2-download tool which will let you flash a kernel directly into RAM and then boot it from the __start symbol.
In order for this to work, your entire kernel must be located in RAM. Make sure the following config options are disabled:
CONFIG_XIP=n
CONFIG_INCLUDE_RESET_VECTOR=n
Then, after building your kernel, push it into device’s RAM by running this from the build directory:
$ nios2-download --go zephyr/zephyr.elf
If you have a console session running (either minicom or nios2-terminal) you should see the application’s output. There are additional arguments you can pass to nios2-download so that it spawns a GDB server that you can connect to, although it’s typically simpler to just use nios2-gdb-server as described below.
Debugging
The Altera SDK includes a GDB server which can be used to debug a MAX10 board. You can either debug a running image that was flashed onto the device in User Flash Memory (UFM), or load an image over the JTAG using GDB.
Debugging With UFM Flashed Image
You can debug an application in the usual way. Here is an example.
# From the root of the zephyr repository
west build -b altera_max10 samples/hello_world
west debug
You will see output similar to the following:
Nios II GDB server running on port 3335
Ignoring --stop option because --tcpport also specified
GNU gdb (GDB) 7.11.0.20160511-git
Copyright (C) 2016 Free Software Foundation, Inc.
License GPLv3+: GNU GPL version 3 or later <http://gnu.org/licenses/gpl.html>
This is free software: you are free to change and redistribute it.
There is NO WARRANTY, to the extent permitted by law.  Type "show copying"
and "show warranty" for details.
This GDB was configured as "--host=x86_64-pokysdk-linux --target=nios2-zephyr-elf".
Type "show configuration" for configuration details.
For bug reporting instructions, please see:
<http://www.gnu.org/software/gdb/bugs/>.
Find the GDB manual and other documentation resources online at:
<http://www.gnu.org/software/gdb/documentation/>.
For help, type "help".
Type "apropos word" to search for commands related to "word"...
Reading symbols from /projects/zephyr/samples/hello_world/build/zephyr/zephyr.elf...done.
Remote debugging using :3335
Using cable "USB-BlasterII [3-1.3]", device 1, instance 0x00
Resetting and pausing target processor: OK
Listening on port 3335 for connection from GDB: accepted
isr_tables_syms () at /projects/zephyr/arch/common/isr_tables.c:63
63      GEN_ABSOLUTE_SYM(__ISR_LIST_SIZEOF, sizeof(struct _isr_list));
(gdb) b z_prep_c
Breakpoint 1 at 0xdf0: file /projects/zephyr/arch/nios2/core/prep_c.c, line 36.
(gdb) b z_cstart
Breakpoint 2 at 0x1254: file /projects/zephyr/kernel/init.c, line 348.
(gdb) c
Continuing.

Breakpoint 2, z_cstart () at /projects/zephyr/kernel/init.c:348
348     {
(gdb)
To start debugging manually:
nios2-gdb-server --tcpport 1234 --stop --reset-target
And then connect with GDB from the build directory:
nios2-poky-elf-gdb zephyr/zephyr.elf -ex "target remote :1234"
Debugging With JTAG Flashed Image
In order for this to work, execute-in-place must be disabled, since the GDB ‘load’ command can only put text and data in RAM. Ensure this is in your configuration:
CONFIG_XIP=n
It is OK for this procedure to leave the reset vector enabled, unlike nios2-download (which errors out if it finds sections outside of SRAM) it will be ignored.
In a terminal, launch the nios2 GDB server. It doesn’t matter what kernel (if any) is on the device, but you should have at least flashed a CPU using nios2-configure-sof. You can leave this process running.
$ nios2-gdb-server --tcpport 1234 --tcppersist --init-cache --reset-target
Build your Zephyr kernel, and load it into a GDB built for Nios II (included in the Zephyr SDK) from the build directory:
$ nios2-poky-elf-gdb zephyr/zephyr.elf
Then connect to the GDB server:
(gdb) target remote :1234
And then load the kernel image over the wire. The CPU will not start from the reset vector, instead it will boot from the __start symbol:
(gdb) load
Loading section reset, size 0xc lma 0x0
Loading section exceptions, size 0x1b0 lma 0x400020
Loading section text, size 0x8df0 lma 0x4001d0
Loading section devconfig, size 0x30 lma 0x408fc0
Loading section rodata, size 0x3f4 lma 0x408ff0
Loading section datas, size 0x888 lma 0x4093e4
Loading section initlevel, size 0x30 lma 0x409c6c
Loading section _k_task_list, size 0x58 lma 0x409c9c
Loading section _k_task_ptr, size 0x8 lma 0x409cf4
Loading section _k_event_list, size 0x10 lma 0x409cfc
Start address 0x408f54, load size 40184
Transfer rate: 417 KB/sec, 368 bytes/write.
After this is done you may set breakpoints and continue execution. If you ever want to reset the CPU, issue the 'load' command again.