Getting started with Thingy:53
This guide helps you get started with the Nordic Thingy:53. It tells you how to update the firmware on the nRF5340 System on Chip (SoC) on the Nordic Thingy:53, and how to get started with machine learning with Edge Impulse.
If you have already set up your Nordic Thingy:53 and want to learn more, see the following documentation:
Developing with Thingy:53 for more advanced topics related to the Nordic Thingy:53.
The introductory documentation for more information on the nRF Connect SDK and the development environment.
Minimum requirements
Make sure you have all the required hardware and that your computer or mobile device has one of the supported operating systems.
Hardware
Universal Serial Bus (USB)-C cable
Computer or mobile device
Software
On your computer, one of the following operating systems:
Microsoft Windows
macOS
Ubuntu Linux
The operating system versions that support the nRF Connect SDK tools are listed in the Supported operating systems section.
If you are using a mobile device, one of the following operating systems:
Android
iOS
Installing the required software
When using a computer to work with the Nordic Thingy:53 firmware, install nRF Connect for Desktop. After installing and starting the application, install the Programmer app.
When using a mobile device to work with the Nordic Thingy:53, install the nRF Programmer mobile application from the corresponding application store.
Getting started with precompiled firmware samples
The Nordic Thingy:53 is preloaded with Edge Impulse application firmware, MCUboot bootloader, and a SoftDevice controller on the network core of the nRF5340 SoC. For more information on the firmware and associated features, see Developing with Thingy:53.
In addition to Edge Impulse, the nRF Connect SDK contains multiple precompiled samples that you can program to the Nordic Thingy:53. For a non-exhaustive list, see Samples and applications for Thingy:53 with FOTA out of the box in Developing with Thingy:53.
To try different samples or to update the existing firmware on the Nordic Thingy:53, you can use Bluetooth® Low Energy (LE), USB (MCUboot), or an external debug probe.
Updating through Bluetooth LE
You can update the Nordic Thingy:53 application and network core over Bluetooth LE using the nRF Programmer mobile application for Android or iOS.
Complete these steps to update the firmware:
Open the nRF Programmer app.
A list of available samples appears.
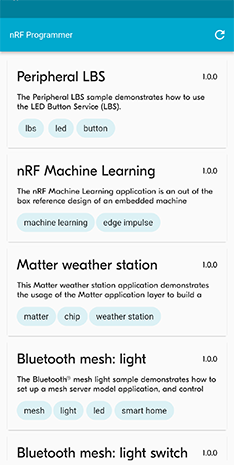
nRF Programmer - list of samples
Select a sample.
Application info appears.
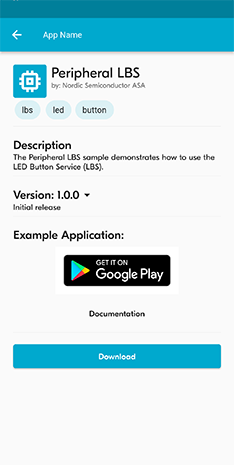
nRF Programmer - Application Info
Select the version of the sample from the drop-down menu.
Tap Download.
When the download is complete, the name of the button changes to Install.
Tap Install.
A list of nearby devices and their signal strengths appears.
Select your Nordic Thingy:53 from the list. It is listed as El Thingy:53.
The transfer of the firmware image starts, and a progress wheel appears.
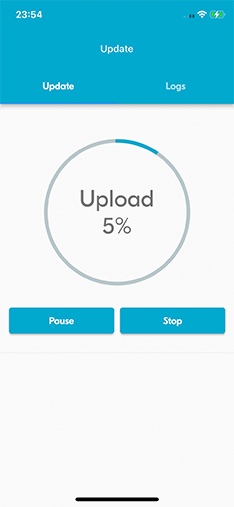
nRF Programmer - progress wheel
If you want to pause the update process, tap Pause. If you want to stop the update process, tap Stop.
The image transfer is complete when the progress wheel reaches 100%. The Nordic Thingy:53 is reset and updated to the new firmware sample.
Tap Done to return to Application info.
Updating through USB
You can update the Nordic Thingy:53 application and network core firmware over USB by using MCUboot, which is a secure bootloader that you can use to update applications without an external debugger.
Note
Do not unplug the Nordic Thingy:53 during this process.
Complete the following steps to update the firmware:
Open the Nordic Thingy:53 Downloads page.
Go to the Precompiled application firmware section, and download the latest version.
Extract the zip file to a location of your choice.
The
CONTENTS.txtfile in the extracted folder contains the location and names of the different firmware images.Open the connector cover on the side of the Nordic Thingy:53 and plug the Nordic Thingy:53 into the computer using a USB-C cable.

The Nordic Thingy:53 schematic - SW1 and USB connector cover
Move the power switch SW1 to the ON position.
Open nRF Connect for Desktop and launch the Programmer app.
Move the power switch SW1 to the OFF position.
Take off the top cover to access the SW2 button.
Press SW2 while switching SW1 to the ON position.

The Nordic Thingy:53 schematic - SW1 and SW2
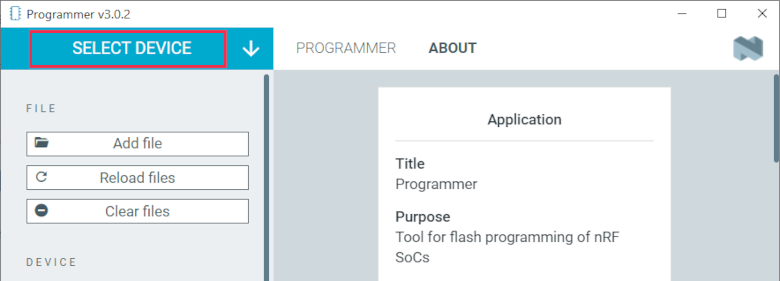
In the Programmer navigation bar, click SELECT DEVICE.
A drop-down menu appears.
In the drop-down menu, select Bootloader Thingy:53.
Click Add file in the FILE section, and select Browse.
A file explorer window appears.
Navigate to the folder where you extracted the application firmware.
Open the
Peripheral_LBSfolder, select the update file and click Open.The update file is titled
peripheral_lbs_<version-number>_thingy53_nrf5340.zip.Click the Write button in the DEVICE section.
The MCUboot DFU window appears.
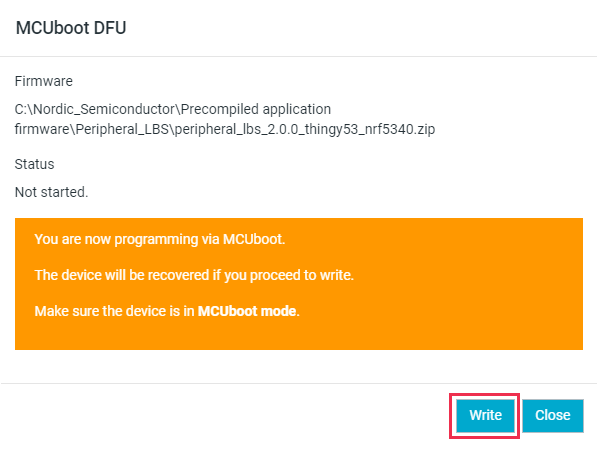
Programmer - MCUboot DFU window
Click Write in the MCUboot DFU window.
The flash slot is erased. When the flash slot has been erased, image transfer starts and a progress bar appears.
When the image transfer has been completed, the network core part of the image is transferred from RAM to the network core flash. This can take up to 20 seconds.
When the update is complete, a Completed successfully message appears.
You can now disconnect the Nordic Thingy:53 from the computer.
Updating through external debug probe
You can update the Nordic Thingy:53 application and network core firmware by using an external debug probe.
Note
The external debug probe must support Arm Cortex-M33, such as the nRF5340 DK. You need a 10-pin 2x5 socket-socket 1.27 mm IDC (Serial Wire Debug (SWD)) JTAG cable to connect to the external debug probe.
Complete these steps to update the firmware. In these steps, the nRF5340 DK is used as the external debug probe. Do no unplug or power off the devices during this process.
Open the Nordic Thingy:53 Downloads page.
Go to the Precompiled application firmware section and download the latest version.
Extract the zip file to a location of your choice.
The
CONTENTS.txtfile in the extracted folder contains the location and names of the different firmware images.Open nRF Connect for Desktop and launch the Programmer app.
Prepare the hardware:
Open the connector cover on the side of the Nordic Thingy:53.
Use a JTAG cable to connect the Nordic Thingy:53 to the debug out port on a 10-pin external debug probe.

Nordic Thingy:53 connected to the debug port on a 10-pin external debug probe
Power on the Nordic Thingy:53; move the power switch SW1 to the ON position.
Power on the external debug probe.
Connect the external debug probe to the computer with a micro-USB cable.
In the Programmer app’s navigation bar, No devices available changes to SELECT DEVICE.
Programmer - Select device
Click Select device and select the appropriate debug probe entry from the drop-down list.
The icon text changes to board name and the ID of the selected device, and the Device memory layout section indicates that the device is connected.
You can identify the nRF5340 DK by its PCA number PCA10095 and its ID that is printed on the label sticker on the DK.
If the nRF5340 DK does not show up in the drop-down list, press
Ctrl+Rin Windows orcommand+Rin macOS to restart the Programmer application.Click Add file in the FILE section, and select Browse.
A file explorer window appears.
Navigate to the folder where you extracted the application firmware.
Open the folder for the application that you want to transfer to the Nordic Thingy:53.
Select the corresponding HEX file to be used with the debug probe and click Open.
The HEX file appears in the File memory layout section.
Click Erase & write in the DEVICE section of the side panel.
The update is complete when the animation in the Programmer app’s Device memory layout section ends.
Getting started with machine learning
The Nordic Thingy:53 is preprogrammed with Edge Impulse firmware. To connect the Nordic Thingy:53 to the Edge Impulse Studio, use the nRF Edge Impulse mobile application to connect over Bluetooth LE, or connect the Nordic Thingy:53 to a computer to connect over USB.
The Edge Impulse firmware enables data collection from all the sensors on the Nordic Thingy:53. You can use the collected data to train and test machine learning models. Deploy the trained machine learning model to the Nordic Thingy:53 over Bluetooth LE or USB.
Complete the following steps to get started with Edge Impulse:
Go to the Edge Impulse website.
Create a free Edge Impulse account.
Follow the instructions in the Nordic Semi Thingy:53 page.
Next steps
You have now completed getting started with the Nordic Thingy:53. See the following links for where to go next:
Developing with Thingy:53 for more advanced topics related to the Nordic Thingy:53.
The introductory documentation for more information on the nRF Connect SDK and the development environment.