nRF9160: AWS IoT
The AWS IoT sample demonstrates how an nRF9160-based device communicates with the AWS IoT message broker over MQTT. This sample showcases the use of the AWS IoT library. The sample implements AWS FOTA through AWS IoT.
Requirements
The sample supports the following development kits:
Hardware platforms |
PCA |
Board name |
Build target |
|---|---|---|---|
PCA20035 |
thingy91_nrf9160 |
|
|
PCA10090 |
|
When built for an _ns build target, the sample is configured to compile and run as a non-secure application with Cortex-M Security Extensions enabled.
Therefore, it automatically includes Trusted Firmware-M that prepares the required peripherals and secure services to be available for the application.
Overview
The sample publishes two different types of messages in JSON object string format to the AWS IoT message broker.
These messages are sent to the AWS IoT shadow topic $aws/things/<thingname>/shadow/update.
Below are the two types of messages that are published:
Type 1: The message comprises of a battery voltage value sampled from the nRF9160 SiP and a corresponding timestamp in milliseconds (UNIX time), that is retrieved from the Date-Time library.
Type 2: The message adds a configurable firmware version number to type 1 messages. This firmware version number is used in correlation with FOTA DFU, which is supported by the sample and the AWS IoT library. See the AWS FOTA library for information on how to create FOTA jobs.
A type 2 message is only published upon an initial connection to the sample, while a type 1 message is published sequentially with a configurable time in between each publishing of the data.
In addition to publishing data, the sample also subscribes to the AWS IoT shadow delta topic, and two customizable application-specific topics.
The customizable topics are not part of the AWS IoT shadow service and must therefore be passed to the AWS IoT library using the aws_iot_subscription_topics_add() function.
Configuration
See Configuring your application for information about how to permanently or temporarily change the configuration.
Setup
To run this sample and connect to AWS IoT, complete the steps described in the AWS IoT documentation. This documentation retrieves the AWS IoT broker hostname, security tag, and client ID. The corresponding options that must be set for each of the aforementioned values are:
Set these options in the project configuration file located at samples/nrf9160/aws_iot/prj.conf.
For documentation related to FOTA DFU, see AWS FOTA.
Configuration options
The application-specific configurations used in the sample are listed below.
They are located in samples/nrf9160/aws_iot/Kconfig.
- CONFIG_APP_VERSION
Publishes the application version number to the AWS IoT message broker.
- CONFIG_PUBLICATION_INTERVAL_SECONDS
Configures the time interval between each publishing of the message.
- CONFIG_CONNECTION_RETRY_TIMEOUT_SECONDS
Configures the number of seconds between each AWS IoT connection retry.
Note
The sample sets the option CONFIG_MQTT_KEEPALIVE to the maximum allowed value, 1200 seconds (20 minutes) as specified by AWS IoT Core.
This is to limit the IP traffic between the device and the AWS IoT message broker for supporting a low power sample.
In certain LTE networks, the NAT timeout can be considerably lower than 1200 seconds.
As a recommendation, and to prevent the likelihood of getting disconnected unexpectedly, set the option CONFIG_MQTT_KEEPALIVE to the lowest timeout limit (Maximum allowed MQTT keepalive and NAT timeout).
Building and running
This sample can be found under samples/nrf9160/aws_iot in the nRF Connect SDK folder structure.
When built as firmware image for the _ns build target, the sample has Cortex-M Security Extensions (CMSE) enabled and separates the firmware between Non-Secure Processing Environment (NSPE) and Secure Processing Environment (SPE).
Because of this, it automatically includes the Trusted Firmware-M (TF-M).
To read more about CMSE, see Processing environments.
To build the sample with Visual Studio Code, follow the steps listed on the How to build an application page in the nRF Connect for VS Code extension documentation. See Building and programming an application for other building and programming scenarios and Testing and debugging an application for general information about testing and debugging in the nRF Connect SDK.
Note
The sample might require increasing the values of the CONFIG_AWS_IOT_MQTT_RX_TX_BUFFER_LEN and CONFIG_AWS_IOT_MQTT_PAYLOAD_BUFFER_LEN options.
After building the sample, program it to your development kit.
Testing
After programming the sample to your development kit, complete the following steps to test it:
Connect the kit to the computer using a USB cable. The kit is assigned a COM port (Windows) or ttyACM device (Linux), which is visible in the Device Manager.
Connect to the kit with a terminal emulator (for example, PuTTY). See How to connect with PuTTY for the required settings.
Power on or reset the kit.
Observe the output in the terminal over UART.
Sample output
When the sample runs, the device boots, and the sample displays the following output in the terminal over UART:
*** Booting Zephyr OS build v2.3.0-rc1-ncs1-snapshot1-6-gad0444b058ef  ***
<inf> aws_iot_sample: AWS IoT sample started, version: v1.0.0
<inf> aws_iot_sample: LTE cell changed: Cell ID: 33703711, Tracking area: 2305
<inf> aws_iot_sample: PSM parameter update: TAU: -1, Active time: -1
<inf> aws_iot_sample: RRC mode: Connected
<inf> aws_iot_sample: Network registration status: Connected - roaming
<inf> aws_iot_sample: PSM parameter update: TAU: 3600, Active time: 60
<inf> aws_iot_sample: RRC mode: Idle
<inf> aws_iot_sample: AWS_IOT_EVT_CONNECTING
<inf> aws_iot_sample: RRC mode: Connected
<inf> aws_iot_sample: RRC mode: Idle
<inf> aws_iot_sample: RRC mode: Connected
<inf> aws_iot_sample: AWS_IOT_EVT_CONNECTED
<inf> aws_iot_sample: Publishing: {
"state":    {
        "reported":    {
        "app_version":    "v1.0.0",
        "batv":    4304,
        "ts":    1592305354579
        }
}
} to AWS IoT broker
<inf> aws_iot_sample: AWS_IOT_EVT_READY
<inf> aws_iot_sample: RRC mode: Idle
<inf> aws_iot_sample: LTE cell changed: Cell ID: 34237195, Tracking area: 2305
<inf> aws_iot_sample: Publishing: {
"state":    {
        "reported":    {
        "batv":    4308,
        "ts":    1592305414579
        }
}
} to AWS IoT broker
<inf> aws_iot_sample: Next data publication in 60 seconds
<inf> aws_iot_sample: RRC mode: Connected
<inf> aws_iot_sample: RRC mode: Idle
<inf> aws_iot_sample: LTE cell changed: Cell ID: 33703711, Tracking area: 2305
<inf> aws_iot_sample: RRC mode: Connected
<inf> aws_iot_sample: Publishing: {
"state":    {
        "reported":    {
        "batv":    4308,
        "ts":    1592305474596
        }
}
} to AWS IoT broker
<inf> aws_iot_sample: Next data publication in 60 seconds
To observe incoming messages in the AWS IoT console, navigate to the AWS IoT Core service and click MQTT test client. To observe messages that are sent from the device, subscribe to the $aws/things/<client_id>/shadow/update shadow topic or the wild card token #.
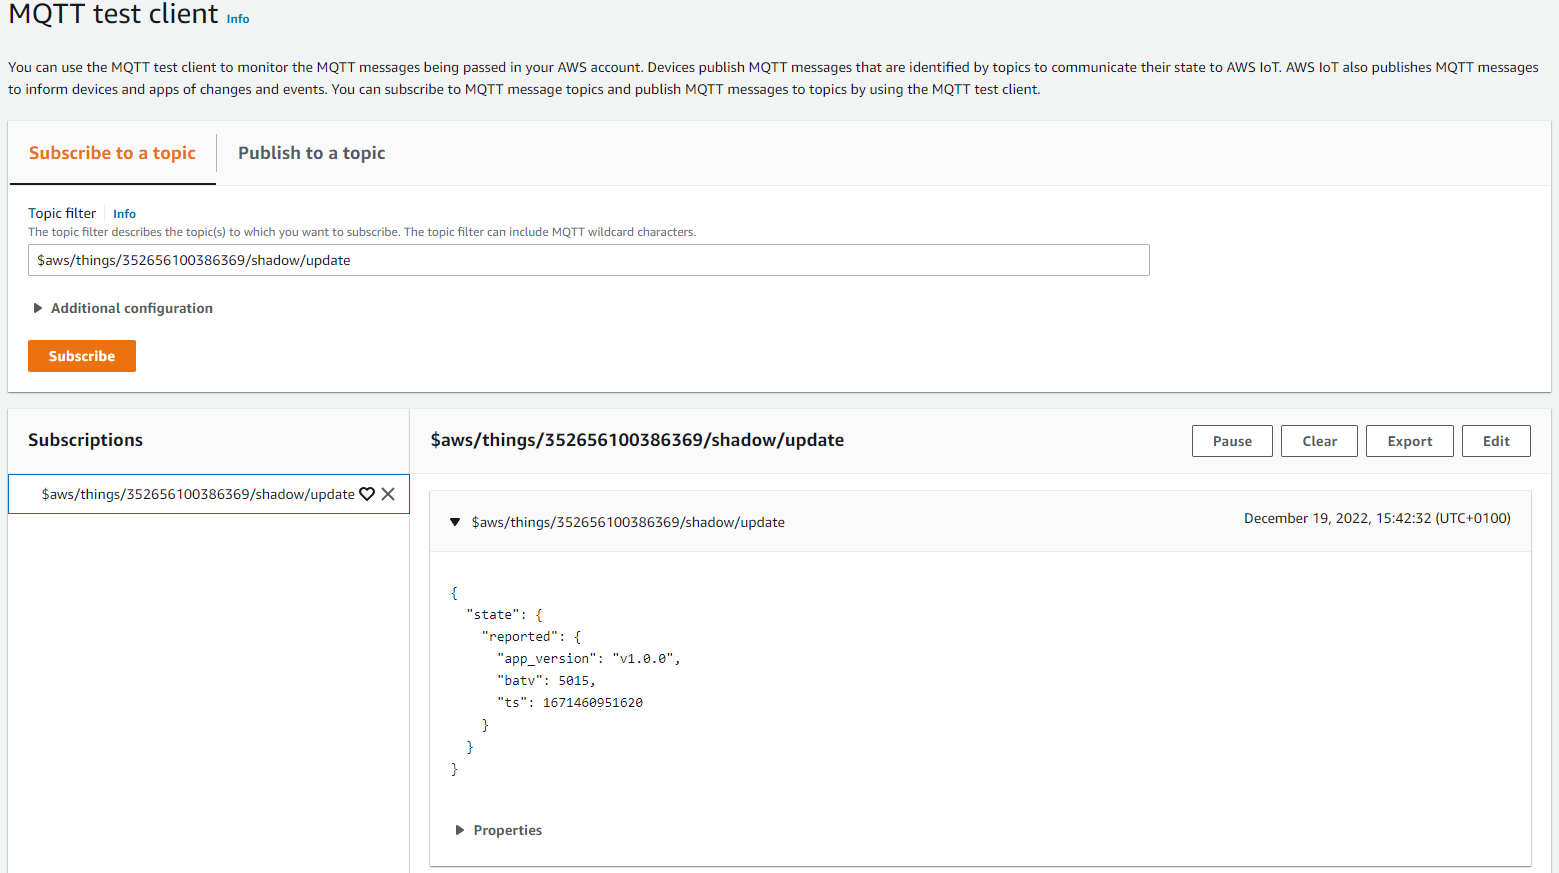
AWS IoT Core MQTT test client
Testing and debugging
If you have issues with the sample, refer to Testing and debugging an application.
Dependencies
This sample uses the following nRF Connect SDK libraries and drivers:
It uses the following sdk-nrfxlib library:
In addition, it uses the following secure firmware component: