Developing with nRF9160 DK
The nRF9160 DK is a hardware development platform used to design and develop application firmware on the nRF9160 LTE Cat-M1 and Cat-NB1 System in Package (SiP).
See the nRF9160 DK Hardware guide for detailed information about the nRF9160 DK hardware. To get started with the nRF9160 DK, follow the steps in the Getting started with nRF9160 DK section. If you are not familiar with the nRF Connect SDK and the development environment, see the introductory documentation.
Board controller
The nRF9160 DK contains an nRF52840 SoC that is used to route some of the nRF9160 SiP pins to different components on the DK, such as LEDs and buttons, and to specific pins of the nRF52840 SoC itself. For a complete list of all the routing options available, see the nRF9160 DK board control section in the nRF9160 DK User Guide.
The nRF52840 SoC on the DK comes preprogrammed with a firmware. If you need to restore the original firmware at some point, download the nRF9160 DK board controller firmware from the nRF9160 DK downloads page. To program the HEX file, use nrfjprog (which is part of the nRF Command Line Tools).
If you want to route some pins differently from what is done in the preprogrammed firmware, program the Hello World sample instead of the preprogrammed firmware.
Build the sample (located under ncs/zephyr/samples/hello_world) for the nrf9160dk_nrf52840 board.
To change the routing options, enable or disable the corresponding devicetree nodes for that board as needed.
See Board controller firmware for detailed information.
Updating the nRF Cloud certificate
When you wish to use nRF Cloud’s REST Application Programming Interface (API), the DK requires a valid security certificate. This means that you need to update the certificate stored on the DK. To do so, you need to download a new certificate and then provision it to your DK.
Downloading the nRF Cloud certificate
Complete the following steps to download the nRF Cloud certificate for your nRF9160 DK:
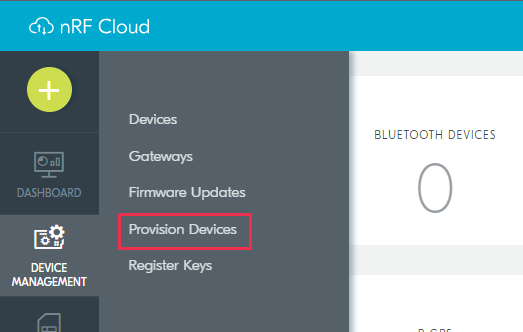
Go to nRF Cloud and sign in.
Click Device Management in the left pane and select Provision Devices.
nRF Cloud - Provision Devices
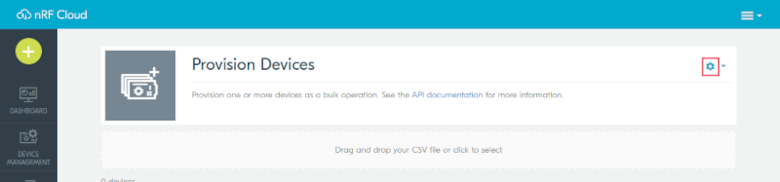
In the page that opens up, click the gear icon near the upper right corner and select Create JITP Certificates.
nRF Cloud - Gear icon in Provision Devices
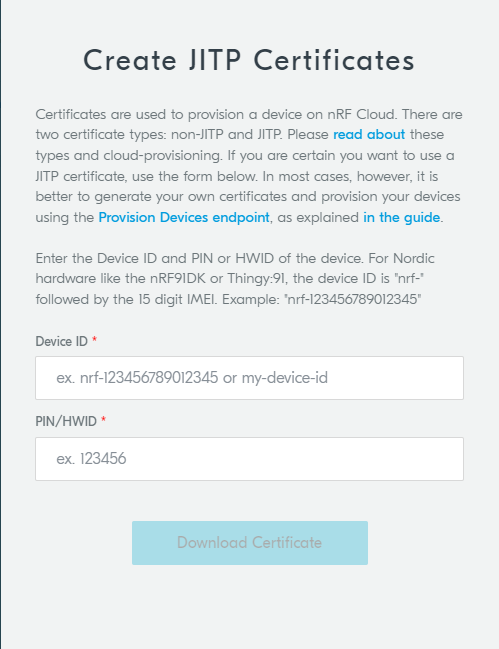
The Create JITP Certificates dialog box opens.
nRF Cloud - Create JITP Certificates dialog box
Enter the following information:
Device ID: the device ID is composed of nrf- and the 15-digit International Mobile (Station) Equipment Identity (IMEI) number that is printed on the label of your nRF9160 DK. For example, nrf-123456789012345.
Ownership code: the ownership code is the PIN or the hardware ID of your DK, and it is found on the label of your nRF9160 DK.
If the label contains a PIN in addition to the IMEI number, enter this pin. If it does not contain a PIN, enter the Hardware ID (HWID) HEX code, with or without colons. For example, AA:BB:CC:DD:EE:FF or AABBCCDDEEFF.
Note
The ownership code serves as a password and proves that you own the specific nRF9160 DK. Therefore, do not share it with anyone.
Click Download Certificate and save the
.cert.jsonfile to a folder of your choice.Note
The certificate contains all the information that is needed to connect your nRF9160 DK to nRF Cloud. Therefore, do not share it with anyone.
Provisioning the nRF Cloud certificate
After downloading the certificate, you must provision it to your nRF9160 DK.
Note
The application firmware on the nRF9160 DK must support long AT commands up to 3 kB to provision the certificate. If you have updated the application firmware, this requirement is fulfilled.
Complete the following steps to provision the certificate:
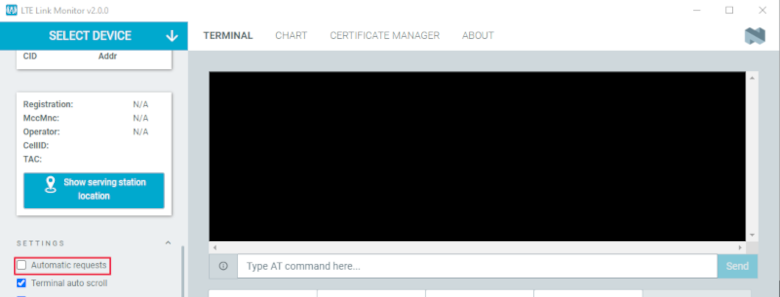
Open the LTE Link Monitor app from nRF Connect for Desktop.
In the SETTINGS section of the side panel, deselect the checkbox for Automatic requests if it is selected.
If you have already inserted the SIM card into your DK, remove it before you continue.
Connect the DK to the computer with a micro-USB cable, and turn it on.
Click Select device and select the DK from the drop-down list. You can identify the nRF9160 DK by the fact that it has three COM ports.
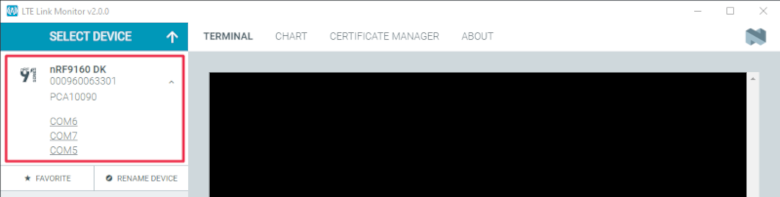
LTE Link Monitor - COM ports
If the three COM ports are not visible, press
Ctrl+Rin Windows orcommand+Rin macOS to restart the Programmer application.The drop-down text changes to the type of the selected device, with the SEGGER ID below the name.
Click TERMINAL in the navigation bar to switch to the terminal view.

LTE Link Monitor - Terminal
Enter
AT+CFUN=4in the text field for AT commands and click Send. This AT command puts the modem to offline state.Enter
AT+CFUN?in the text field for AT commands and click Send. This AT command returns the state of the modem.The command must return
+CFUN: 4, which indicates that the modem is in offline state. If it returns a different value, repeat the previous step.Click CERTIFICATE MANAGER in the navigation bar to switch to the certificate manager view.

LTE Link Monitor - Certificate Manager
Click Load from JSON and select the
*.cert.jsonfile that you downloaded from nRF Cloud. Alternatively, you can drag and drop the file onto the GUI.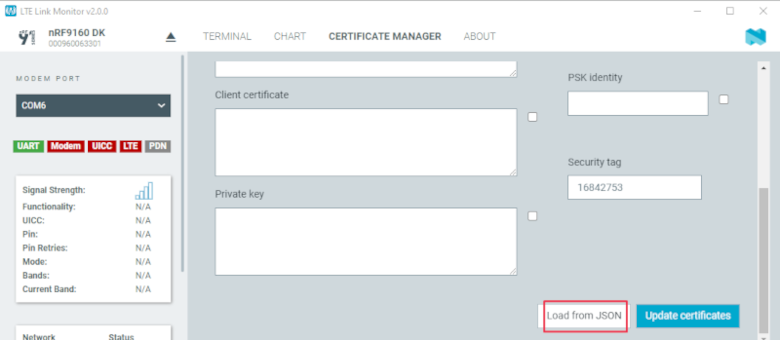
LTE Link Monitor - Load from JSON
Ensure that the Security tag is set to
16842753, which is the security tag for nRF Cloud credentials.Click Update certificate.

LTE Link Monitor - Update certificates
The log message “Certificate update completed” indicates that the certificate was provisioned successfully. If you encounter any errors, switch to the terminal view and check the output of the AT commands that were sent to the nRF9160 DK modem.
Note
If you have connected your nRF9160 DK to nRF Cloud before, you must delete the device there after provisioning the certificate. Open the entry for your device from the Devices view, then click the gear icon to the right of the device’s name, and select Delete Device. Then, add the nRF9160 DK again as described in Connecting the nRF9160 DK to nRF Cloud
Build targets
In Zephyr, nRF9160 DK is divided into two different build targets:
nrf9160dk_nrf9160for firmware in the secure domainnrf9160dk_nrf9160_nsfor firmware in the non-secure domain
Note
In nRF Connect SDK releases before v1.6.1, the build target nrf9160dk_nrf9160_ns was named nrf9160dk_nrf9160ns.
Make sure to select a suitable build target when building your application.
Building and programming
You can program applications and samples on the nRF9160 DK after obtaining the corresponding firmware images.
Download the latest application and modem firmware from the nRF9160 DK Downloads page.
To program applications using the Programmer app from nRF Connect for Desktop, follow the instructions in Updating the application firmware.
In Step 2, set the switch to nRF91 or nRF52 as appropriate for the application or sample you are programming.
See the Device programming section in the nRF9160 DK User Guide for more information.
Likewise, in Step 7, choose the .hex file for the application you are programming.
Note
When you update the application firmware on an nRF9160 DK, you must also update the modem firmware as described in Updating the modem firmware.
Building and programming using Visual Studio Code
The nRF Connect for VS Code extension is a complete IDE for developing applications for nRF91, nRF53 and nRF52 Series devices. This includes an interface to the compiler and linker, an RTOS-aware debugger, a seamless interface to the nRF Connect SDK, and a serial terminal. For detailed instructions, see the nRF Connect for Visual Studio Code documentation site.
Complete the following steps after installing the nRF Connect for VS Code extension:
Open Visual Studio Code.
If you installed the nRF Connect SDK using the Toolchain Manager, you can click the Open VS Code button next to the version you installed.
Complete the steps listed on the Building nRF Connect SDK application quick guide page in the nRF Connect for VS Code extension documentation.
Program the application:
Set the SW10 switch (marked PROG/DEBUG) in the nRF91 position to program the nRF9160 application. In nRF9160 DK v0.9.0 and earlier, the switch is called SW5.
Connect the nRF9160 DK to your PC using a USB cable.
Power on the nRF9160 DK.
In Visual Studio Code, click the Flash option in the Actions View.
If you have multiple boards connected, you are prompted to pick a device at the top of the screen.
A small notification banner appears in the bottom-right corner of Visual Studio Code to display the progress and confirm when the flashing is complete.
Building and programming on the command line
Complete the command-line build setup before you start building nRF Connect SDK projects on the command line.
To build and program the source code from the command line, complete the following steps:
Open a terminal window.
Go to the specific sample or application directory. For example, the folder path is
ncs/nrf/applications/asset_tracker_v2when building the source code for the nRF9160: Asset Tracker v2 application on the nRF9160 DK.Make sure that you have the required version of the nRF Connect SDK repository by pulling the nRF Connect SDK repository, sdk-nrf on GitHub using the procedures described in Obtaining a copy of the nRF Connect SDK and Updating a copy of the nRF Connect SDK.
To get the rest of the dependencies, run the
west updatecommand as follows:west updateTo build the sample or application code, run the
west buildcommand as follows:west build -b build_target
The parameter build_target must be
nrf9160dk_nrf9160_nswhen building the application code for the nRF9160 DK.Note
The parameter destination_directory_name can be used to optionally specify the destination directory in the west command. Unless a destination_directory_name is specified, the build files are automatically generated in
build/zephyr/.
Program the application:
Set the SW10 switch (marked PROG/DEBUG) in the nRF91 position to program the nRF9160 application. In nRF9160 DK v0.9.0 and earlier, the switch is called SW5.
Connect the nRF9160 DK to your PC using a USB cable.
Power on the nRF9160 DK.
Program the sample or application to the device using the following command:
west flashNote
When programming with the nRF9160: Asset Tracker v2 application, use the
west flash --erasecommand. The application has secure boot enabled by default that includes data in the One-Time Programmable region (OTP). This means that everything must be erased before flashing.The device resets and runs the programmed sample or application.
Board revisions
nRF9160 DK v0.14.0 and later has additional hardware features that are not available on earlier versions of the DK:
External flash memory
I/O expander
To make use of these features, specify the board revision when building your application.
Note
You must specify the board revision only if you use features that are not available in all board revisions. If you do not specify a board revision, the firmware is built for the default revision (v0.7.0). Newer revisions are compatible with the default revision.
To specify the board revision, append it to the build target when building.
For example, when building a non-secure application for nRF9160 DK v1.0.0, use nrf9160dk_nrf9106_ns@1.0.0 as build target.
See Building for a board revision and Additional hardware in v0.14.0+ for more information.
Available drivers, libraries, and samples
See the Drivers, Libraries, and nRF9160 samples sections and the respective repository folders for up-to-date information.