ESP32-Ethernet-Kit
Overview
The ESP32-Ethernet-Kit is an Ethernet-to-Wi-Fi development board that enables Ethernet devices to be interconnected over Wi-Fi. At the same time, to provide more flexible power supply options, the ESP32-Ethernet-Kit also supports power over Ethernet (PoE).
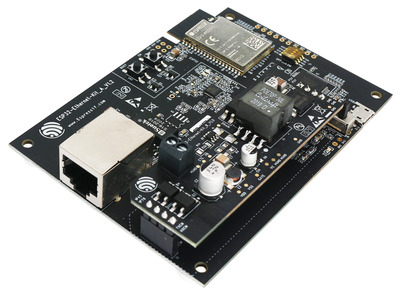
ESP32-Ethernet-Kit V1.2 Overview
ESP32-Ethernet-Kit is an ESP32-WROVER-E based development. For more information, check the datasheet at ESP32-WROVER-E Datasheet.
It consists of two development boards, the Ethernet Board A and the PoE board B. The Ethernet Board (A) contains Bluetooth/Wi-Fi dual-mode ESP32-WROVER-E module and IP101GRI, a Single Port 10/100 Fast Ethernet Transceiver (PHY). The PoE Board (B) provides power over Ethernet functionality. The A board can work independently, without the board B installed.
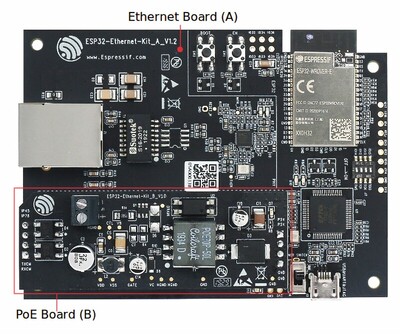
ESP32-Ethernet-Kit V1.2
For the application loading and monitoring, the Ethernet Board (A) also features FTDI FT2232H chip - an advanced multi-interface USB bridge. This chip enables to use JTAG for direct debugging of ESP32 through the USB interface without a separate JTAG debugger.
Functionality Overview
The block diagram below shows the main components of ESP32-Ethernet-Kit and their interconnections.
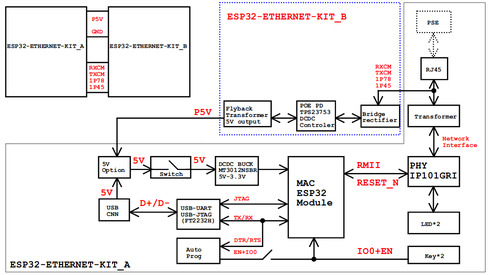
ESP32-Ethernet-Kit block diagram
Functional Description
The following figures and tables describe the key components, interfaces, and controls of the ESP32-Ethernet-Kit.
Ethernet Board (A)
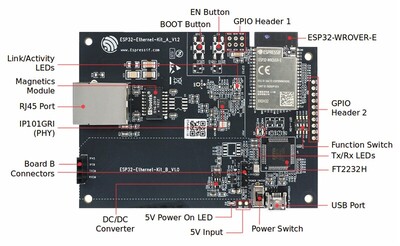
ESP32-Ethernet-Kit - Ethernet Board (A) layout
The table below provides description starting from the picture’s top right corner and going clockwise.
Key Component |
Description |
|---|---|
ESP32-WROVER-E |
This ESP32 module features 64-Mbit PSRAM for flexible extended storage and data processing capabilities. |
GPIO Header 2 |
Five unpopulated through-hole solder pads to provide access to selected GPIOs of ESP32. For details, see GPIO Header 2. |
Function Switch |
A 4-bit DIP switch used to configure the functionality of selected GPIOs of ESP32. For details see Function Switch. |
Tx/Rx LEDs |
Two LEDs to show the status of UART transmission. |
FT2232H |
The FT2232H chip serves as a multi-protocol USB-to-serial bridge which can be programmed and controlled via USB to provide communication with ESP32. FT2232H also features USB-to-JTAG interface which is available on channel A of the chip, while USB-to-serial is on channel B. The FT2232H chip enhances user-friendliness in terms of application development and debugging. See ESP32-Ethernet-Kit V1.2 Ethernet Board (A) Schematic |
USB Port |
USB interface. Power supply for the board as well as the communication interface between a computer and the board. |
Power Switch |
Power On/Off Switch. Toggling the switch to 5V0 position powers the board on, toggling to GND position powers the board off. |
5V Input |
The 5 V power supply interface can be more convenient when the board is operating autonomously (not connected to a computer). |
5V Power On LED |
This red LED turns on when power is supplied to the board, either from USB or 5 V Input. |
DC/DC Converter |
Provided DC 5 V to 3.3 V conversion, output current up to 2 A. |
Board B Connectors |
A pair male and female header pins for mounting the PoE Board (B) |
IP101GRI (PHY) |
The physical layer (PHY) connection to the Ethernet cable is implemented using the IP101GRI chip. The connection between PHY and ESP32 is done through the reduced media-independent interface (RMII), a variant of the media-independent interface (MII) standard. The PHY supports the IEEE 802.3/802.3u standard of 10/100 Mbps. |
RJ45 Port |
Ethernet network data transmission port. |
Magnetics Module |
The Magnetics are part of the Ethernet specification to protect against faults and transients, including rejection of common mode signals between the transceiver IC and the cable. The magnetics also provide galvanic isolation between the transceiver and the Ethernet device. |
Link/Activity LEDs |
Two LEDs (green and red) that respectively indicate the “Link” and “Activity” statuses of the PHY. |
BOOT Button |
Download button. Holding down BOOT and then pressing EN initiates Firmware Download mode for downloading firmware through the serial port. |
EN Button |
Reset button. |
GPIO Header 1 |
This header provides six unpopulated through-hole solder pads connected to spare GPIOs of ESP32. For details, see GPIO Header 1. |
PoE Board (B)
This board coverts power delivered over the Ethernet cable (PoE) to provide a power supply for the Ethernet Board (A). The main components of the PoE Board (B) are shown on the block diagram under Functionality Overview.
The PoE Board (B) has the following features:
Support for IEEE 802.3at
Power output: 5 V, 1.4 A
To take advantage of the PoE functionality the RJ45 Port of the Ethernet board (A) should be connected with an Ethernet cable to a switch that supports PoE. When the Ethernet Board (A) detects 5 V power output from the PoE Board (B), the USB power will be automatically cut off.

ESP32-Ethernet-Kit - PoE Board (B) layout
Key Component |
Description |
|---|---|
Board A Connector |
Four female (left) and four male (right) header pins for connecting the PoE Board (B) to Ethernet Board (A). The pins on the left accept power coming from a PoE switch. The pins on the right deliver 5 V power supply to the Ethernet Board (A). |
External Power Terminals |
Optional power supply (26.6 ~ 54 V) to the PoE Board (B). |
Setup Options
This section describes options to configure the ESP32-Ethernet-Kit hardware.
Function Switch
When in On position, this DIP switch is routing listed GPIOs to FT2232H to provide JTAG functionality. When in Off position, the GPIOs may be used for other purposes.
DIP SW |
GPIO Pin |
|---|---|
1 |
GPIO13 |
2 |
GPIO12 |
3 |
GPIO15 |
4 |
GPIO14 |
RMII Clock Selection
The ethernet MAC and PHY under RMII working mode need a common 50 MHz reference clock (i.e. RMII clock) that can be provided either externally, or generated from internal ESP32 APLL (not recommended).
Note
For additional information on the RMII clock selection, please refer to ESP32-Ethernet-Kit V1.2 Ethernet Board (A) Schematic, sheet 2, location D2.
RMII Clock Sourced Externally by PHY
By default, the ESP32-Ethernet-Kit is configured to provide RMII clock for the IP101GRI PHY’s 50M_CLKO output. The clock signal is generated by the frequency multiplication of 25 MHz crystal connected to the PHY. For details, please see the figure below.
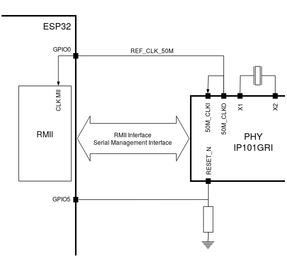
RMII Clock from IP101GRI PHY
Please note that the PHY is reset on power up by pulling the RESET_N signal down with a resistor. ESP32 should assert RESET_N high with GPIO5 to enable PHY. Only this can ensure the power-up of system. Otherwise ESP32 may enter download mode (when the clock signal of REF_CLK_50M is at a high logic level during the GPIO0 power-up sampling phase).
RMII Clock Sourced Internally from ESP32’s APLL
Another option is to source the RMII Clock from internal ESP32 APLL, see figure below. The clock signal coming from GPIO0 is first inverted, to account for transmission line delay, and then supplied to the PHY.
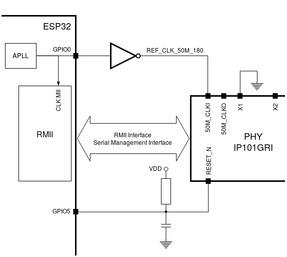
RMII Clock from ESP Internal APLL
To implement this option, users need to remove or add some RC components on the board. For details please refer to ESP32-Ethernet-Kit V1.2 Ethernet Board (A) Schematic, sheet 2, location D2. Please note that if the APLL is already used for other purposes (e.g. I2S peripheral), then you have no choice but use an external RMII clock.
GPIO Allocation
This section describes allocation of ESP32 GPIOs to specific interfaces or functions of the ESP32-Ethernet-Kit.
IP101GRI (PHY) Interface
The allocation of the ESP32 (MAC) pins to IP101GRI (PHY) is shown in the table below. Implementation of ESP32-Ethernet-Kit defaults to Reduced Media-Independent Interface (RMII).
No. |
ESP32 Pin (MAC) |
IP101GRI (PHY) |
|---|---|---|
RMII Interface |
||
1 |
GPIO21 |
TX_EN |
2 |
GPIO19 |
TXD[0] |
3 |
GPIO22 |
TXD[1] |
4 |
GPIO25 |
RXD[0] |
5 |
GPIO26 |
RXD[1] |
6 |
GPIO27 |
CRS_DV |
7 |
GPIO0 |
REF_CLK |
Serial Management Interface |
||
8 |
GPIO23 |
MDC |
9 |
GPIO18 |
MDIO |
PHY Reset |
||
10 |
GPIO5 |
Reset_N |
Note
The allocation of all pins under the ESP32’s RMII Interface is fixed and cannot be changed either through IO MUX or GPIO Matrix. REF_CLK can only be selected from GPIO0, GPIO16 or GPIO17 and it can not be changed through GPIO Matrix.
GPIO Header 1
This header exposes some GPIOs that are not used elsewhere on the ESP32-Ethernet-Kit.
No. |
ESP32 Pin |
|---|---|
1 |
GPIO32 |
2 |
GPIO33 |
3 |
GPIO34 |
4 |
GPIO35 |
5 |
GPIO36 |
6 |
GPIO39 |
GPIO Header 2
This header contains GPIOs that may be used for other purposes depending on scenarios described in column “Comments”.
No. |
ESP32 Pin |
Comments |
|---|---|---|
1 |
GPIO17 |
See note 1 |
2 |
GPIO16 |
See note 1 |
3 |
GPIO4 |
|
4 |
GPIO2 |
|
5 |
GPIO13 |
See note 2 |
6 |
GPIO12 |
See note 2 |
7 |
GPIO15 |
See note 2 |
8 |
GPIO14 |
See note 2 |
9 |
GND |
Ground |
10 |
3V3 |
3.3 V power supply |
Note
The ESP32 pins GPIO16 and GPIO17 are not broken out to the ESP32-WROVER-E module and therefore not available for use. If you need to use these pins, please solder a module without PSRAM memory inside, e.g. the ESP32-WROOM-32D or ESP32-SOLO-1.
Functionality depends on the settings of the Function Switch.
GPIO Allocation Summary
ESP32-WROVER-E |
IP101GRI |
UART |
JTAG |
GPIO |
Comments |
|---|---|---|---|---|---|
S_VP |
IO36 |
||||
S_VN |
IO39 |
||||
IO34 |
IO34 |
||||
IO35 |
IO35 |
||||
IO32 |
IO32 |
||||
IO33 |
IO33 |
||||
IO25 |
RXD[0] |
||||
IO26 |
RXD[1] |
||||
IO27 |
CRS_DV |
||||
IO14 |
TMS |
IO14 |
|||
IO12 |
TDI |
IO12 |
|||
IO13 |
TCK |
IO13 |
|||
IO15 |
TDO |
IO15 |
|||
IO2 |
IO2 |
||||
IO0 |
REF_CLK |
See note 1 |
|||
IO4 |
IO4 |
||||
IO16 |
IO16 (NC) |
See note 2 |
|||
IO17 |
IO17 (NC) |
See note 2 |
|||
IO5 |
Reset_N |
See note 1 |
|||
IO18 |
MDIO |
||||
IO19 |
TXD[0] |
||||
IO21 |
TX_EN |
||||
RXD0 |
RXD |
||||
TXD0 |
TXD |
||||
IO22 |
TXD[1] |
||||
IO23 |
MDC |
Note
To prevent the power-on state of the GPIO0 from being affected by the clock output on the PHY side, the RESET_N signal to PHY defaults to low, turning the clock output off. After power-on you can control RESET_N with GPIO5 to turn the clock output on. See also RMII Clock Sourced Externally by PHY. For PHYs that cannot turn off the clock output through RESET_N, it is recommended to use a crystal module that can be disabled/enabled externally. Similarly like when using RESET_N, the oscillator module should be disabled by default and turned on by ESP32 after power-up. For a reference design please see ESP32-Ethernet-Kit V1.2 Ethernet Board (A) Schematic.
The ESP32 pins GPIO16 and GPIO17 are not broken out to the ESP32-WROVER-E module and therefore not available for use. If you need to use these pins, please solder a module without PSRAM memory inside, e.g. the ESP32-WROOM-32D or ESP32-SOLO-1.
System requirements
Prerequisites
Espressif HAL requires WiFi and Bluetooth binary blobs in order work. Run the command below to retrieve those files.
west blobs fetch hal_espressif
Note
It is recommended running the command above after west update.
Building & Flashing
Simple boot
The board could be loaded using the single binary image, without 2nd stage bootloader. It is the default option when building the application without additional configuration.
Note
Simple boot does not provide any security features nor OTA updates.
MCUboot bootloader
User may choose to use MCUboot bootloader instead. In that case the bootloader must be built (and flashed) at least once.
There are two options to be used when building an application:
Sysbuild
Manual build
Note
User can select the MCUboot bootloader by adding the following line to the board default configuration file.
CONFIG_BOOTLOADER_MCUBOOT=y
Sysbuild
The sysbuild makes possible to build and flash all necessary images needed to bootstrap the board with the ESP32 SoC.
To build the sample application using sysbuild use the command:
west build -b esp32_ethernet_kit/esp32/procpu --sysbuild samples/hello_world
By default, the ESP32 sysbuild creates bootloader (MCUboot) and application images. But it can be configured to create other kind of images.
Build directory structure created by sysbuild is different from traditional Zephyr build. Output is structured by the domain subdirectories:
build/
├── hello_world
│   └── zephyr
│       ├── zephyr.elf
│       └── zephyr.bin
├── mcuboot
│    └── zephyr
│       ├── zephyr.elf
│       └── zephyr.bin
└── domains.yaml
Note
With --sysbuild option the bootloader will be re-build and re-flash
every time the pristine build is used.
For more information about the system build please read the Sysbuild (System build) documentation.
Manual build
During the development cycle, it is intended to build & flash as quickly possible. For that reason, images can be built one at a time using traditional build.
The instructions following are relevant for both manual build and sysbuild. The only difference is the structure of the build directory.
Note
Remember that bootloader (MCUboot) needs to be flash at least once.
Build and flash applications as usual (see Building an Application and Run an Application for more details).
# From the root of the zephyr repository
west build -b esp32_ethernet_kit/esp32/procpu samples/hello_world
The usual flash target will work with the esp32_ethernet_kit board
configuration. Here is an example for the Hello World
application.
# From the root of the zephyr repository
west build -b esp32_ethernet_kit/esp32/procpu samples/hello_world
west flash
Open the serial monitor using the following command:
west espressif monitor
After the board has automatically reset and booted, you should see the following message in the monitor:
***** Booting Zephyr OS vx.x.x-xxx-gxxxxxxxxxxxx *****
Hello World! esp32_ethernet_kit
Debugging
As with much custom hardware, the ESP32 modules require patches to OpenOCD that are not upstreamed yet. Espressif maintains their own fork of the project. The custom OpenOCD can be obtained at OpenOCD ESP32.
The Zephyr SDK uses a bundled version of OpenOCD by default. You can overwrite that behavior by adding the
-DOPENOCD=<path/to/bin/openocd> -DOPENOCD_DEFAULT_PATH=<path/to/openocd/share/openocd/scripts>
parameter when building.
Here is an example for building the Hello World application.
# From the root of the zephyr repository
west build -b esp32_ethernet_kit/esp32/procpu samples/hello_world -- -DOPENOCD=<path/to/bin/openocd> -DOPENOCD_DEFAULT_PATH=<path/to/openocd/share/openocd/scripts>
west flash
You can debug an application in the usual way. Here is an example for the Hello World application.
# From the root of the zephyr repository
west build -b esp32_ethernet_kit/esp32/procpu samples/hello_world
west debug
Enabling Ethernet
Enable Ethernet MAC, PHY and MDIO; add these to your device tree overlay:
ð {
status = "okay";
};
&phy {
status = "okay";
};
&mdio {
status = "okay";
};
Enable Ethernet in KConfig:
CONFIG_ETH_ESP32=y
CONFIG_NETWORKING=y
CONFIG_NET_L2_ETHERNET=y
Board Init
RESET_N (GPIO5) is automatically set high to enable the Ethernet PHY during board initialization (board_init.c)
