Migrate your development environment to nRF Connect SDK v2.7.0 (for v2.6.99-cs2 users)
This document describes how to update your development environment for the nRF54H20 DK from the nRF Connect SDK v2.6.99-cs2 to the nRF Connect SDK v2.7.0.
Overview
nRF Connect SDK v2.7.0 introduced a series of changes that might affect your existing development environment. The following is a summary of the most important ones:
- Updated nRF Connect SDK toolchain
The nRF Connect SDK toolchain has been updated.
- SDFW and SCFW firmware bundle
A new version (v0.5.0) of the SDFW and SCFW firmware bundle was released. This is the only version compatible with the nRF Connect SDK v2.7.0. The nRF54H20 DK must be in lifecycle state
EMPTYto be provisioned with the new firmware bundle.
Minimum requirements
Make sure you have all the required hardware, software, and that your computer has one of the supported operating systems.
Hardware
nRF54H20 DK version PCA10175 v0.7.2 (ES3) or PCA10175 v0.8.0 (ES3.3, ES4). These are the only versions of the nRF54H20 DK compatible with nRF Connect SDK v2.7.0. Check the version number on your DK’s sticker to verify its compatibility with nRF Connect SDK version v2.7.0.
USB-C cable.
Software
On your computer, one of the following operating systems:
Operating System |
x86 |
x64 |
ARM64 |
|---|---|---|---|
Tier 3 |
Tier 3 |
Not supported |
|
Tier 3 |
Tier 1 |
Not supported |
|
Not supported |
Tier 1 |
Not supported |
|
Not supported |
Tier 2 |
Not supported |
|
Not applicable |
Tier 3 |
Tier 3 |
|
Not applicable |
Tier 1 |
Tier 1 |
|
Not applicable |
Tier 3 |
Tier 3 |
|
Not applicable |
Tier 2 |
Tier 2 |
|
Not applicable |
Tier 3 |
Not supported |
See Supported operating systems for more information about the tier definitions.
The operating system versions that support the nRF Connect SDK tools are listed in the Supported operating systems section.
You also need the following:
Git or Git for Windows (on Linux and Mac, or Windows, respectively)
The latest version of the nRF Command Line Tools package. After downloading and installing the tools, add the nrfjprog executable to the system path, on Linux and MacOS, or to the environment variables, on Windows, to run it from anywhere on the system.
The CLI tools installation will also trigger the installation of J-Link. During that installation, in the Choose optional components window, select update existing installation.
On Windows, SEGGER USB Driver for J-Link from SEGGER J-Link version 7.94e.
Note
To install the SEGGER USB Driver for J-Link on Windows, you must manually reinstall J-Link v7.94e from the command line using the
-InstUSBDriver=1parameter, updating the installation previously run by the nRF Command Line Tools:Navigate to the download location of the J-Link executable and run one of the following commands:
From the Command Prompt:
JLink_Windows_V794e_x86_64.exe -InstUSBDriver=1
From PowerShell:
.\JLink_Windows_V794e_x86_64.exe -InstUSBDriver=1
In the Choose optional components window, select again update existing installation.
Add the J-Link executable to the system path, on Linux and MacOS, or to the environment variables, on Windows, to run it from anywhere on the system.
The latest version of Visual Studio Code for your operating system from the Visual Studio Code download page.
In Visual Studio Code, the latest version of the nRF Connect for VS Code Extension Pack.
On Linux, the nrf-udev module with udev rules required to access USB ports on Nordic Semiconductor devices and program the firmware.
Updating the nRF Connect SDK and its toolchain
You can update to the nRF Connect SDK v2.7.0 and its toolchain by using Toolchain Manager.
Toolchain Manager is a tool available from nRF Connect for Desktop, a cross-platform tool that provides different applications that simplify installing the nRF Connect SDK. Both the tool and the application are available for Windows, Linux, and MacOS.
To proceed with the update, complete the following steps:
Install Toolchain Manager:
Download nRF Connect for Desktop for your operating system.
Install and run the tool on your machine.
In the APPS section, click Install next to Toolchain Manager.
The app is installed on your machine, and the Install button changes to Open.
Open the Toolchain Manager application in nRF Connect for Desktop.
Click the button with the arrow pointing down next to the installed nRF Connect SDK version to expand the drop-down menu with options.
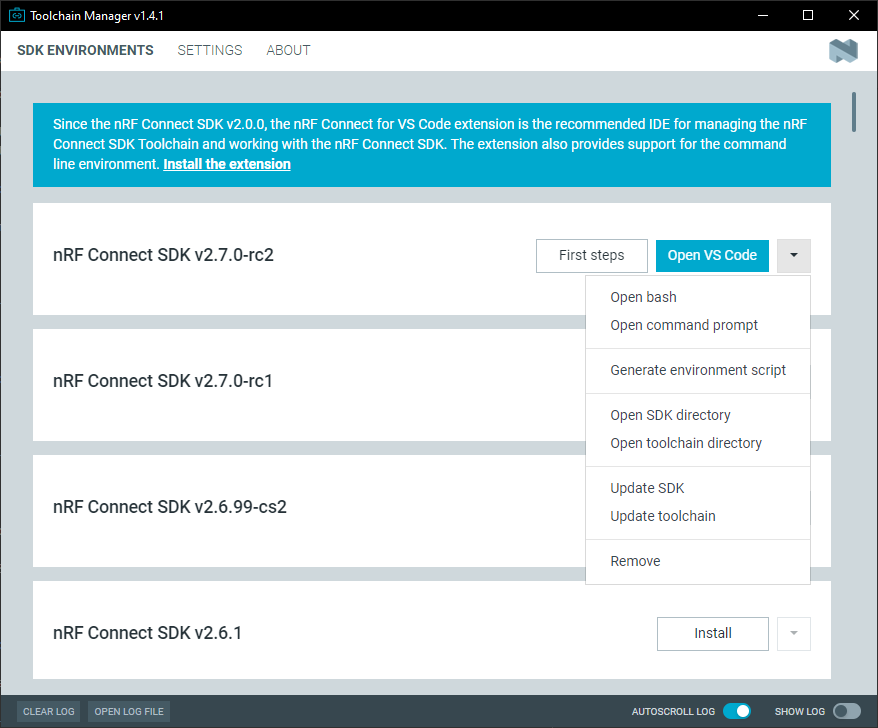
The Toolchain Manager dropdown menu options
In the drop-down menu, click Update toolchain.
In the same drop-down menu, click Update SDK.
Updating the Terminal application
To update Serial Terminal from nRF Connect for Desktop, follow these steps:
On your computer, open nRF Connect for Desktop If there is an update available, a pop up will notify you of its availability.
If available, install the update from the pop up screen.
Update Serial Terminal from nRF Connect for Desktop.
If you are using the nRF Terminal application part of the nRF Connect for Visual Studio Code extension, open Visual Studio Code instead and ensure you are running the newest version of both the editor and the extension.
Updating nRF Util and its commands
nRF Connect SDK v2.7.0 requires nRF Util version 7.11.1 or above.
Verify the version of the nRF Util installation on your machine by running the following command:
nrfutil --version
If your version is below 7.11.1, run the following command to update nRF Util:
nrfutil self-upgrade
Add nRF Util to the system path (on Linux and MacOS) or environment variables (on Windows) to run it from anywhere on the system. On Linux and MacOS, use one of the following options:
Add nRF Util’s directory to the system path.
Move the file to a directory in the system path.
On MacOS and Linux, give
nrfutilexecute permissions by typingchmod +x nrfutilin a terminal or using a file browser. This is typically a checkbox found under file properties.Update the nRF Util
devicecommand to version 2.4.0 as follows:nrfutil install device=2.4.0 --force
For more information, consult the nRF Util documentation.
Verify the LCS of the device
The current nRF54H20 DK is delivered with its lifecycle state (LCS) set to EMPTY.
To correctly operate, its lifecycle state must be transitioned to Root of Trust (RoT) through the bring-up steps.
To be compatible with nRF Connect SDK v2.7.0, the SDFW and SCFW firmware bundle programmed on the nRF54H20 DK during through the bring-up steps must be v0.5.0.
Note
The forward transition to LCS RoT is permanent.
After the transition, it is not possible to transition backward to LCS EMPTY.
You can verify the current lifecycle state of the nRF54H20 as follows:
nrfutil device x-adac-discovery --serial-number <serial_number>
The output will look similar to the following:
*serial_number*
adac_auth_version     1.0
vendor_id             Nordic VLSI ASA
soc_class             0x00005420
soc_id                [e6, 6f, 21, b6, dc, be, 11, ee, e5, 03, 6f, fe, 4d, 7b, 2e, 07]
hw_permissions_fixed  [00, 00, 00, 00, 00, 00, 00, 00, 00, 00, 00, 00, 00, 00, 00, 00]
hw_permissions_mask   [01, 00, 00, 00, 87, 00, 00, 00, 00, 00, 00, 00, 00, 00, 00, 00]
psa_lifecycle         LIFECYCLE_EMPTY (0x1000)
sda_id                0x01
secrom_revision       0xad3b3cd0
sysrom_revision       0xebc8f190
token_formats         [TokenAdac]
cert_formats          [CertAdac]
cryptosystems         [Ed25519Sha512]
Additional TLVs:
TargetIdentity: [ff, ff, ff, ff, ff, ff, ff, ff]
If the lifecycle state (psa_lifecycle) shown is not RoT (LIFECYCLE_EMPTY (0x1000) means the LCS is set to EMPTY) you can follow the bring-up steps in the next chapter.
If the lifecycle state (psa_lifecycle) shown is RoT (LIFECYCLE_ROT (0x2000)), the device is in Root of Trust:
If your nRF54H20 DK was already programmed with the SDFW and SCFW firmware bundle version 0.5.0, you can jump to the Next steps chapter.
If your current nRF54H20 DK was programmed with a firmware bundle version 0.3.x:
Use a different nRF54H20 DK with LCS
EMPTYand continue to the nRF54H20 bring-up.Use a different nRF54H20 DK with LCS
RoTand already programmed with the firmware bundle version 0.5.0.
nRF54H20 DK bring-up
Caution
Follow these steps only if your device is in lifecycle state EMPTY.
For more information, see Verify the LCS of the device.
The following sections describe the steps required for the nRF54H20 bring-up.
Programming the BICR
The Board Information Configuration Registers (BICR) are non-volatile memory (NVM) registers that contain information on how the nRF54H20 SoC must interact with other board elements, including the information about the power and clock delivery to the SoC.
To prepare the nRF54H20 DK for first use, you must manually program the values of the BICR using a precompiled BICR binary file (bicr_ext_loadcap.hex).
Download the BICR binary file .
Connect the nRF54H20 DK to your computer using the DEBUGGER port on the DK.
Note
On MacOS, connecting the DK might cause a popup containing the message “Disk Not Ejected Properly to repeatedly appear on screen.
To disable this, run JLinkExe, then run MSDDisable in the J-Link Commander interface.
List all the connected development kits to see their serial number (matching the one on the DK’s sticker):
nrfutil device list
Move the BICR HEX file to a folder of your choice, then program the BICR by running nRF Util from that folder using the following command:
nrfutil device program --options chip_erase_mode=ERASE_NONE --firmware bicr_ext_loadcap.hex --core Secure --serial-number <serial_number>
Provisioning the SDFW and SCFW
After programming the BICR, the nRF54H20 SoC requires the provisioning of a bundle ( nrf54h20_soc_binaries_v0.5.0.zip) containing the precompiled firmware for the Secure Domain and System Controller.
To program the Secure Domain Firmware (SDFW, also known as urot) and the System Controller Firmware (SCFW) from the firmware bundle to the nRF54H20 DK, do the following:
Download the nRF54H20 firmware bundle v0.5.0.
Note
On MacOS, ensure that the ZIP file is not unpacked automatically upon download.
Move the
.zipbundle to a folder of your choice, then run nRF Util to program the binaries using the following command:nrfutil device x-provision-nrf54h --firmware <path-to_bundle_zip_file> --serial-number <serial_number>
Updating the FICR
Caution
This step is required only if your nRF54H20 DK is version PCA10175 v0.7.2 or v0.8.0 ES3.3. Jump to the next step if your DK is version ES4, meaning v0.8.0 with no ES markings.
After programming the SDFW and SCFW from the firmware bundle, you must update the Factory Information Configuration Registers (FICR) to correctly configure some trims of the nRF54H20 SoC. To update the FICR, you must run a J-Link script:
Get the Jlink script that updates the FICR:
curl -LO https://files.nordicsemi.com/artifactory/swtools/external/scripts/nrf54h20es_trim_adjust.jlink
Run the script:
Linux and Mac OS:
JLinkExe -CommanderScript nrf54h20es_trim_adjust.jlink
Windows:
jlink.exe -CommanderScript nrf54h20es_trim_adjust.jlink
Transitioning the nRF54H20 SoC to RoT
Set the device to Root of Trust using the following command:
nrfutil device x-adac-lcs-change --life-cycle rot --serial-number <serial_number>
Verify again the current lifecycle state of the nRF54H20:
nrfutil device x-adac-discovery --serial-number <serial_number>
The output will look similar to the following:
*serial_number*
adac_auth_version     1.0
vendor_id             Nordic VLSI ASA
soc_class             0x00005420
soc_id                [e6, 6f, 21, b6, dc, be, 11, ee, e5, 03, 6f, fe, 4d, 7b, 2e, 07]
hw_permissions_fixed  [00, 00, 00, 00, 00, 00, 00, 00, 00, 00, 00, 00, 00, 00, 00, 00]
hw_permissions_mask   [01, 00, 00, 00, 87, 00, 00, 00, 00, 00, 00, 00, 00, 00, 00, 00]
psa_lifecycle         LIFECYCLE_ROT (0x2000)
sda_id                0x01
secrom_revision       0xad3b3cd0
sysrom_revision       0xebc8f190
token_formats         [TokenAdac]
cert_formats          [CertAdac]
cryptosystems         [Ed25519Sha512]
Additional TLVs:
TargetIdentity: [ff, ff, ff, ff, ff, ff, ff, ff]
The lifecycle state (
psa_lifecycle) is now correctly set to Root of Trust (LIFECYCLE_ROT (0x2000))After the LCS transition, reset the device:
nrfutil device reset --reset-kind RESET_PIN --serial-number <serial_number>
Next steps
Your environment is now set to use the nRF Connect SDK v2.7.0 with the nRF54H20 DK:
If you want to modify your existing custom applications previously developed for nRF Connect SDK v2.6.99-cs2 to be compatible with v2.7.0, consult the Migrate your application for the nRF54H20 DK to nRF Connect SDK v2.7.0 (for v2.6.99-cs2 users) page.
If you want to build and program a sample application on your nRF54H20 DK, consult the building and programming section in the Getting started with the nRF54H20 DK page.