Getting started with Thingy:91
This guide lets you evaluate the nRF Connect SDK’s support for Nordic Thingy:91 without the need of installing the SDK. It tells you how to update the Thingy:91 application and modem firmware and connect the Thingy:91 to nRF Cloud.
If you want to go through a hands-on online training to familiarize yourself with cellular IoT technologies and development of cellular applications, enroll in the Cellular IoT Fundamentals course in the Nordic Developer Academy.
Requirements for setting up the Thingy:91
Make sure you have all the required hardware and that your computer has one of the supported operating systems.
Hardware
nano-Subscriber Identity Module (SIM) card that supports LTE-M or Narrowband Internet of Things (NB-IoT) (The Thingy:91 comes shipped with an iBasis SIM card.)
Computer
Micro-USB 2.0 cable
Note
For getting started, you use a micro-USB cable to connect to the Thingy:91. When you start developing with your Thingy:91, it is recommended to use an external debug probe.
Software
On your computer, one of the following operating systems:
Microsoft Windows
macOS
Ubuntu Linux
The operating system versions that support the nRF Connect SDK firmware are listed in the Supported operating systems (firmware) section. Some additional tools for working with Nordic Semiconductor devices might have different OS requirements.
Preparing for setup
Before you start updating the modem firmware and application on the Thingy:91, you must do some preliminary configurations.
Complete the following steps to prepare the Thingy:91 for setup:
Install the Cellular Monitor app on the computer:
Download and install nRF Connect for Desktop.
Open nRF Connect for Desktop.
Find Cellular Monitor in the list of apps and click Install.
Prepare the Thingy:91 hardware:
Open the box and take out the Thingy:91 and the iBasis SIM card it comes shipped with.
Remove the protective cover.
Punch out the nano-SIM from the SIM card and plug it into the SIM card holder on the Thingy:91.

Inserting SIM
Plug the Thingy:91 into the computer using a micro-USB cable.
Power the Thingy:91 on by switching SW1 to the ON position.

Thingy:91 Power switch (SW1)
Updating the Thingy:91 firmware
Thingy:91 (v1.5.0 or lower) comes preloaded with the nRF9160: Asset Tracker firmware and modem firmware on the nRF9160 System in Package (SiP), and the Connectivity bridge application firmware on the nRF52840 System on Chip (SoC) that enable the device to use the environment sensors and track the device using Global Positioning System (GPS). The data is transmitted to nRF Cloud.
Before you start using the Thingy:91, it is recommended that you update the application firmware on the nRF9160 SiP to Asset Tracker v2. You must also update the modem firmware.
Tip
For a more compact nRF Cloud firmware application, you can build and install the Cellular: nRF Cloud multi-service sample. See the Programming onto Thingy:91 section for more information.
You can update the application and modem firmware on a Thingy:91 through a Universal Serial Bus (USB) cable using MCUboot. MCUboot is a secure bootloader that is used to update applications if you do not have an external debugger. The board enters MCUboot mode if any of the following buttons are pressed while the Thingy:91 is being powered on (using SW1):
SW3 - The main button used to flash the nRF9160 SiP. You use this button when getting started with the Thingy:91.
SW4 - The button used to update the nRF52840 SoC.
Before you start, make sure the Thingy:91 is connected to the computer with a micro-USB cable and powered on.
Note
Do not unplug the Nordic Thingy:91 during this process.
To update the firmware on the Thingy:91, complete the following steps:
Open the Cellular Monitor app.
Click SELECT DEVICE and select the Thingy:91 from the drop-down list.
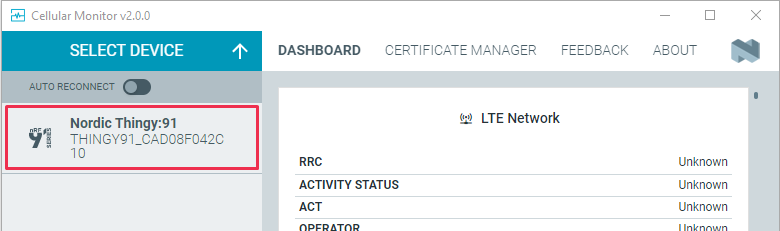
Cellular Monitor - Select device
The drop-down text changes to the type of the selected device, with its SEGGER ID below the name.
Click Program device in the ADVANCED OPTIONS section.
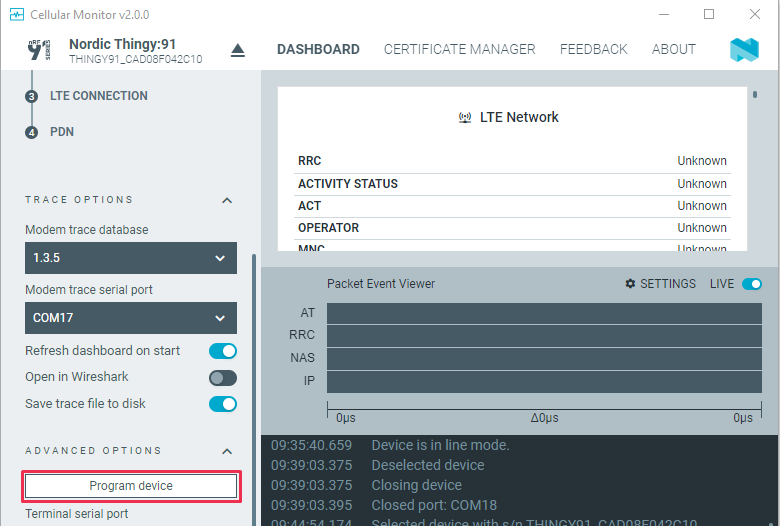
Cellular Monitor - Program device
The Program sample app window appears, displaying applications you can program to the Thingy:91.
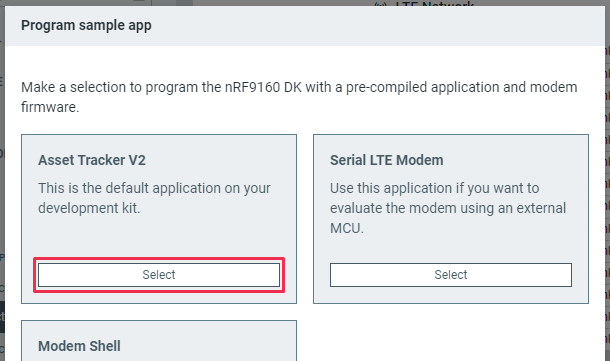
Click Select in the Asset Tracker V2 section. Asset Tracker v2 is an application that simulates sensor data and transmits it to Nordic Semiconductor’s cloud solution, nRF Cloud.
Cellular Monitor - Select Asset Tracker V2
The Program Modem Firmware (Optional) window appears.
Click Select in the section for the latest modem firmware.
The Program Mode Firmware (Optional) window expands to display additional information.
Cellular Monitor - Enable MCUboot
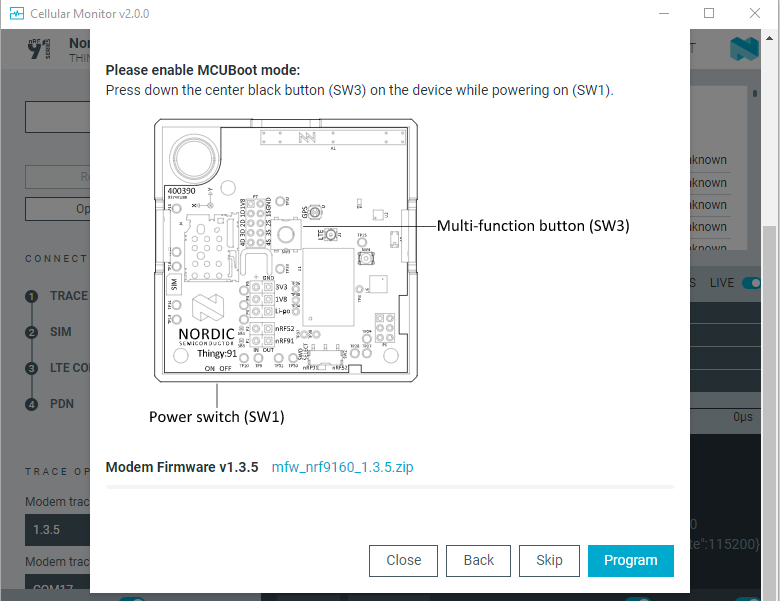
Switch off the Thingy:91.
Press SW3 while switching SW1 to the ON position to enable MCUboot mode.
Click Program to program the modem firmware to the Thingy:91. Do not unplug or turn off the device during this process.
When the process is complete, you see a success message.
If you see an error message, switch off the Thingy:91, enable MCUboot mode again, and click Program.
Click Continue to move to the next step.
The Program Mode Firmware (Optional) window changes to the Program Asset Tracker V2 window.
Switch off the Thingy:91.
Press SW3 while switching SW1 to the ON position to enable MCUboot mode.
Click Program to program the application to the Thingy:91. Do not unplug or turn off the device during this process.
When the process is complete, you see a success message. Click Close to close the Program Asset Tracker V2 window.
If you see an error message, switch off the Thingy:91, enable MCUboot mode again, and click Program.
Copy the Integrated Circuit Card Identifier (ICCID) of the inserted micro-SIM. This is required for activating the iBasis SIM when Connecting the Thingy:91 to nRF Cloud.
If you have activated your iBasis SIM card before or are using a SIM card from a different provider, you can skip this step.
Click Start to begin the modem trace. The button changes to Stop and is greyed out.
Click Refresh dashboard to refresh the information.
If the information does not load, switch the Thingy:91 off and on, select the device from the SELECT DEVICE drop-down, and click Start to begin the modem trace again.
Copy the ICCID by clicking on the ICCID label or the displayed ICCID number in the Sim section.
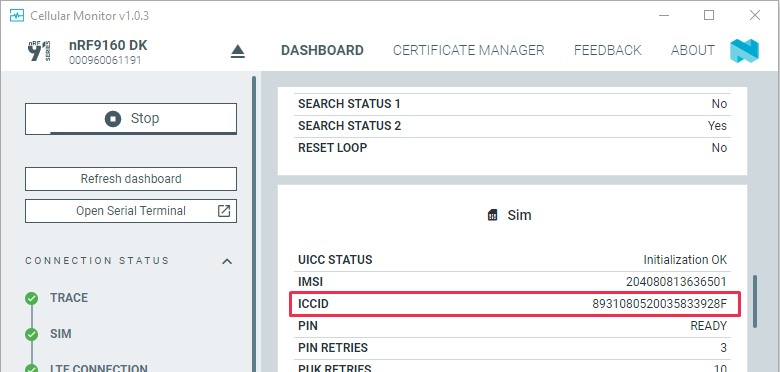
Cellular Monitor - ICCID
Note
The ICCID copied here has 20 digits. When activating the SIM, you need to remove the last two digits so that it is 18 digits.
Connecting the Thingy:91 to nRF Cloud
To transmit data from your Thingy:91 to nRF Cloud, you need an nRF Cloud account. nRF Cloud is Nordic Semiconductor’s platform for connecting your IoT devices to the cloud, viewing and analyzing device message data, prototyping ideas that use Nordic Semiconductor’s chips, and more.
Once you have an account, activate your SIM card and add the Thingy:91 to your nRF Cloud account.
Note
The instructions assume you are activating an iBasis SIM card that came with your Thingy:91.
If you are using a SIM card from another provider, make sure you activate it through your network operator before adding the device to nRF Cloud.
Creating an nRF Cloud account
To create an nRF Cloud account, complete the following steps:
Open the nRF Cloud landing page and click Register.
Enter your email address and choose a password, then click Create Account. nRF Cloud will send you a verification email.
Copy the 6-digit verification code and paste it into the registration dialog box. If you do not see the verification email, check your junk mail for an email from
no-reply@verificationemail.com.If you closed the registration dialog box, you can repeat Step 1 and then click Already have a code?. Then enter your email and the verification code.
You can now log in to nRF Cloud with your email and password. After logging in, you are taken to the dashboard view that displays your device count and service usage.
Activating the SIM card
To activate the iBasis SIM card that comes shipped with the Thingy:91, complete the following steps in the nRF Cloud portal. Make sure you are logged in to the portal.
Click SIM Cards under Device Management in the navigation pane on the left.
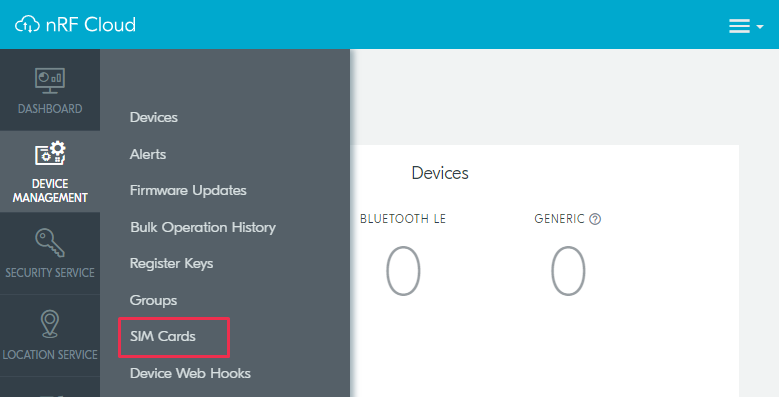
nRF Cloud - SIM Cards
Click Add SIM.

nRF Cloud - Add SIM
The Add SIM page opens in the Verify SIM Card view.
Complete the following steps on the Add SIM page to activate your iBasis SIM card:
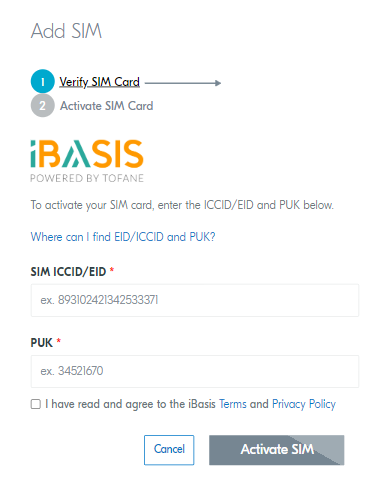
nRF Cloud - Add SIM page
Enter the 18-digit Integrated Circuit Card Identifier (ICCID) or the 19-digit eUICC Identifier (EID) in the SIM ICCID/EID text box.
If you followed the instructions in the Updating the Thingy:91 firmware section, paste the copied ICCID into the SIM ICCID/EID box and remove the last two digits.
Note
The SIM cards can have either the EID, the ICCID, or neither printed on it.
Enter the Personal Unblocking Key (PUK) in the PUK text box.
The PUK is printed on the SIM card. Reveal the PUK by scratching off the area on the back of the SIM card.
Accept the Terms and the Privacy Policy.
Click the Activate SIM button.
The Add SIM page changes to the Activate SIM Card view.
Fill in the required information.
Click Save to complete the activation.
After the SIM card is activated, you can add your Thingy:91 to nRF Cloud.
Adding the Thingy:91 to nRF Cloud
To add the Thingy:91 to nRF Cloud, complete the following steps. Make sure you are logged in to the nRF Cloud portal and have an activated SIM card in the SIM card slot of the Thingy:91.
Connect the Thingy:91 to the computer with a USB cable and switch it on, or reset the device if it is already switched on.
Wait up to three minutes for the device to find the cellular network and connect to the nRF Cloud server.
At this stage, the Thingy:91 is provisioned on nRF Cloud, but not yet associated with your nRF Cloud account. When the device has connected, the RGB LED double pulse blinks as white to indicate that user association is required and you can move to the next step. See Asset Tracker v2 LED indication for more information.
Click Devices under Device Management in the navigation pane on the left.
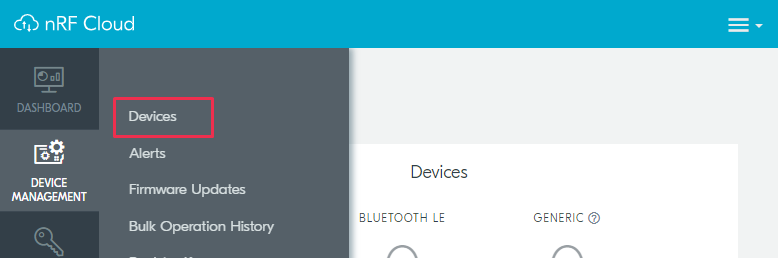
nRF Cloud - Devices
Click Add Devices.
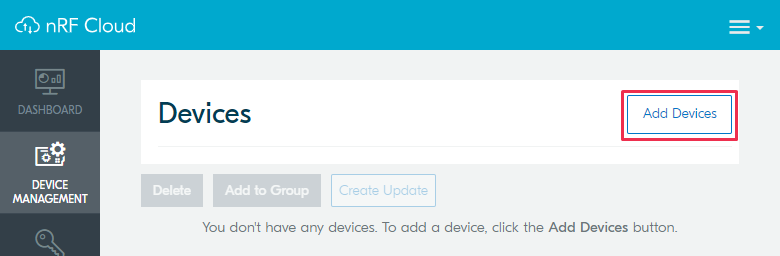
nRF Cloud - Add Devices
The Select Device Type pop-up opens.
Click LTE Device in the Select Device Type pop-up.
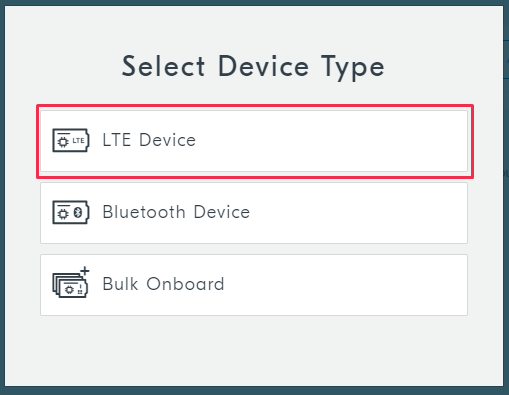
nRF Cloud - Select Device Type
Enter your device ID and ownership code (PIN/HWID) on the Add LTE Device page.
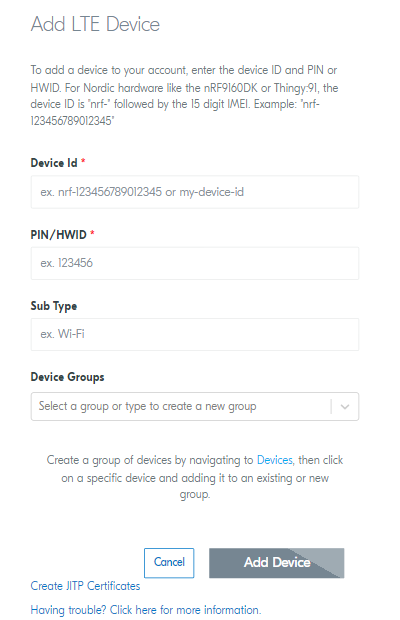
nRF Cloud - Add LTE Device
Device ID: The device ID is composed of nrf- and the 15-digit International Mobile (Station) Equipment Identity (IMEI) number that is printed on the label of your Thingy:91. For example, nrf-123456789012345. It is case sensitive, so make sure all the letters are lower-case.
PIN/HWID: The ownership code is the PIN or the hardware ID of your device, and it is found on the label of your Thingy:91. This is not the PIN code for your SIM card.
If the label contains a PIN in addition to the IMEI number, enter this pin. If it does not contain a PIN, enter the Hardware ID (HWID) HEX code, with or without colons. For example, AA:BB:CC:DD:EE:FF or AABBCCDDEEFF.
Note
The ownership code serves as a password and proves that you own the specific Thingy:91. Therefore, do not share it with anyone.
Click the Add Device button.
The Do you need to activate an iBasis SIM? pop-up opens.
Click Continue and wait for the device to reconnect to nRF Cloud. It is normal for the device to disconnect and reconnect multiple times during device provisioning.
If you have not yet activated the iBasis SIM card that came with your Thingy:91, click Activate iBasis SIM instead, and follow the instructions.
The Thingy:91 is now added to your nRF Cloud account. This is indicated by the RGB LED blinking green, which shows that the device is publishing data. See Asset Tracker v2 LED indication for more information.
On nRF Cloud, you can access the device by clicking Devices under Device Management in the navigation pane on the left.
Next steps
You have now completed getting started with the Thingy:91. See the following links for where to go next:
Installation and Configuring and building documentation to install the nRF Connect SDK and learn more about its development environment.
Developing with nRF91 Series for more advanced topics related to the Thingy:91.
Connectivity bridge about using the nRF UART Service with Thingy:91.