Building and programming an application
For simplicity, this guide will refer to both samples and applications as “applications”.
For additional information, check the user guide for the hardware platform that you are using. These user guides contain platform-specific instructions for building and programming. For example, see Building and programming a sample in the Working with nRF5340 DK user guide for information about programming an nRF5340 DK, or Programming precompiled firmware images and Building and programming from the source code for information about programming a Thingy:91.
Note
On Windows, because of the Windows path length limitations, the build can fail with errors related to permissions or missing files if some paths in the build are too long.
To avoid this issue, shorten the build folder name, for example, from build_nrf5340dk_nrf5340_cpuapp_ns to build, or shorten the path to the build folder in some other way.
Building with Visual Studio Code
The nRF Connect for VS Code extension is a complete IDE for developing applications for nRF91, nRF53 and nRF52 Series devices. This includes an interface to the compiler and linker, an RTOS-aware debugger, a seamless interface to the nRF Connect SDK, and a serial terminal. For detailed instructions, see the nRF Connect for Visual Studio Code documentation site.
For instructions specifically for building, see Building an application. If you want to build and program with custom options, read about the advanced Custom launch and debug configurations and Application-specific flash options.
Note
If you are building the application or sample using SEGGER Embedded Studio IDE or on the command line and want to migrate to Visual Studio Code, follow the instructions in the migrating from other IDEs to VS Code documentation.
For more information about files generated as output of the build process, see Output build files.
Building on the command line
After completing the manual or automatic command-line build setup, use the following steps to build nRF Connect SDK projects on the command line.
Open a terminal window.
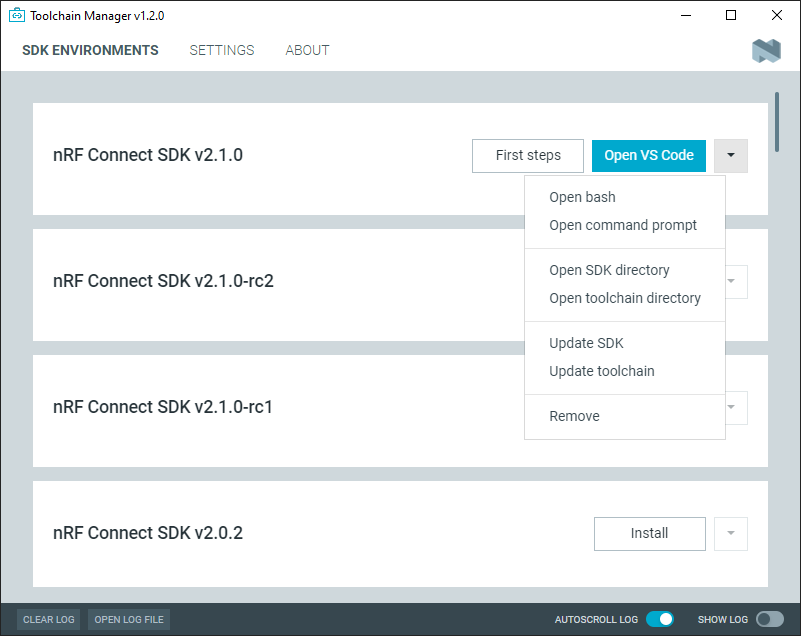
If you have installed the nRF Connect SDK using the Toolchain Manager, click the down arrow next to the version you installed and select Open bash.

The Toolchain Manager dropdown menu options
Go to the specific application directory. For example, to build the nRF9160: AT Client sample, run the following command to navigate to its directory:
cd nrf/samples/nrf9160/at_clientBuild the application using the west command. The build target is specified by the parameter build_target in the west command as follows:
west build -b build_target
Some applications contain configuration overlay files that enable specific features. These can be added to the
west buildcommand as follows:west build -b build_target -- -DOVERLAY_CONFIG="overlay-feature1.conf;overlay-feature2.conf"
Note
You can run the west command with optional parameters:
directory_name - To build from a directory other than the application directory, use directory_name to specify the application directory.
build_target@board_revision - To get extra devicetree overlays with new features available for a board version. The board_revision is printed on the label of your DK, just below the PCA number. For example, if you run the west build command with an additional parameter
@1.0.0for nRF9160 build target, it adds the external flash on the nRF9160 DK that was available since board version 0.14.0.
For more information on other optional build parameters, run the
west build -hhelp text command.See Board names for more information on the supported boards and build targets. To reuse an existing build directory for building another application for another board or build target, pass
-p=autotowest build.If you want to configure your application, run the following west command:
west build -t menuconfigSee Configuring your application for additional information about configuring an application.
After running the
west buildcommand, the build files can be found inbuild/zephyr. For more information about files generated as output of the build process, see Output build files. For more information on the contents of the build directory, see Build Directory Contents in the Zephyr documentation.Important
If you are working with an nRF9160 DK, make sure to select the correct controller before you program the application to your development kit.
Set the SW10 switch (marked debug/prog) in the NRF91 position to program the main controller, or in the NRF52 position to program the board controller. In nRF9160 DK v0.9.0 and earlier, the switch is called SW5. See the Device programming section in the nRF9160 DK User Guide for more information.
Connect the development kit to your PC using a USB cable.
Note
To program the nRF52840 Dongle instead of a development kit, skip the following instructions and follow the programming instructions in nRF52840 Dongle.
Power on the development kit.
Program the application to the kit using the following command:
west flash --eraseThis command clears the full flash memory before programming, which is the recommended approach. If the application depends on other flash memory areas (for example, if it uses the Settings partition where bonding information is stored), erasing the full kit before programming ensures that these areas are updated with the new content.
As an alternative, you can also clear only those flash memory pages that are to be overwritten with the new application. With such approach, the old data in other areas will be retained.
To erase only the areas of flash memory that are required for programming the new application, use the following command:
west flashThe
west flashcommand automatically resets the kit and starts the application.
For more information on building and programming using the command line, see the Zephyr documentation on Building, Flashing and Debugging.
