The CoAP block transfer server example illustrates Nordic's implementation of the CoAP block transfer. The CoAP block transfer allows large payloads to be broken into separate packages that can then be handled by the CoAP protocol.
The two CoAP server examples in this SDK have the same behavior, but use different IPv6 protocol stacks as a UDP transport protocol.
Both examples implement an endpoint that hosts the following resources:
    host
    |-- .well-known
    |   `-- core
    `-- block
CoAP server resources required for this example can be accessed by any CoAP client provided the client knows the server's IPv6 address. To use this example, the CoAP client needs to support sending block1 options in order to transfer larger data blocks. This example makes use of CoAP Block transfer library functions in order to ease the encoding and decoding of the block1 options from the CoAP requests.
Figure 1 illustrates how a CoAP client on a PC accesses available resources from a CoAP server. The figure also shows the PC (UART terminal) attached to the kit (CoAP server) and displaying the logs from UART.

Figure 1: Setup of the CoAP server application block transfer capability.
Configuration parameters for all used modules are defined and described in the sdk_config.h file. This file is located in the config subfodler of the main application folder.
- Note
- This application needs a custom SoftDevice for IPv6.
-
This application is not power optimized!
-
This application will start advertising again after disconnection.
Common module dependency and usage
This section summarizes the usage of nRF5x resources and common modules in the examples with the exceptions of the IoT 6lowpan and IPv6 stack library.
| Module | Inclusion/Usage | Description |
| Timer | 1 | One timer is used for servicing the IoT timer. |
| Buttons | 0 | No buttons are used in this example. |
| LEDs | 2 | LEDs are used to indicate the application states. See LED assignments section for details. |
| Adv Data Encoder | Yes | The device name used is 'COAP_Server', IPSP Service UUID is included in the UUID list. |
| Scheduler | No | Scheduler is used for processing stack events. |
| UART Trace | Included and enabled | Tracing is included and enabled by default. |
Setup
- The example named iot_ipv6_coap_server_block uses Nordic's IPv6 stack. You can find the source code and project files of this example in the following folder:
<InstallFolder>/examples/iot/coap/ipv6/server_block
- The example named iot_lwip_coap_server_block uses the lwIP IPv6 stack. You can find the source code and project files of this example in the following folder:
<InstallFolder>/examples/iot/coap/lwip/server_block
LED assignments:
- LED 1 and LED 2 display the state of the application as described in the table below.
| LED 1 | LED 2 | |
| Blinking | Off | Device advertising as BLE peripheral. |
| On | Blinking | BLE link established, IPv6 interface down. |
| Off | On | BLE link established, IPv6 interface up. |
| On | On | Assertion failure in the application. |
Testing
See Connecting devices to the router for a list of relevant Linux commands.
- Compile and program the application. Observe that the device is advertising.
- Prepare the Linux router device by initializing the 6LoWPAN module.
- Discover the advertising device by using the hcitool lescan command.
- Connect to the discovered device from the Linux console by using the Bluetooth 6LoWPAN connect command.
- Check if the connected state is reflected by the LEDs.
- Run the Wireshark or hcidump program to monitor the btX interface.
- An ICMPv6 ping can be used on the link-local and on the global IPv6 address assigned to the device to check if the device is reachable.
- Note
- To find the global address, use the prefix assigned to the interface in Router Advertisement.
- Use any CoAP client with block transfer requests to interact with the application. A freely available CoAP client implementation is the Mozilla Firefox browser with the Copper (Cu) CoAP user-agent add-on (Figure 3).
- Note
- This example is designed to complement the Nordic CoAP client example, and they will work together provided that the Nordic CoAP client application is modified with the server address.
- Write some large text bulk in the "Outgoing" payload tab.
- Select payload "Text" from the top menu of the plugin.
- Choose the desired block size you want to test out, for example, a 64-bytes block. This can be changed through the "Behaviour" menu from the plugin main menu. Note that the text to transfer needs to be larger than the block size chosen in order to make the block transfer succeed. An example of setting the block size is shown in Figure 2.
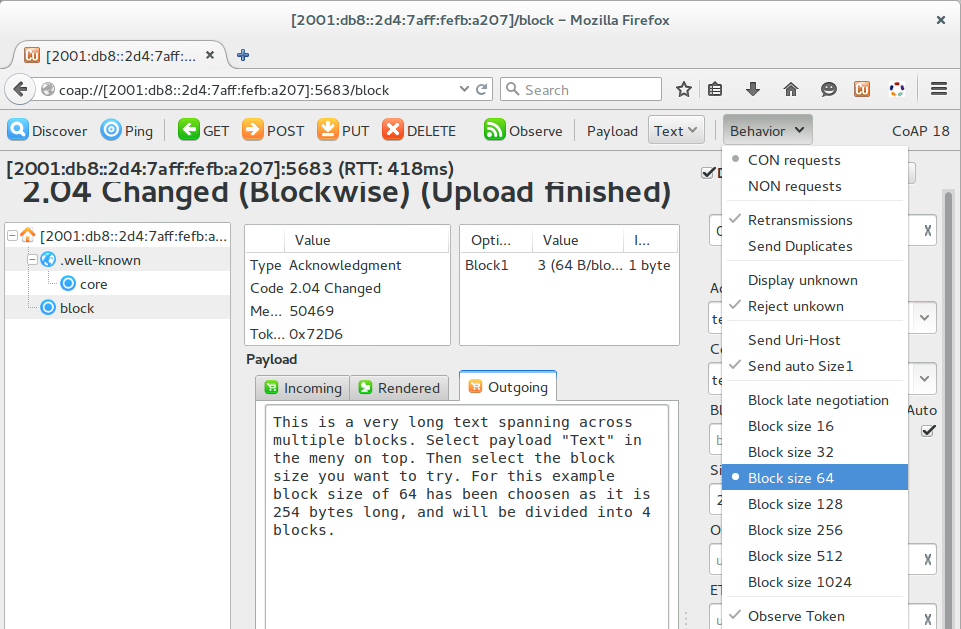
Figure 2: Block size settings in the Copper (Cu) CoAP user-agent add-on.
- Select content type "Plain/text" as Content-Format in order to make the server accept the content format. An example of settings is shown in Figure 3.
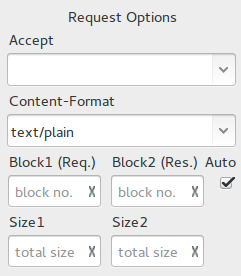
Figure 3: Content-Format settings in the Copper (Cu) CoAP user-agent add-on.
- Connect to the kit with a UART serial terminal, using baud rate 1000000, no flow control, and parity none.
- Press the Put button on the plugin main menu in order to start the block transfer.
- Verify that the blocks are printed out on the UART serial terminal. An example output is shown in Figure 4.
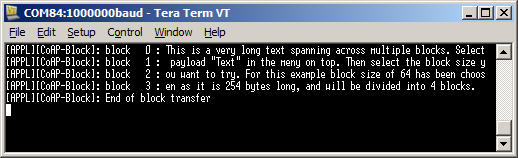
Figure 4: PC UART serial log from the connected development kit.
- Disconnect from the device using Bluetooth 6LoWPAN disconnect command.
- Observe that the device is advertising.
Troubleshooting
- It is possible that the global address is not immediately available on the connection as the Neighbor Discovery, Router Advertisement, and Duplicate Address Detection procedures take a few seconds to complete.
- If you observe that the CoAP server responses are received at the btX interface but the CoAP client device never receives them, it is possible that the forwarding between networks is not enabled. This can be done on Linux using the command
sysctl -w net.ipv6.conf.all.forwarding=1.
 1.8.3.1
