 |
nRF51 IoT SDK
|
|
nRF51 IoT SDK
|
These example applications demonstrate how lwIP stack on nRF51 and the MQTT protocol can be used to talk to a Xively cloud service.
The example consists of two MQTT clients that realize the publish-subscribe pattern:
The MQTT Publisher application can periodically update the state of a data channel (Thermometer), while the MQTT Subscriber can receive notifications about these updates.
To properly identify IoT devices, Xively uses Feed ID and API Key parameters. A Feed is the collection of channels (datastreams) defined for a device with additional metadata, such as location, whether the device is physical/virtual, fixed/mobile, indoor/outdoor, etc. An API Key determines the levels of permissions for access to Xively resources. Feed Id and API Key are generated automatically. However, you can change the API Key on the device's webpage.
These parameters and the channel name are hardcoded in the header section of main.c file of both applications. Parameters of your device can simply be put into quotation marks (without brackets).
The hostname of the Xively MQTT Broker is hardcoded in main.c.
For more information about the data format, protocols and API of Xively cloud, please refer to Xively REST API
The setup of the example applications is presented in Figure 1.

Any recent data that has been published on MQTT publisher and has been received on MQTT subscriber is also transmitted through the serial device and terminal program (such as PUTTY) so that it can be used to monitor the COM port of each development kit through a terminal session.
The sequence of MQTT messages exchanged between the example applications and the MQTT broker is shown in Figure 2.
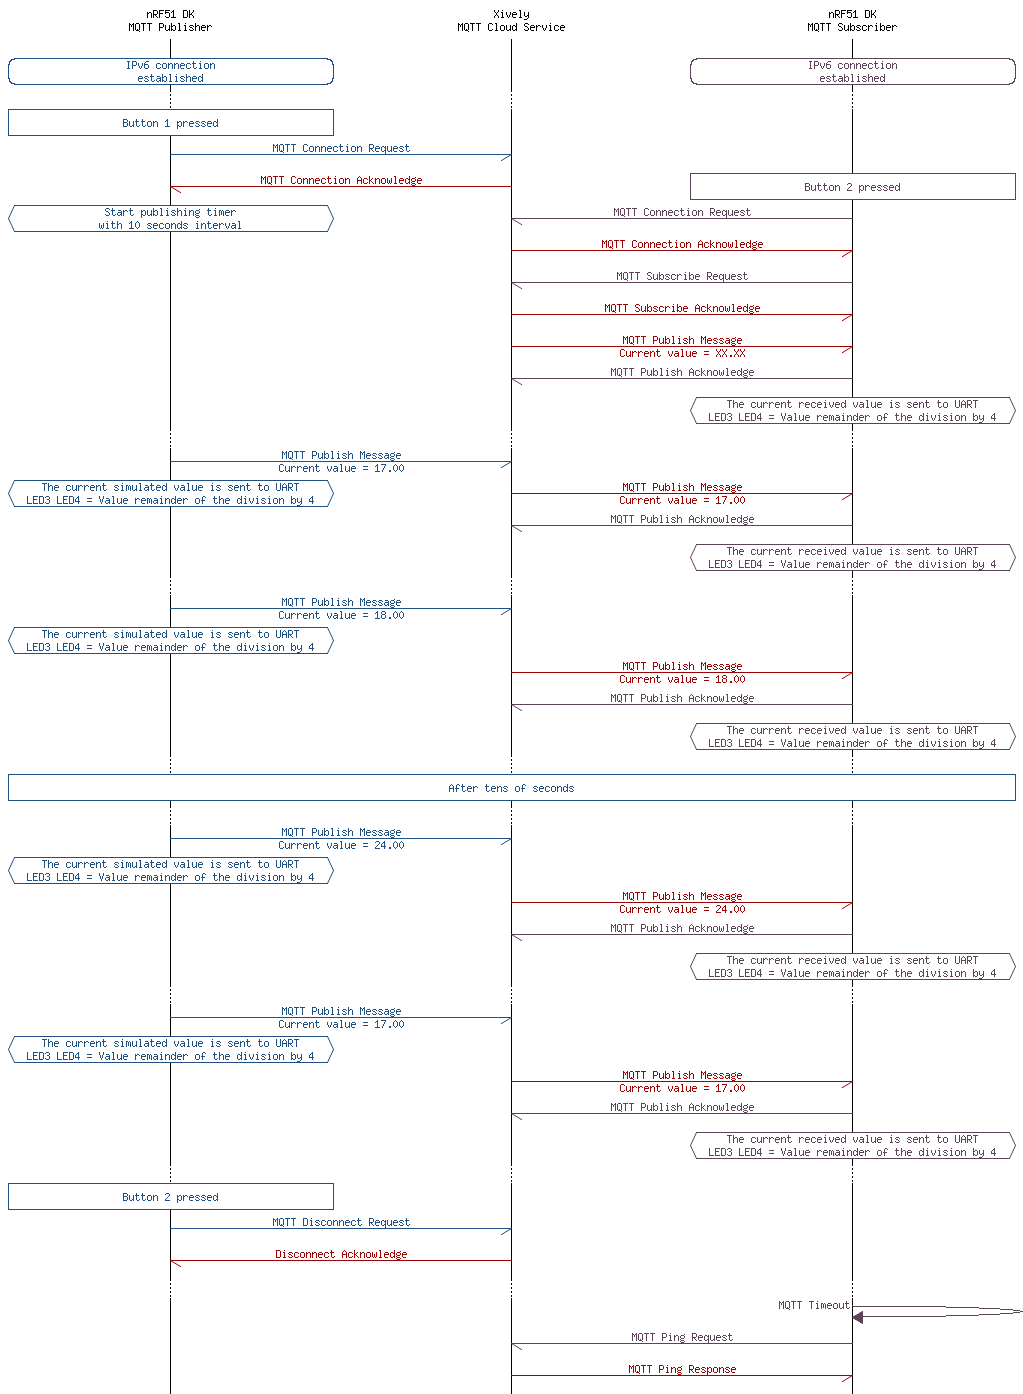
This application serves as a data source, sending periodic updates (at the interval of 10 seconds) with simulated temperature within the range 17.00 - 24.00 °C.
The Xively cloud accepts JSON data representation. For more information, see /v2/feeds/FEED_ID.json. The simulated temperature is sent using the following format:
Pressing Button 1 triggers the MQTT connection establishment process and after its successful completion nRF51 kit starts publishing the timer. It is also possible to close the connection by pressing Button 2.
MQTT Xively publisher indicates the remainder of the temperature value with division by 4 on LED 3 and LED 4. So, for example, if the current value is 17, then LED3 is OFF and LED4 is ON indicating that the remainder is 1.
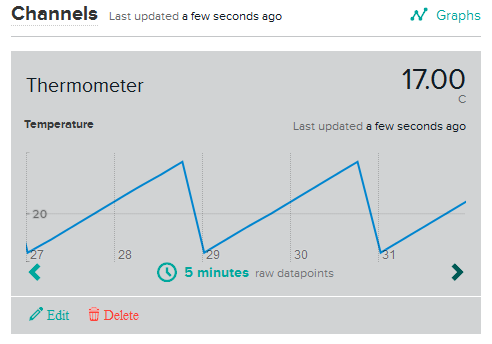
If the MQTT Publish Request is sent successfully, a new datapoint is registered on the MQTT cloud and it appears in the graph on the web interface (Figure 3).
This section summarizes the usage of nRF51 resources and common modules in the examples apart from the IoT 6lowpan and IPv6 stack library.
| Module | Inclusion/Usage | Description |
|---|---|---|
| Timer | 3 | Three timers are used for IoT timer, buttons and for application purpose |
| Buttons | 2 | Buttons are used for initiating MQTT requests. See Button assignments section for details. |
| LEDs | 4 | LEDs are used to indicate the application states. See LED assignments section for details. |
| Adv Data Encoder | Yes | The device name used is 'MQTTXivelyPublisher', IPSP Service UUID is included in the UUID list. |
| Scheduler | Yes | Scheduler is used for processing stack events. |
| UART Trace | Included not enabled | Tracing is included but not enabled by default. |
The name of this example is iot_lwip_mqtt_xively_publisher. The source code and project files of the example can be found in the following folder:
<InstallFolder>/Nordic/nrf51/examples/iot/cloud/mqtt/publisher
| LED 1 | LED 2 | LED 3 | LED 4 | |
|---|---|---|---|---|
| Blinking | Off | Off | Off | Device advertising as BLE peripheral. |
| On | Blinking | Off | Off | BLE link established, IPv6 interface down. |
| On | Off | Off | Off | IPv6 interface up. |
| Off | On | Off | Off | MQTT connection established. |
| Off | On | On/Off | On/Off | Recently sent temperature value (LED 3 LED 4 = temperature modulo 4). For example, value of 17 = LED 3 OFF, LED 4 ON. Value of 19 = LED 3 ON, LED 4 ON |
| On | On | On | On | Assertion failure in the application. |
| Button 1 | Button 2 |
|---|---|
| MQTT Xively Connection request. Start periodic data updates. | MQTT Xively Disconnection request. Stop periodic data updates. |
See Connecting devices to the router for a list of relevant Linux commands.
It is also possible to test Xively MQTT publisher without using another nRF51 kit with Xively MQTT Subscriber code. This part can be simulated with the following program.
This application acts as a MQTT subscriber that subscribes to the following topic: /v2/feeds/FEED_ID.json.
Pressing Button 1 triggers the MQTT connection establishment process and after its successful completion the nRF51 kit will send a subscribe message to the MQTT broker. Immediately after that the MQTT broker will send a MQTT Publish message with the actual value of the Thermometer channel. It is also possible to close the connection by pressing Button 2.
Xively MQTT Subscriber receives data from Xively MQTT Broker in JSON format. The application looks for the "current_value" string and converts the string temperature value to a decimal one. Finally, the remainder of the temperature value with division by 4 is presented on LED 3 and LED 4.
With a proper setup, Xively MQTT Subscriber should indicate the same status of LED 3 and LED 4 as Xively MQTT Publisher with a small delay.
This section summarizes the usage of nRF51 resources and common modules in the examples apart from the IoT 6lowpan and IPv6 stack library.
| Module | Inclusion/Usage | Description |
|---|---|---|
| Timer | 3 | Three timers are used for IoT timer, buttons and for application purpose |
| Buttons | 2 | Buttons are used for initiating MQTT requests. See Button assignments section for details. |
| LEDs | 4 | LEDs are used to indicate the application states. See LED assignments section for details. |
| Adv Data Encoder | Yes | The device name used is 'MQTTXivelySubscriber', IPSP Service UUID is included in the UUID list. |
| Scheduler | Yes | Scheduler is used for processing stack events. |
| UART Trace | Included not enabled | Tracing is included but not enabled by default. |
The name of this example is iot_lwip_mqtt_xively_subscriber. The source code and project files of the example can be found in the following folder:
<InstallFolder>/Nordic/nrf51/examples/iot/cloud/mqtt/subscriber
| LED 1 | LED 2 | LED 3 | LED 4 | |
|---|---|---|---|---|
| Blinking | Off | Off | Off | Device advertising as BLE peripheral. |
| On | Blinking | Off | Off | BLE link established, IPv6 interface down. |
| On | Off | Off | Off | IPv6 interface up. |
| Off | On | Off | Off | MQTT connection established. |
| Off | On | On/Off | On/Off | Actual received temperature value (LED 3 LED 4 = temperature modulo 4). For example, value of 17 = LED 3 OFF, LED 4 ON. Value of 19 = LED 3 ON, LED 4 ON |
| On | On | On | On | Assertion failure in the application. |
| Button 1 | Button 2 |
|---|---|
| MQTT Xively Connection request. Start periodic data updates. | MQTT Xively Disconnection request. Stop periodic data updates. |
See Connecting devices to the router for a list of relevant Linux commands.
Test steps:
It is also possible to test Xively MQTT Subscriber without using another nRF51 kit with Xively MQTT Publisher code. This part can be simulated with the following Python program.
In the demonstration version of Xively cloud, some restrictions have been identified:
 1.8.3.1
